Jailbreaking is a word that Apple users often hear. But, Can you jailbreak iPhone/iPad? Do you know how to jailbreak iPhone/iPad on Windows? This detailed step-by-step tutorial will show you how to jailbreak iPad/iPhone with computer!
- Way 1. Jailbreak iPhone/iPad With Computer Using iRa1n
- Way 2. Jailbreak iPhone/iPad With Computer Using Checkn1x
- Way 3. Jailbreak iPhone/iPad With Computer Using Checkra1n
Way 1. Jailbreak iPad/iPhone on Windows with iRa1n
iRa1n is short of iRemovalRa1n. It is compatible with iOS 12.0 to iOS 14.8.1. Basically, it is the Windows version of checkra1n released inside the iRemoval PRO 5 app.
How to Jailbreak iPad/iPhone on Windows with iRa1n?
Step 1. Launch iSalvor, choose Bypass iCloud Activation Lock Screen and click Start, connect your iOS device to PC, then click Downlod to download iRa1n.
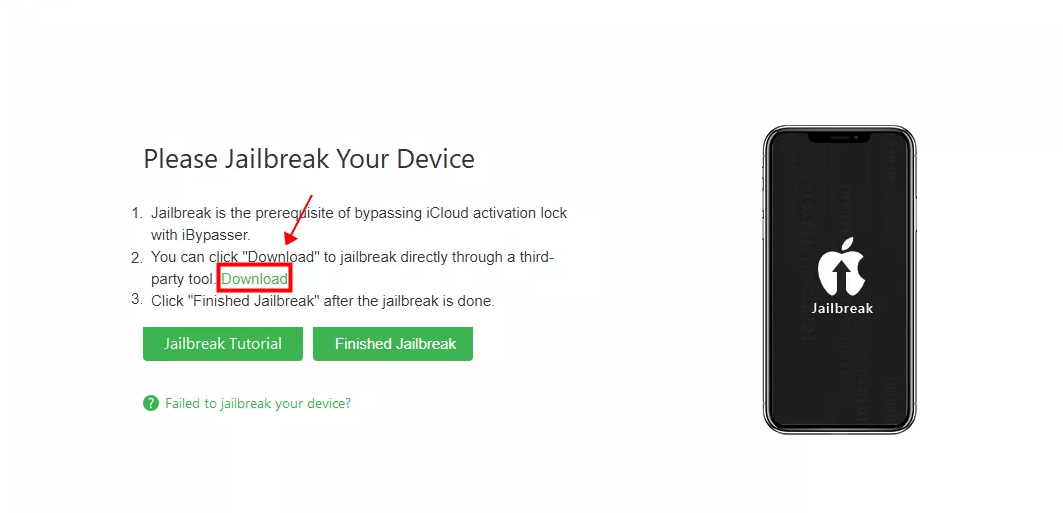
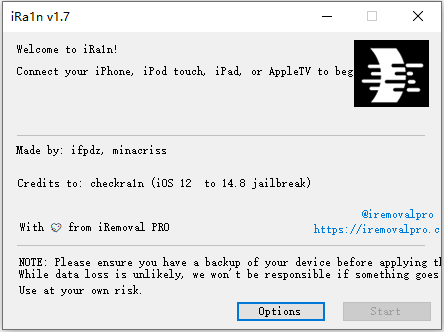
Step 2. Launch iRa1n.exe after extracting iRa1n jailbreaking tool.
Note
You need to extract all the ZIP files before you launch the file. Make sure you don't run them directly from the ZIP files.
Users of Windows10 are advised to run the program as Administrator.
Step 3. Connect your device to your computer. Click Trust on your phone to allow the computer to recognize it. Installing the driver will be prompted the first time you launch the jailbreak tool. To confirm installation, click Yes and run the jailbreak tool again.
Note
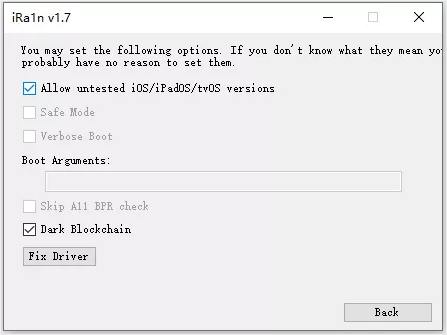
For Apple 6s-7P and iPad series (iOS 14.4 and above): You should select "Options" and choose "Allow untested iOS/iPadOS/tvOS versions", then return to jailbreak.
For Apple 8-X (iOS 14.4 and above): You should choose "Options" and check "Allow untested iOS/iPadOS/tvOS versions" and "Skip A11 BPR check".
For jailbreak Apple 8-X (iOS 14.0~14.3): You should click "Options" and choose "Skip A11 BPR check", then go back to jailbreak.
For iOS 14.3 and earlier: You can jailbreak your device directly.
Step 4. Next, click Start to jailbreak your device. Put your device into DFU mode by following the instructions onscreen.
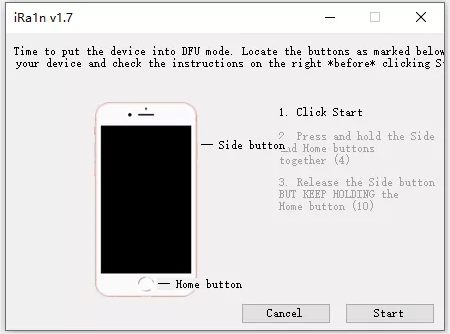
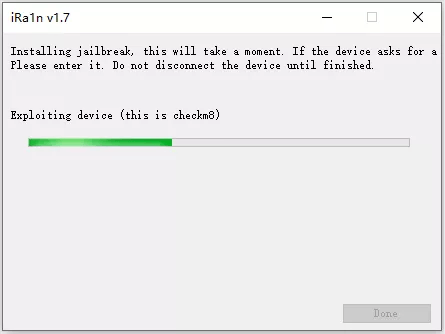
Step 5. iRa1n will start jailbreaking automatically. The process will take some time to complete.
Step 6. Now that your device has been jailbroken, click Start and you can use it as you wish.
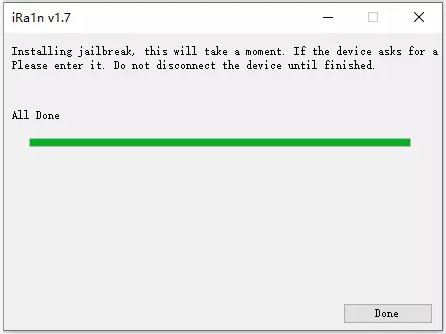
If you are still unable to jailbreak, please try the following steps again.
Way 2. Jailbreak iPad/iPhone on Windows with Checkn1x
Checkn1x is a Linux-based ISO distribution preinstalled with Checkra1n. Therefore, you can use Checkn1x to jailbreak iOS device.
Preparation For Jailbreak
Windows 7 or above with 32 or 64 bit
USB flash drive (at least 2GB capacity)
Download BalenaEtcher and Checkn1x ISO file
How to Jailbreak iPad/iPhone on Windows with Checkn1x?
Step 1. Insert your USB flash drive to the computer. You’d better make a backup for your USB drive data in case of data loss.
Step 2. Download BalenaEtcher and Checkn1x iso file.
Step 3. Open BalenaEtcher, click Flash from file, and select the downloaded image.
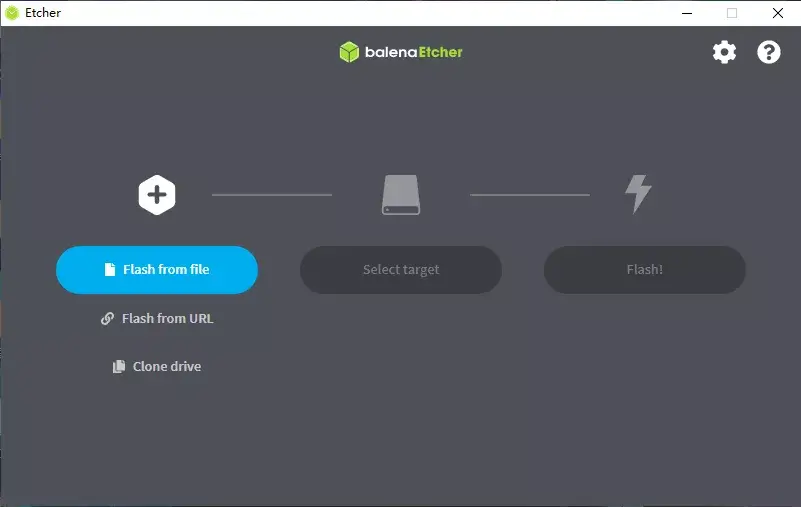
Step 4. Click Flash and wait for it to complete.

Step 5. Close the app, and restart your computer.
Step 6. Press F12 before the brand logo appears, then choose your flash disk.
Step 7. Press Alt + F2 to run the Checkra1n jailbreak tool.
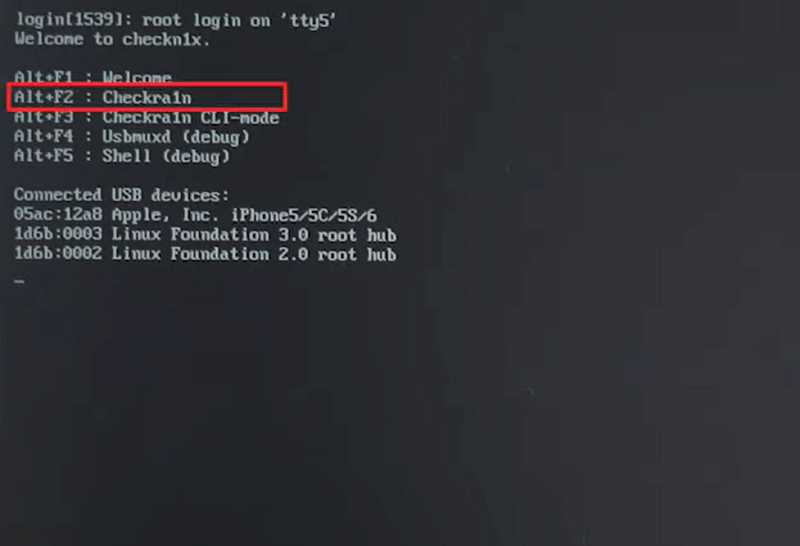
Step 8. After we enter the Checkra1n interface, choose Options.
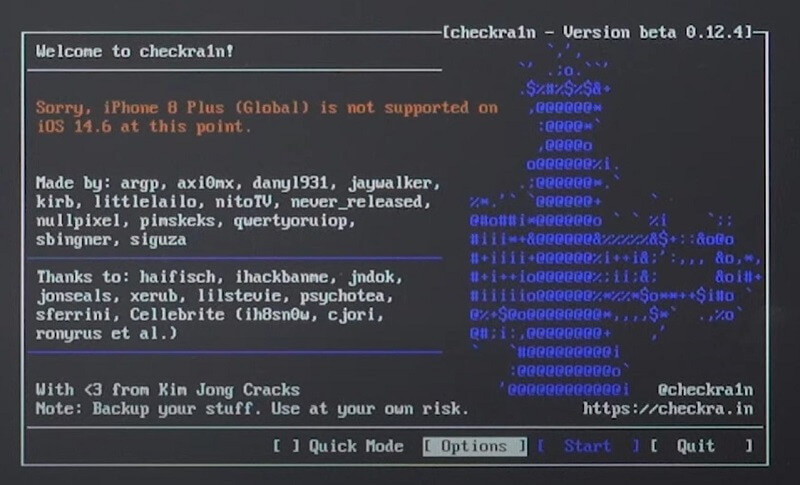
Step 9. If your iPhone is iPhone 8, iPhone 8 plus or iPhone X, select Allow untested iOS/iPadOS/tvOS versions and Skip All BPR check. If your iPhone is iPhone 6s, 6s plus, 7 or 7plus, just select Allow untested iOS/iPadOS/tvOS versions.
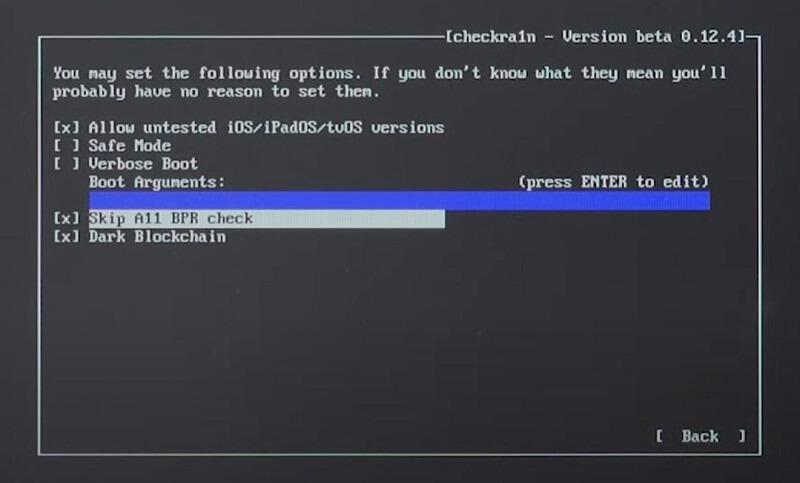
Step 10. Click Back and Start jailbreak.
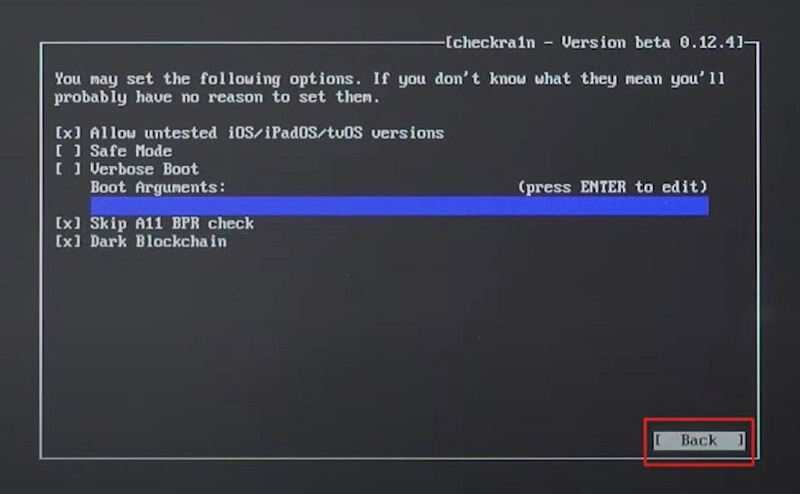
Step 11. Device will be entering recovery mode.
Step 12. Follow the instructions to put your device into DFU mode. If everything worked out, you’ll see All Done message. Press Ctrl + Alt + Delete to restart your computer.
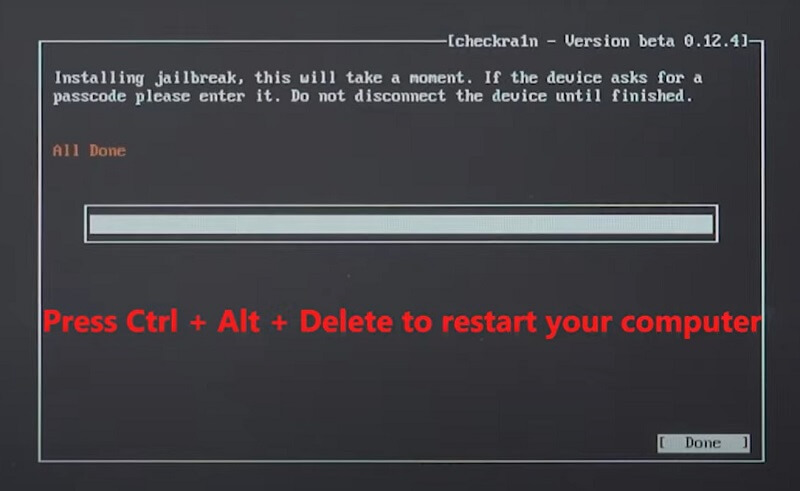
Way 3. Jailbreak iPad/iPhone on Windows with Checkra1n
Preparation For Jailbreak
Windows 10/8.1/8/7 with 32 or 64 bit
USB flash drive (at least 2GB capacity)
Download ubuntu.iso file, rufus.exe and checkra1n-x86_64 file
Note
Device models supported to jailbreak on iOS 14.x:
- full support for A10/A10X devices - iPhone 6s\6s plus\7\7plus, iPad (2018, 6th generation)\iPad (2019, 7th generation), iPod touch (2019, 7th generation)
- limited support for A11 devices on iOS 14.x (Options > Skip A11 BPR check) - iPhone 8\8 plus\X. After jailbreaking A11 devices, do not set Passcode, Touch ID, Face ID, or password for your lock screen
It is recommended to use Mac computer to jailbreak your device if you are able to access a Mac computer running on macOS 10.13-10.15.
If your iDevice is iPhone 5S, use a Mac computer to jailbreak your iPhone instead of using a Windows computer. Because jailbreaking iPhone 5S will not be successful.
How to Jailbreak iPad/iPhone on Windows with Checkra1n?
1. Make the USB Drive for Ubuntu
Step 1. Plug in the USB flash drive to your computer. You’d better make a backup for your USB drive data in case of data loss.
Step 2. Download and launch Rufus. (Note: It’s not necessary to install Rufus. You can directly use the software whenever you download Rufus.)
Step 3. Tap SELECT on the interface of Rufus, and choose Ubuntu image that you just downloaded. After that, there is ubuntu-20.04.1-desktop-amd64.iso showing in the field of Boot selection. Next, keep other default unchanged and tap START to continue.
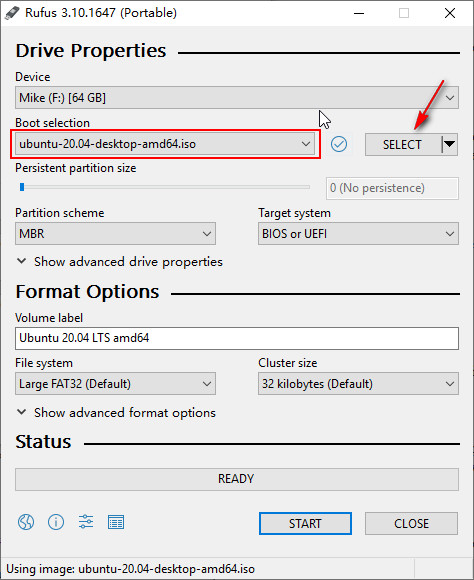
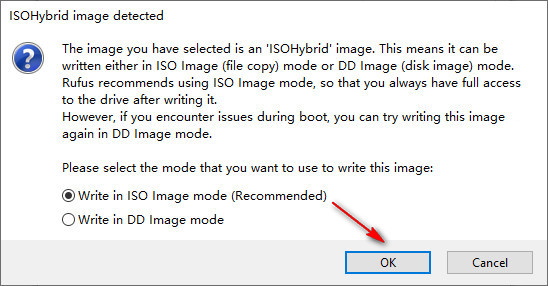
Step 4. A warning will pop up, showing all data on your USB flash will be destroyed. If you have backed up, tap OK. Then choose the recommended mode and click OK when the ISOHybrid image is detected.
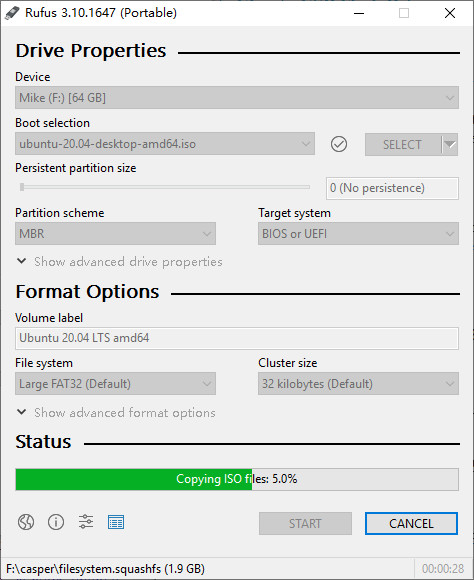
Step 5. It will take 2-3 minutes for Rufus to create Ubuntu USB drive. Just make sure that your USB flash drive connected to your computer.
Step 6. Tap Close when the status shows READY.
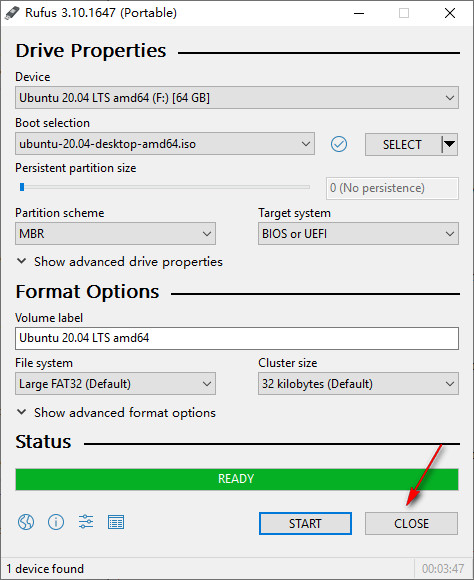
Note: In order to prevent your USB flash from being unrecognized, it is recommended to plug in the USB flash again.
2. Boot Ubuntu on Your Windows Computer
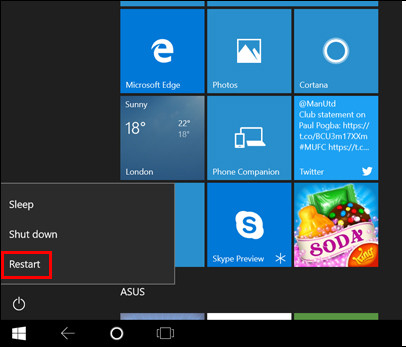
Step 1. Restart your computer by navigating to Windows > Restart.
Step 2. Press F12 to enter BIOS control system before your computer enters into operating system (Usually it is when your computer logo appears ).
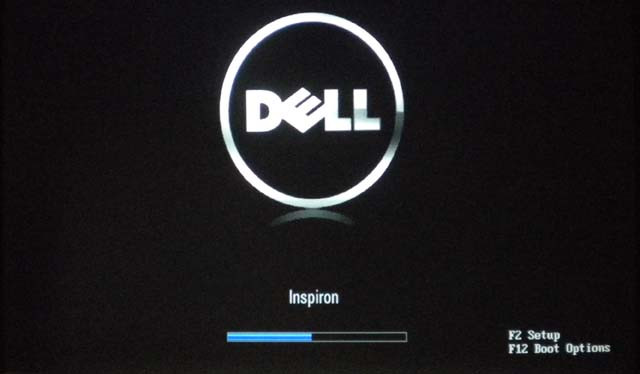
Note: You have to search for the right key for your computer brand if F12 doesn’t work. Because different brands of computers use different shortcut keys to enter BIOS control system.
Step 3. Next, select the Ubuntu USB flash drive that you created just now on the BIOS interface. Choose the right option via arrow keys on the keyboard. Then press Enter to proceed.
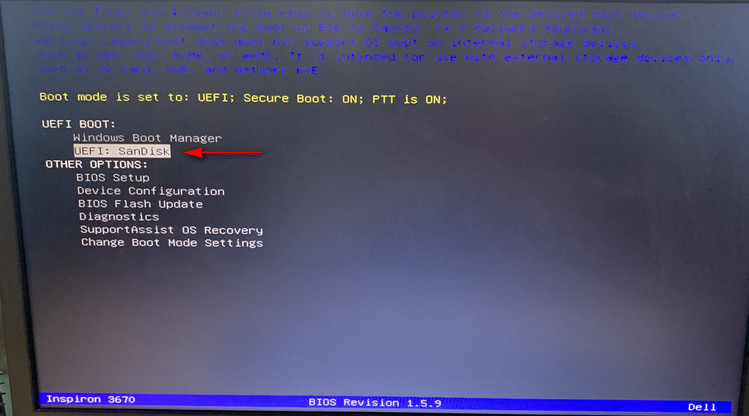
Step 4. The Ubuntu system will start to load. That means all filessystem checks are in progress.
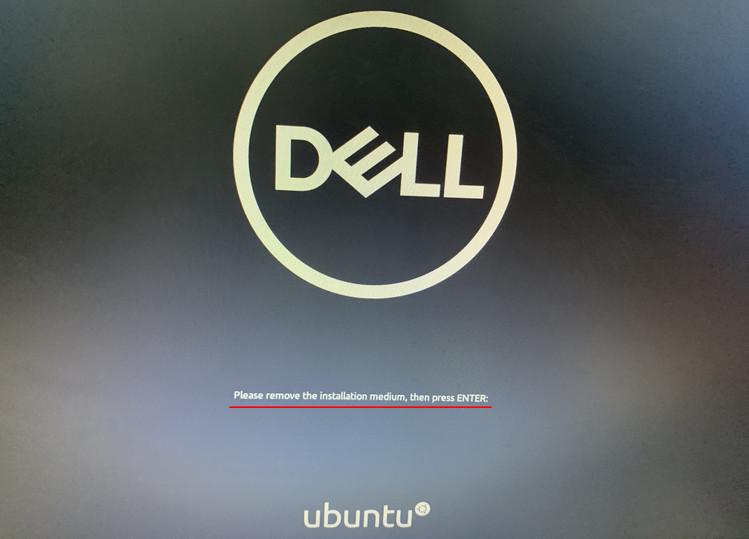
Step 5. Choose the first one - *Ubuntu to boot the Ubuntu OS.

Step 6. Click Try Ubuntu to launch Ubuntu from the USB flash drive after the booting process completes.
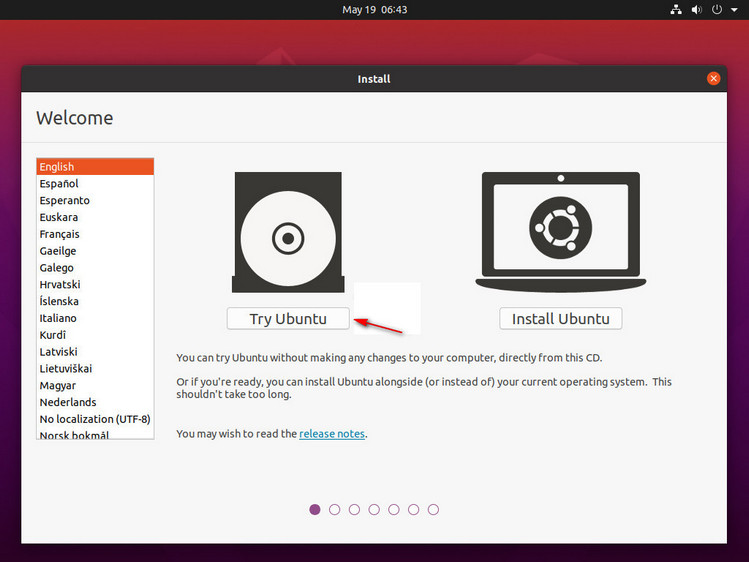
Step 7. You will enter the Ubuntu system. Please keep your iOS device connected to your computer.
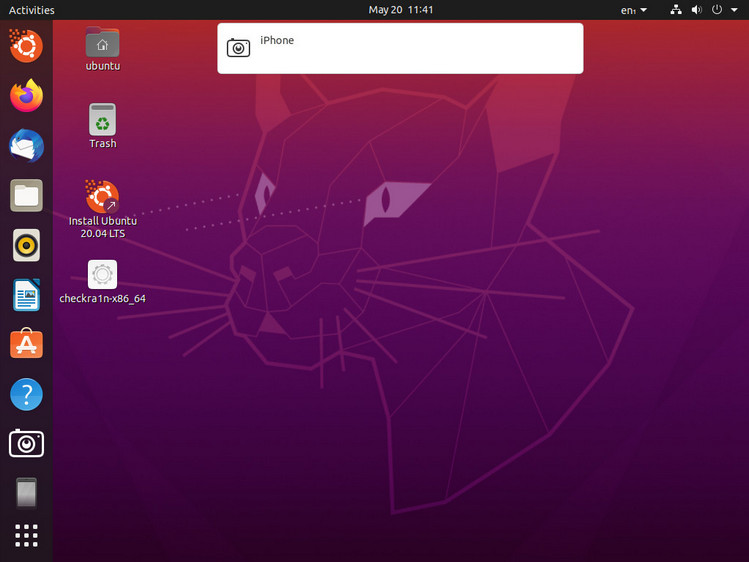
3. Jailbreak Your iPhone/iPad/iPod Touch
Step 1. Search the file of checkra1n-x86_64 that you have downloaded. You can also click here to download the jailbreak tool if you haven’t downloaded it. And launch checkra1n after downloading.
Step 2. In order to launch checkra1n on Windows, you have to use Terminal. You can copy the codes below or type the codes mannually in Terminal.
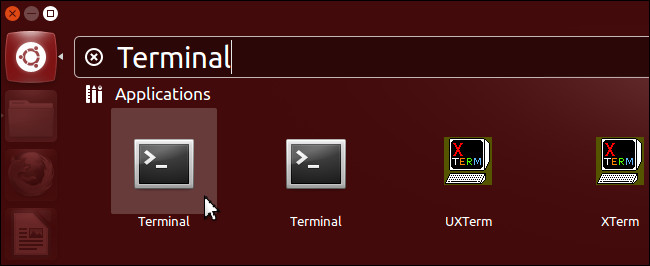
- Enter chmod +x (there is a space before the plus sign and after the x). Next, drag the checkra1n-x86_64 file to the Terminal interface, then press Enter key.
- Enter sudo (there is a space after sudo) and drag the checkra1n-x86_64 file to the Terminal interface, then press Enter again.
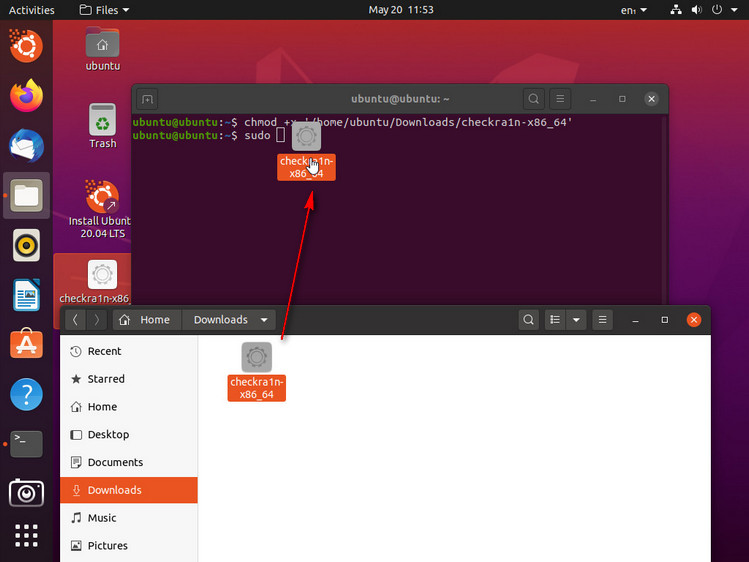
Tips: You can copy and paste the Checkra1n jailbreak tool to your desktop if you can’t drag the file to the Terminal. Then select Show in Files in the right-click menu. Next, try to drag the file again.
Step 3. After that, Checkra1n will start to run as the following screen shows.
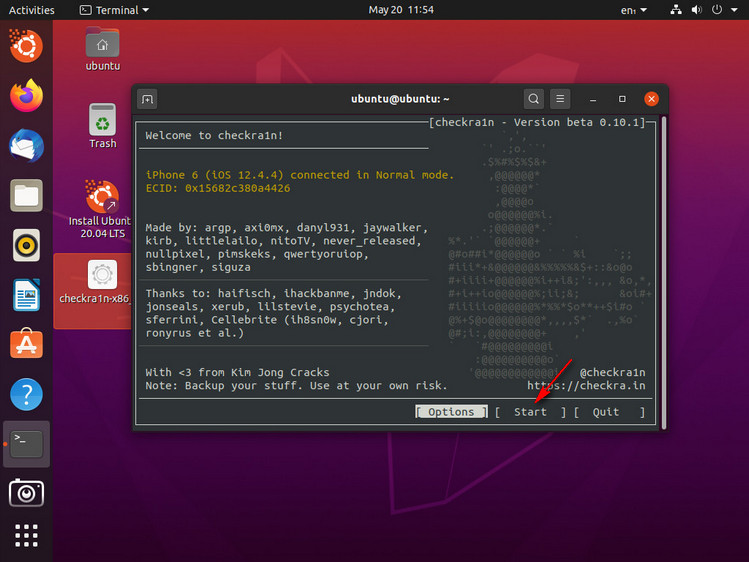
Note
If the Start button on Checkra1n is grey, please click Options and select Allow untested iOS/iPadOS/tvOS versions and click Back then the Start button will be usable.
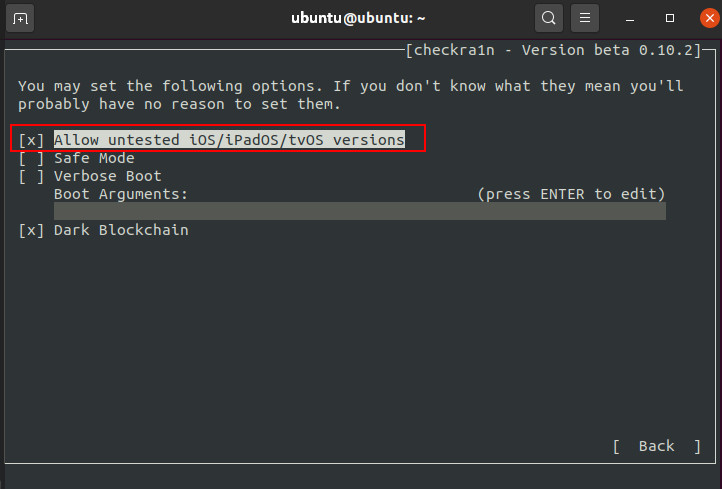
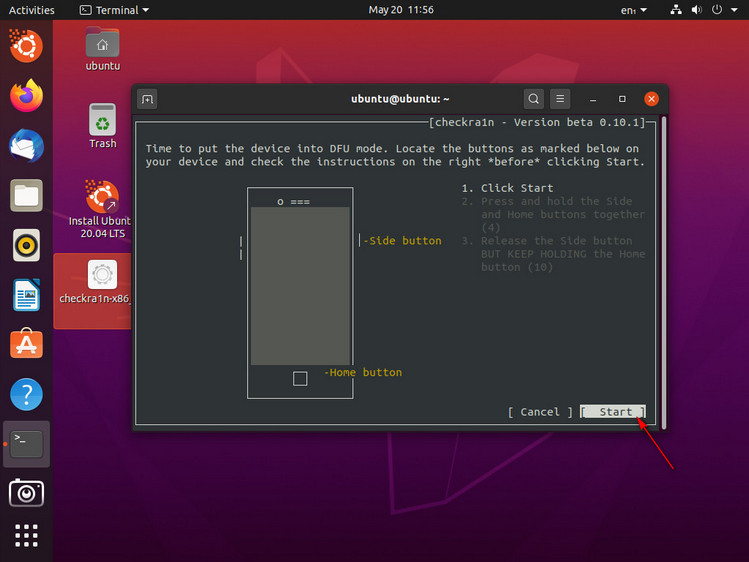
Step 4. With the help of Checkra1n, your device will enter recovery mode to apply the jailbreak. Tap Next when you are ready.
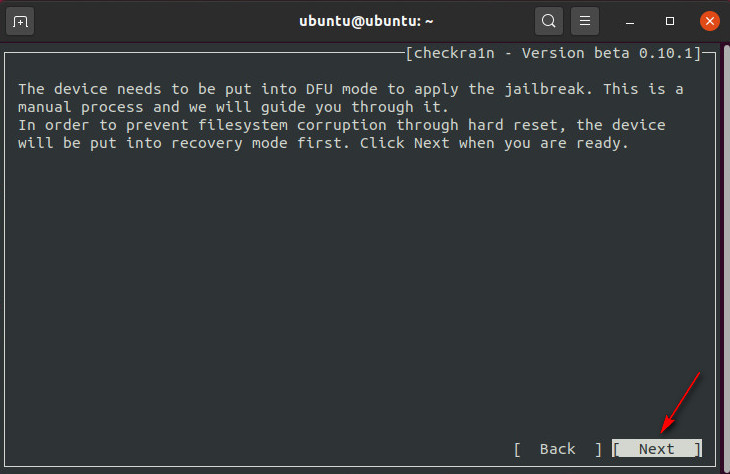
Click Start when your iOS device enters recovry mode. Follow the instructions onscreen to put your device into DFU mode.
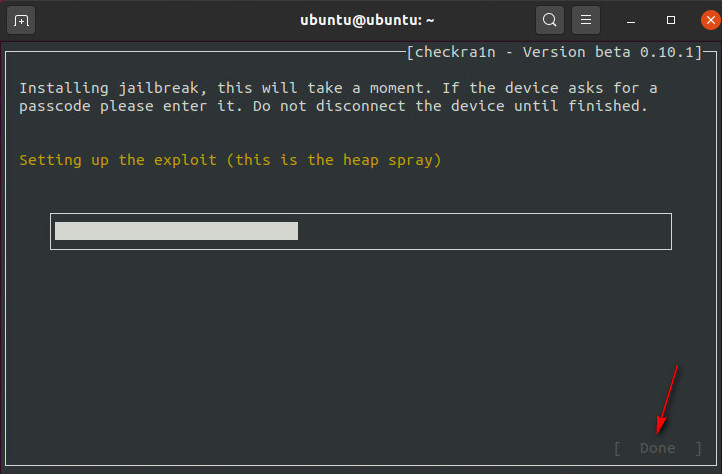
Step 5. Next, Checkra1n will start to jailbreak your device. It will take a moment. And don’t disconnect your iOS device until it finishes. After finishing jailbreak, Click Done.
Note
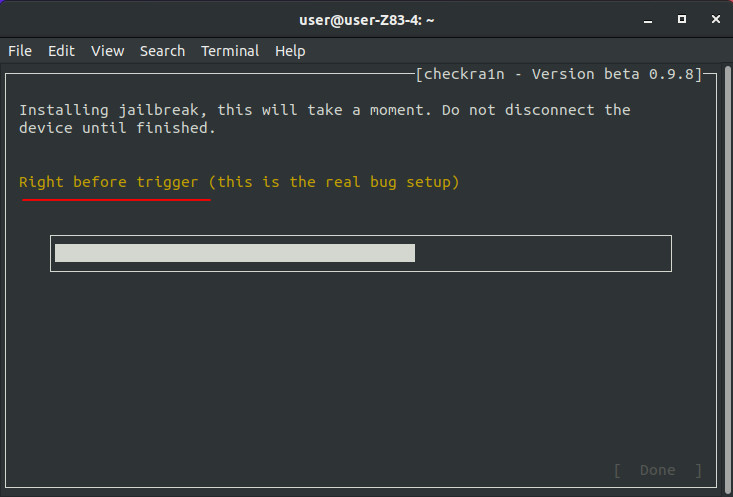
If you are stuck on the screen of Right before trigger in Chcekra1n, use the methods below to fix this issue.
Change another USB flash drive to repeat the tutorial guide.
Flash your iOS device and restart the computer.
Note
If the jailbreak process is not successful, try plugging your iPhone/iPad/iPod touch or tablet into the USB port on the back of your computer. Then attempt the jailbreak process again. The USB port on the back is typically a USB2.0 port which is often more compatible with devices than the USB3.0 ports on the front.
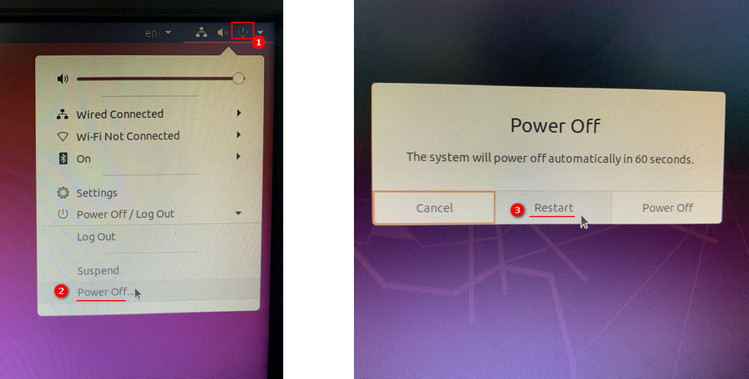
Step 6. Quit from Ubuntu when you complete jailbreaking. Then restart your computer according to the path: Power > Power Off > Restart.
Step 7. Unplug your USB flash drive manually and press Enter.

Step 8. Your computer will enter Windows operating system normally when you restart the computer. Now you can launch iSalvor to bypass iCloud activation lock with 1 click!
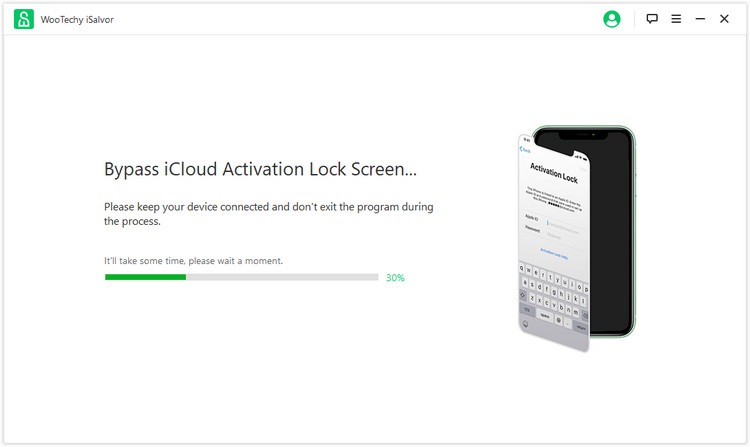
WooTechy iSalvor - Best Tool to Jailbreak iPhone/iPad
76,000,000+
Downloads
- No Activation Lock: Bypass iCloud activation lock without Apple ID and password
- No Screen Lock: Remove screen lock on iPhone/iPad/iPod Touch
- No SIM Lock: Remove iPhone SIM lock from various carriers
- No Camera Sound: Disable camera shutter sound without muting iPhone
- Anti-Tracking: Devices won't be tracked or erased by previous owner and can be signed in with different Apple ID after jailbreak
- Easy-To-Use: Simple steps, no specialized technical knowledge required
- Multi-Language Support: Support for English, Spanish, French, German, Chinese, Japanese, etc
- After-Sales Guarantee: 30-day money back policy with instant refund if unsuccessful
Try For Free
Secure Download
Try For Free
Secure Download


