USB debugging is an essential feature for Android users who want to connect their devices to a PC for various purposes, such as data transfer, rooting, or development. Enabling USB debugging allows your Android device to communicate with a PC using Android Debug Bridge (ADB), which provides access to the system-level functionalities of the device.
However, many people do not know how to enable USB debugging at all. Don’t worry. This article will guide you through the steps to enable USB debugging on Android from a PC, as well as address common issues that might arise during the process.
Part 1. What is USB Debugging?
USB Debugging is a feature on Android devices that allows communication between an Android device and a PC over a USB connection. This mode is primarily used for development purposes, enabling developers and advanced users to access and interact with the internal system of the Android device via the Android Debug Bridge (ADB).
For a normal user, USB Debugging can offer several practical benefits, although its primary purpose is for developers. Here are some ways USB Debugging can be useful to the average user:
Transfer Files and Media: USB Debugging can improve the process of transferring files between your Android device and PC, especially when using tools that require deeper access to the file system.
Backup and Restore Data: Some third-party PC software, like Android backup tools, require USB Debugging to be enabled to back up or restore data on your Android device.
Install or Uninstall Apps: Certain apps or tools allow you to manage the apps on your Android device from your PC. You can install apps directly from your computer, uninstall multiple apps at once, or even access system apps that are usually hidden.
Recover from Soft Bricks: If your device is stuck in a boot loop or not functioning properly, enabling USB Debugging (if it was previously activated) allows you to use ADB commands to attempt to fix the issue.
Data Recovery: If your device's screen is damaged or unresponsive, and USB Debugging was previously enabled, you can use ADB to access and recover data from a broken Android device before performing a factory reset.
Part 2. How to Enable USB Debugging on Android From PC?
1Enable USB Debugging on Android Using ADB
To enable USB Debugging on an Android device using ADB commands, especially when the device has a damaged or unresponsive screen and the bootloader is unlocked, follow these detailed steps. This method assumes you have some familiarity with ADB and command line tools:
Prerequisites
Unlocked Bootloader: Ensure that your device has an unlocked bootloader before proceeding.
ADB Toolkit: Download and extract the ADB toolkit on your computer.
Device Connectivity: Connect your device to your computer via USB.
Step 1: Enter Recovery Mode
Different devices have different methods to enter recovery mode. For Samsung devices, typically, you hold the Volume Up + Home + Power buttons simultaneously when the device is off until the recovery menu appears.
Step 2: Set Up ADB
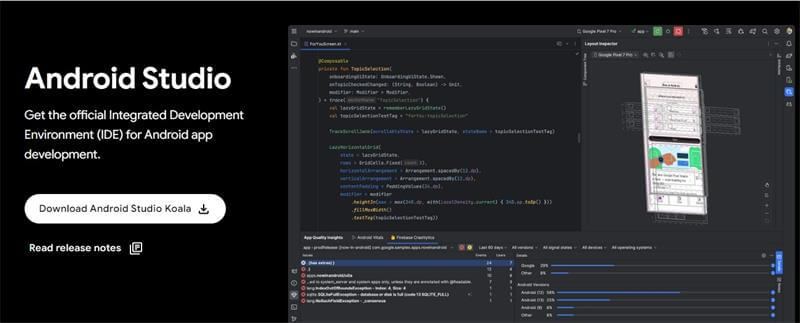
Download the latest Android SDK Platform Tools from the official Android developer site.
Extract the downloaded zip file to a convenient location on your PC, such as your desktop.
Step 3: Access Platform-Tools Directory
Navigate to the extracted folder, find the “platform-tools” folder.
Open a command prompt or PowerShell window here by typing cmd in the address bar and pressing Enter, or by right-clicking while holding the Shift key and selecting "Open PowerShell window here."
Step 4: Connect and Check Device
Connect your Android device to your PC via a USB cable.
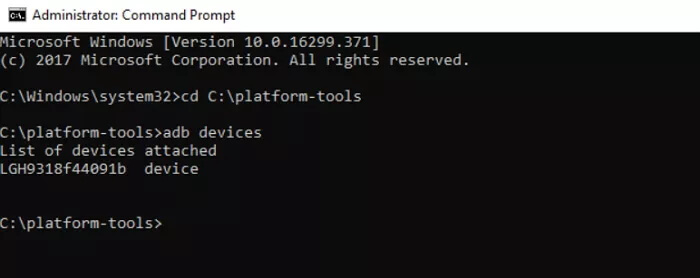
Type adb devices in the command prompt or PowerShell window and press Enter. You should see a device listed. If not, ensure the device is properly connected and in recovery mode.
Step 5: Mount System Directories
Execute the following commands to mount the system and data directories:
- adb shell
- mount data
- mount system
Step 6: Transfer the USB Configuration File
Pull the persist.sys.usb.config file from your device to modify it:
- adb pull /data/property/persist.sys.usb.config C:\Users\YourUsername\Desktop\
Replace YourUsername with your actual PC username.
Step 7: Edit the USB Configuration File
Right-click on the pulled file on your desktop, open it with a text editor like Notepad.
Add mtp,adb to the file to enable USB debugging and MTP.
Save the file.
Step 8: Push the Modified File Back
Use the following command to push the file back to your device:
- adb push "C:\Users\YourUsername\Desktop/persist.sys.usb.config" /data/property
Step 9: Modify the Build Properties
Pull the build.prop file from your device:
- adb pull /system/build.prop C:\Users\YourUsername\Desktop\
Open it with a text editor and add the following lines:
- persist.service.adb.enable=1
- persist.service.debuggable=1
- persist.sys.usb.config=mtp,adb
Save the file.
Step 10: Push the Modified Build Properties
Push the modified build.prop back to the device:
- adb push "C:\Users\YourUsername\Desktop/build.prop" /system/
Step 11: Reboot the Device
Reboot your device by executing:
- adb reboot
2Enable USB Debugging on Android Using MTP USB Drivers
Using MTP (Media Transfer Protocol) USB drivers is another method that may help you access your device’s data or enable USB debugging. MTP drivers facilitate communication between your Android device and your computer, allowing file transfers even when the screen is damaged. Here’s how you can attempt to enable USB Debugging using MTP USB drivers:
Visit your Android device manufacturer’s website and download the specific MTP USB drivers for your device model. This step ensures that your computer can properly recognize your Android device when connected.
After downloading, install the MTP USB drivers on your computer by following the installation instructions provided by the manufacturer.
Use a USB cable to connect your Android device to the computer. Ensure the cable is functional and supports data transfer, as a charge-only cable won’t work for this purpose.
On your Windows computer, right-click on the Start button and select "Device Manager" from the context menu. This will open the Device Manager window, where you can manage hardware devices connected to your computer.
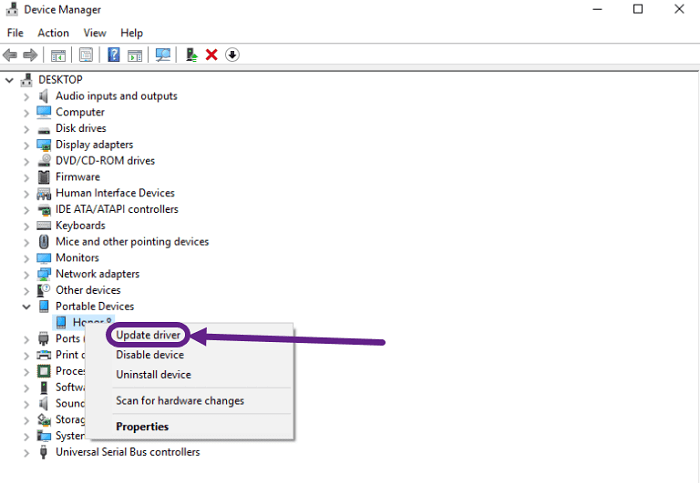
In the Device Manager, look for your Android device under the "Portable Devices" section. If your device is listed here, it indicates that the computer has detected it, but the proper drivers might not be installed yet.
Right-click on your device name and select "Update driver" from the context menu.
Choose "Browse my computer for drivers" to manually locate and install the drivers.
Navigate to the folder where you saved the downloaded MTP USB drivers, select it, and update the driver to "MTP USB Device."
Bonus: How to Recover Data From Android Phone with Broken Screen?
If you have an unresponsive Android phone that is broken and have enabled the USB debugging as the steps mentioned above, you're one step closer to recovering your data. One of the most effective tools for this task is WooTechy iSeeker for Android, a powerful data recovery solution designed to help you retrieve lost files from Android phones. Whether you need to recover photos, messages, contacts, or other important data, iSeeker for Android simplifies the process, even if your device is damaged or locked.
Why Use WooTechy iSeeker for Android?

75.000.000+
Downloads
- User-Friendly Interface: iSeeker for Android offers an intuitive interface that makes data recovery straightforward, even for users with limited technical knowledge. Just connect your device, select the files you want to recover, and let the software do the rest.
- Supports Various File Types: The tool supports the recovery of multiple file types, including photos, videos, contacts, messages, call history, and more.
- Recovery from Broken or Locked Devices: Even if your Android device has a broken screen or is locked, iSeeker for Android can help you recover data as long as USB debugging is enabled.
-
Free Download
Secure Download
Free Download
Secure Download
Here’s a step-by-step guide to recovering your data using iSeeker for Android:
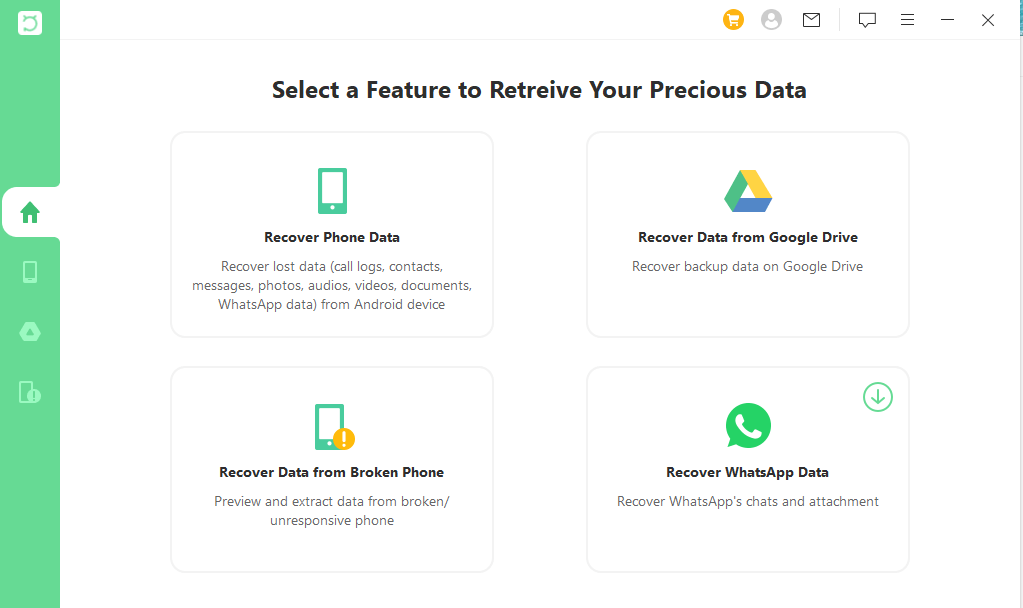
Step 1: Install and launch iSeeker Android on your computer. Connect your phone to the computer and select "Recover Data from Broken Phone" from the main screen.
Note
This mode currently supports only Samsung devices. If you have a phone from a different brand, please select the first mode, "Recover Phone Data."
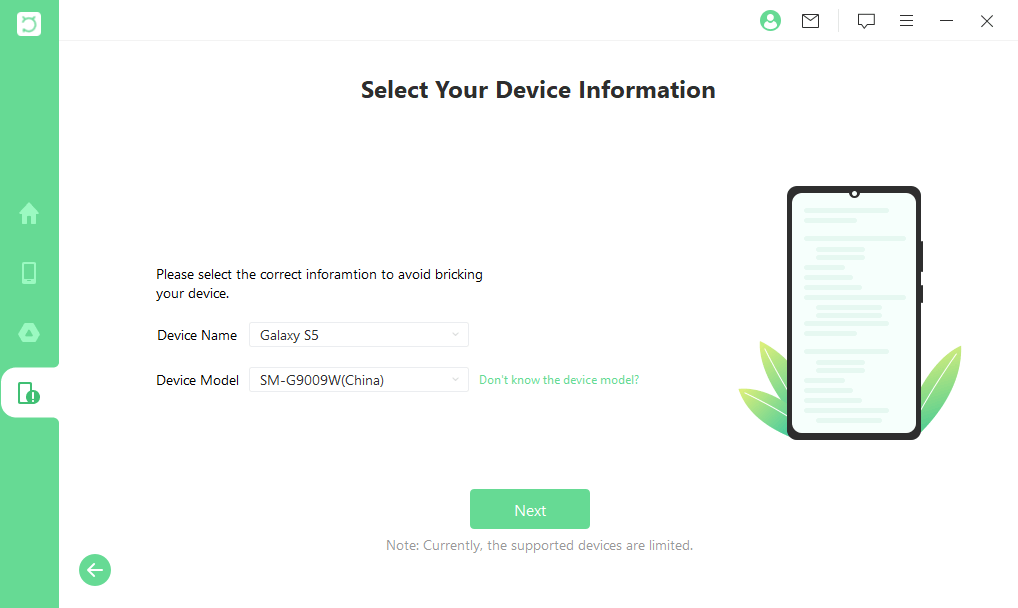
Step 2: Choose your device's name and model, then click "Next" and follow the on-screen instructions.
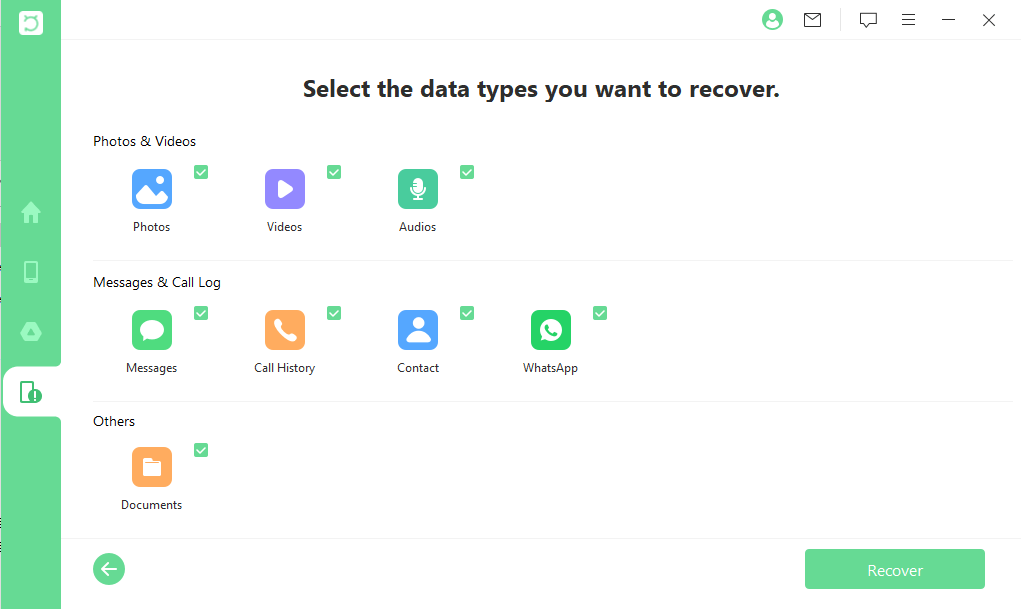
Step 3: Select the types of files that you want to reocver from the list of data types. iSeeker will begin analyzing your device for the data.
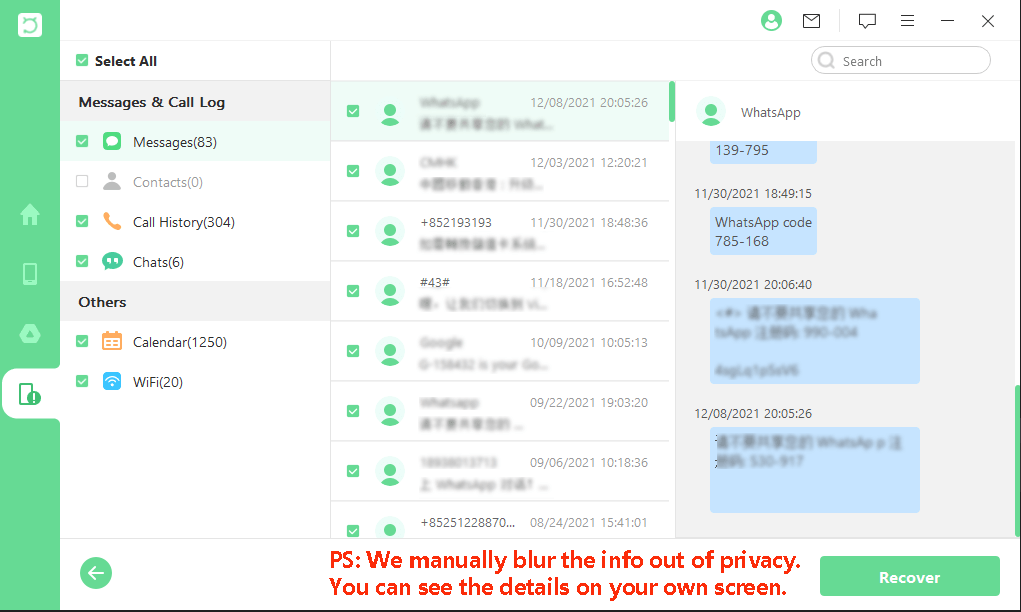
Step 4: Once the data is displayed on the screen, preview it, select the files you want to restore, and click "Recover."
Part 4. Common Issues & Fixes When Enabling USB Debugging
Enabling USB Debugging on an Android device is usually a straightforward process, but sometimes users encounter issues, particularly when enabling USB debugging from a PC. Below are some common problems and their solutions. Check them out!
1Device Not Recognized
When you connect your Android device to a computer, it may not be recognized even after enabling USB Debugging. The computer might not detect the device at all, or it might show a "Device Not Recognized" error.
How to Fix this Issue?
Check USB Cable and Port: Ensure that you are using a USB cable that supports data transfer, not just charging. Try connecting your device to different USB ports on your computer.
Enable File Transfer Mode: After connecting your device to the computer, swipe down on the notification bar, tap on the USB options notification, and select File Transfer (MTP) mode. This allows the computer to recognize the device and access its data.
Update or Reinstall Drivers: Sometimes, the drivers installed on your computer might be outdated or corrupted. You can update or reinstall the drivers:
On Windows, open Device Manager and find your Android device under Portable Devices or Other Devices.
Right-click on the device and select Update driver. Choose to search automatically for updated driver software.
If the device is still not recognized, try uninstalling the driver by right-clicking on it and selecting Uninstall device. Then, disconnect and reconnect your device to allow Windows to reinstall the drivers automatically.
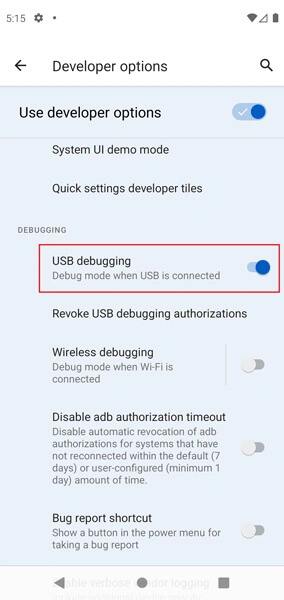
Enable USB Debugging Again: Sometimes toggling USB Debugging off and then back on can reset the connection. Go to Settings > Developer Options and turn off USB Debugging, wait a few seconds, and turn it back on.
2Authorization Issues
Even when USB Debugging is enabled, your device may not authorize the connection with your computer, preventing ADB commands from executing. Typically, this happens if the "Allow USB Debugging?" prompt doesn’t appear on your device.
How to Fix this Issue?
Check for the Authorization Prompt: When you connect your Android device to your computer, you should see a prompt asking to authorize the computer for USB Debugging. Ensure that your device’s screen is unlocked, as the prompt might not appear if the screen is locked. Tap OK to authorize.
Reset USB Debugging Authorization: If the authorization prompt does not appear, you can reset USB Debugging authorizations:
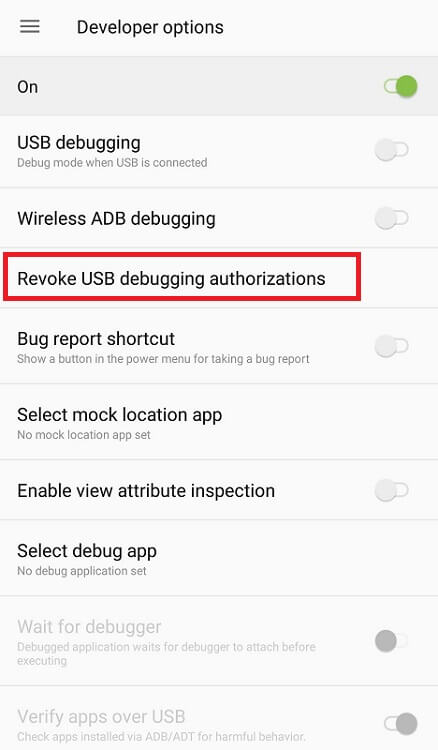
Go to Settings > Developer Options and find Revoke USB Debugging Authorizations. Tap this option to reset all previous authorizations.
After revoking, disconnect and reconnect your device to the computer. The authorization prompt should reappear.
Restart Both Devices: Restarting your Android device and your computer can resolve temporary issues that might prevent authorization. After rebooting, reconnect the device and check if the prompt appears.
Use ADB Kill-Server Command: Sometimes the ADB daemon on your computer may need to be restarted:
Open a command prompt or terminal window on your computer.
Type adb kill-server and press Enter.
Then type adb start-server and press Enter.
Reconnect your device and check if the authorization prompt appears.
Conclusion
Enabling USB debugging on an Android phone from PC using ADB commands involves intricate steps and requires specific conditions. By meticulously following the outlined steps, users can potentially enable USB debugging and regain access to critical data.
Once USB debugging is successfully enabled, tools such as WooTechy iSeeker for Android provide a powerful solution for data recovery. This software simplifies the process of retrieving lost or inaccessible files, ensuring that essential data is not permanently lost despite device malfunctions.
Free Download
Secure Download
Free Download
Secure Download


