Restoring an iPhone can be a lifesaver in many situations, whether it’s due to software glitches, forgotten passwords, or data loss. While iTunes has long been the traditional tool for restoring iPhones, many users find iTunes cumbersome and frequently encounter various restore errors. Fortunately, there are effective alternatives to iTunes.
If you are also wondering how to restore iPhone without iTunes, this article will guide you through various methods for a smooth and hassle-free process.
Table of Contents
Part 1. How to Restore iPhone Using iCloud Without iTunes?
Restoring your iPhone through iCloud is one of the most straightforward ways to recover iPhone data without iTunes. It’s especially convenient if you’ve already backed up your iPhone to iCloud, allowing you to restore apps, settings, and personal data effortlessly. Here’s how to do it step-by-step:
Before getting started, it’s crucial to verify that you have a recent iCloud backup. To check this, go to Settings > [your name] > iCloud > Manage Storage > Backups. Here, you can see the date and size of the latest backup.
Navigate to Settings > General > Transfer or Reset iPhone > Erase All Content and Settings.
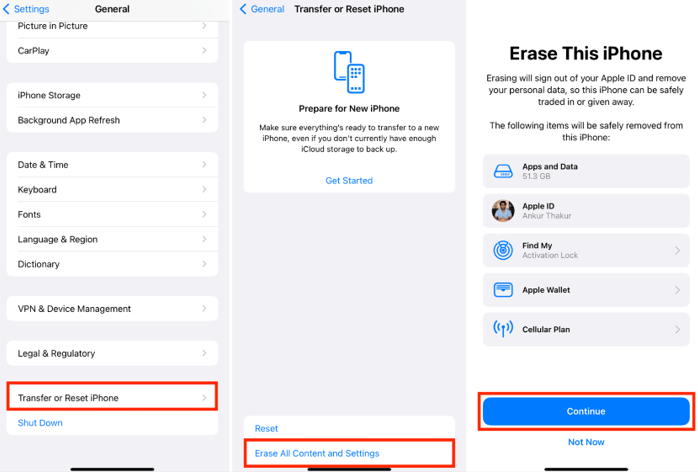
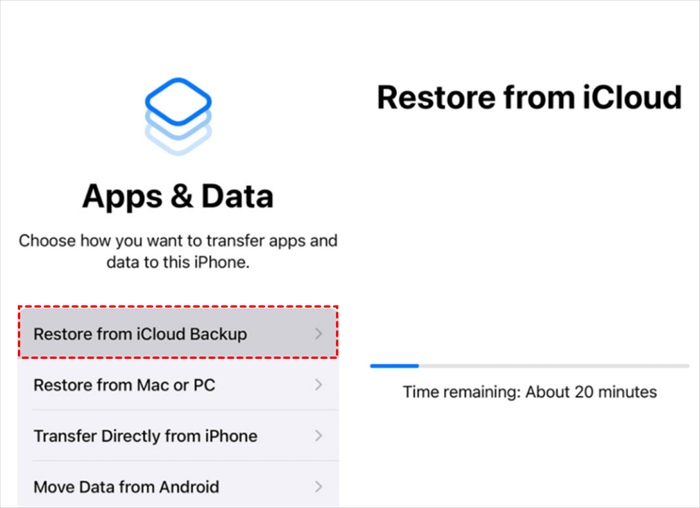
After your iPhone restarts, follow the setup instructions until you reach the Apps & Data screen.
Choose “Restore from iCloud Backup” and sign in to iCloud with your Apple ID.
Choose the most recent backup from the list. The restoration process will start, and your data will be restored to your iPhone.

- Simple and convenient.
- No need for a computer.
- Can restore anywhere with a stable internet connection.

- Requires a recent iCloud backup.
- Takes time, depending on the backup size and internet speed.
Troubleshooting Tips:
Slow Restoration Process: If the restore process is taking too long, it could be due to a slow internet connection. Try connecting to a different Wi-Fi network with a stronger signal.
Not Enough iCloud Storage: If your backup exceeds the free 5GB iCloud storage limit, you may need to upgrade your iCloud storage plan to restore all your data. This can be done by going to Settings > [your name] > iCloud > Manage Storage > Change Storage Plan.
Part 2. How to Restore iPhone Using Restore Software Without iTunes?
While iCloud is a convenient option, it may not always be available to everyone. If you encounter challenges with iTunes or don’t have a recent backup on iCloud, third-party software can be a powerful alternative. One such tool is WooTechy iPhixer, a user-friendly iOS system repair tool designed to fix a wide range of iOS issues without risking data loss. It can handle tasks such as system repair, factory resets, and even iOS downgrades.
When to Use iPhixer for iPhone Restoration:
You want to avoid data loss while fixing minor software issues or bugs.
You are unable to use iTunes due to errors or compatibility issues.
Your iPhone is stuck in a boot loop, black screen, or other system errors that prevent normal operation.
You need a user-friendly interface that simplifies the restoration process.
Free Download
Secure Download
How to Use iPhixer to Restore iPhone without iTunes?
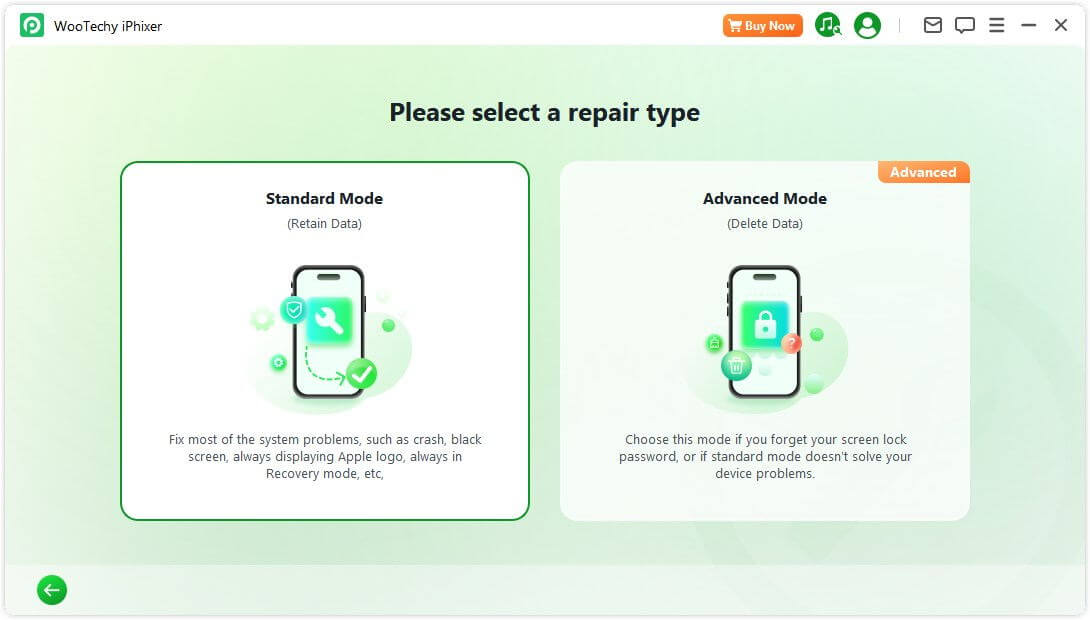
Step 1: Get iPhixer on your computer and launch it. Choose the Standard Mode on the main interface.
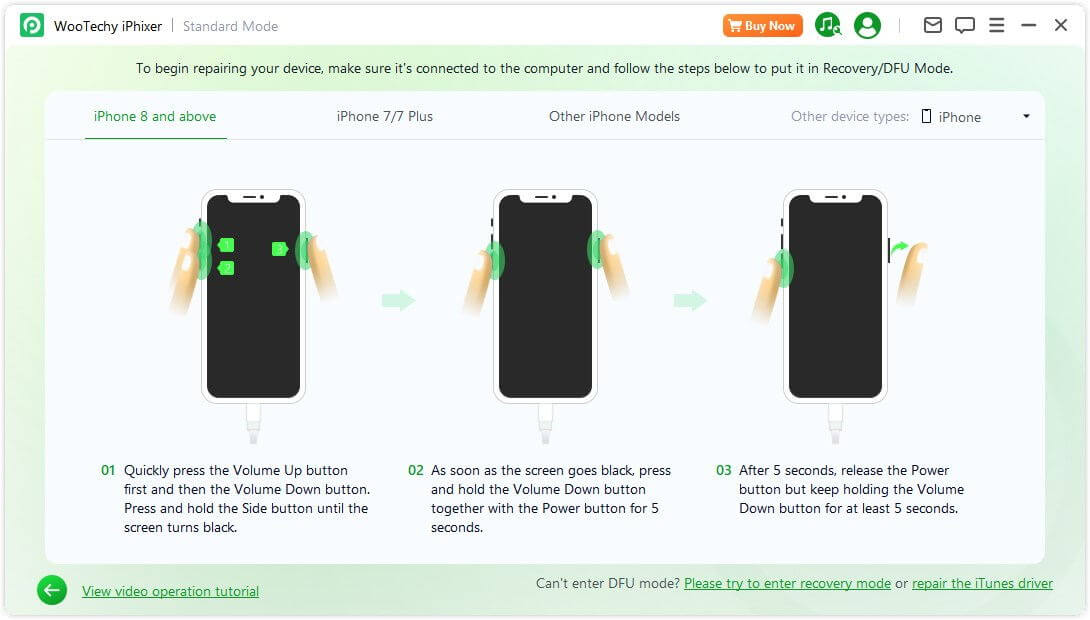
Step 2: Connect your device with the computer and tap on Next button. If your iPhone isn't detected, follow the on-screen instructions to put it into Recovery Mode or Device Firmware Upgrade (DFU) mode.
Step 3: Click Download button to get the firmware matched with your iPhone.
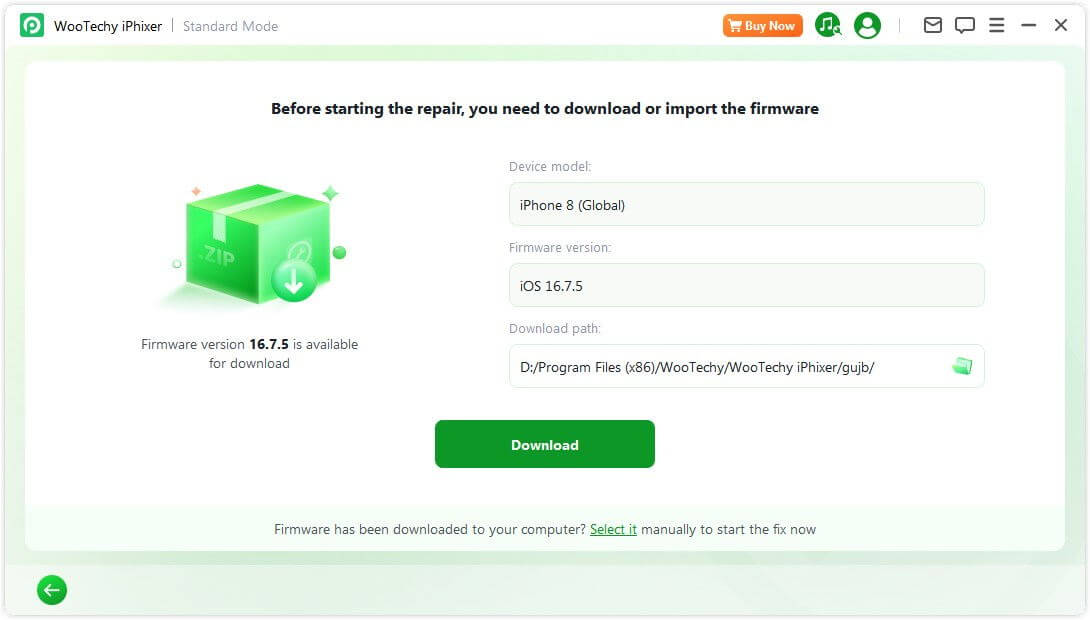
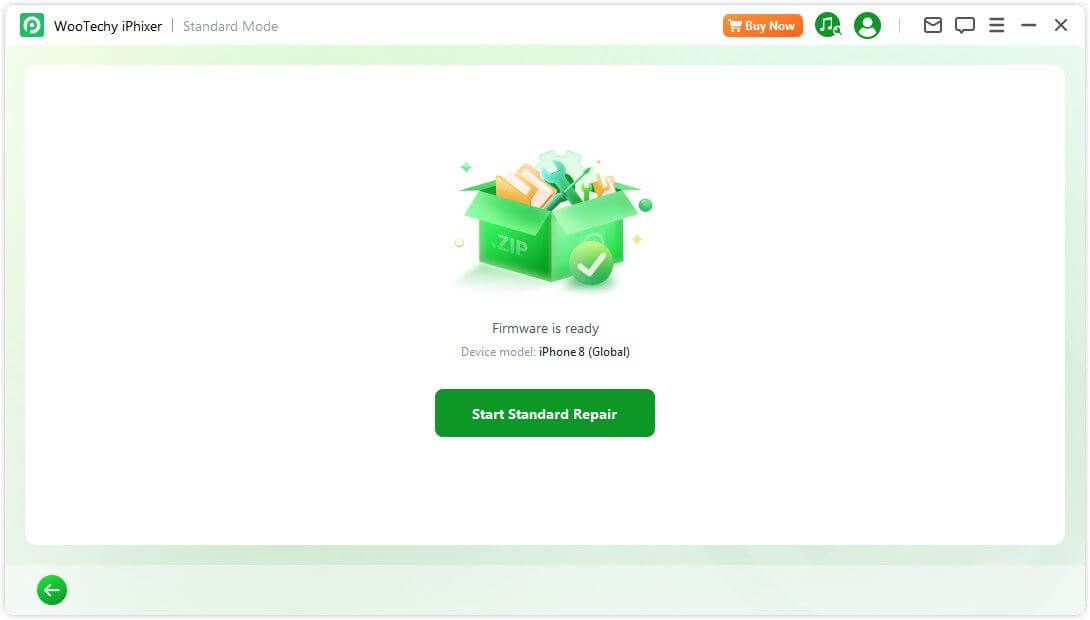
Step 4: Click Start Standard Repair button to let iPhixer repair your iPhone. When the process is complete, your iPhone will restart and be restored without iTunes.

- Easy-to-follow interface.
- Allows for selective data recovery.
- Ideal for users with limited technical knowledge.
- A great alternative for those who encounter issues with iTunes or prefer a more user-friendly tool.

- Requires a purchase for full features.
- Needs a computer to be used.
Part 3. How to Restore iPhone Using Mac Without iTunes?
In addition to using iCloud and third-party tools, Mac users have the advantage of the Finder application, which has replaced iTunes in macOS Catalina and later. This allows seamless iPhone restoration without having to worry about iTunes. Let’s go through the steps to restore your iPhone using Finder.
Step-by-Step Guide to Restoring Your iPhone Using Finder:
Use a USB cable to connect your iPhone to your Mac. Trust your computer when prompted.
Open the Finder application. It will display your iPhone under the Locations section in the sidebar.
Click on your iPhone’s name in the Locations section of Finder.
Click Restore iPhone on the interface.
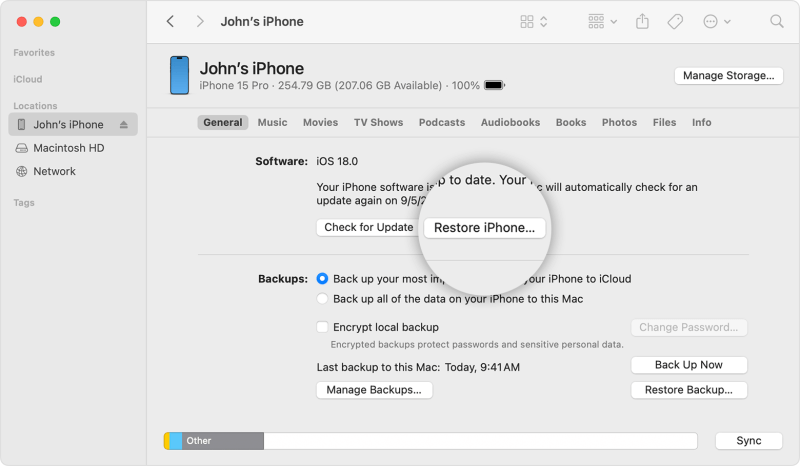
In the Finder window, you will see options to either Update or Restore your iPhone. Click on Restore iPhone if you want to erase all content and settings, or select Update if you want to reinstall iOS without deleting your data.
A pop-up will appear asking you to confirm the restoration. Click Restore again to proceed. Finder will download the latest version of iOS and install it on your iPhone.
After the restore process, you will need to set up your iPhone. You can restore from an iCloud backup or set it up as a new device.

- Don’t need to download or purchase any third-party tools.
- Provides a straightforward interface for managing iPhone.
- Works seamlessly with the latest macOS versions, allowing users to restore their iPhones without iTunes.

- Not available for users with older Macs or those running macOS versions before Catalina.
- All data on your iPhone will be erased.
- A slow or unstable internet connection can delay the firmware download process.
Troubleshooting Tips:
iPhone Not Showing Up in Finder: If your iPhone doesn’t appear in Finder, try using a different USB cable or port. Make sure both your iPhone and Mac are running the latest software versions.
Stuck in Recovery Mode: If your iPhone is stuck in Recovery Mode after attempting a restore, try restarting the restoration process or using the Update option instead. If still not working, try exiting Recovery Mode with iPhixer for free.
Bonus. How to Restore Deleted Data on iPhone without iTunes?
Even after restoring your iPhone, you might find that some important data is missing. If your data wasn’t backed up prior to the restoration, don’t worry; recovery is still possible with the right tools.
WooTechy iSeeker is one of the most popular third-party data recovery software solutions for iPhones. It is designed to recover various types of data, including photos, messages, contacts, and app data, directly from your iPhone or iCloud backup. Here’s a comprehensive guide on how to use iSeeker to restore deleted iPhone data effectively.
Step 1. Download and install it on your Windows or Mac computer, connecting using a USB cable. On the main interface, select Recover from iOS Device if you don’t have a backup. Click Next to proceed once the software detects your iPhone.
Free Download
Secure Download
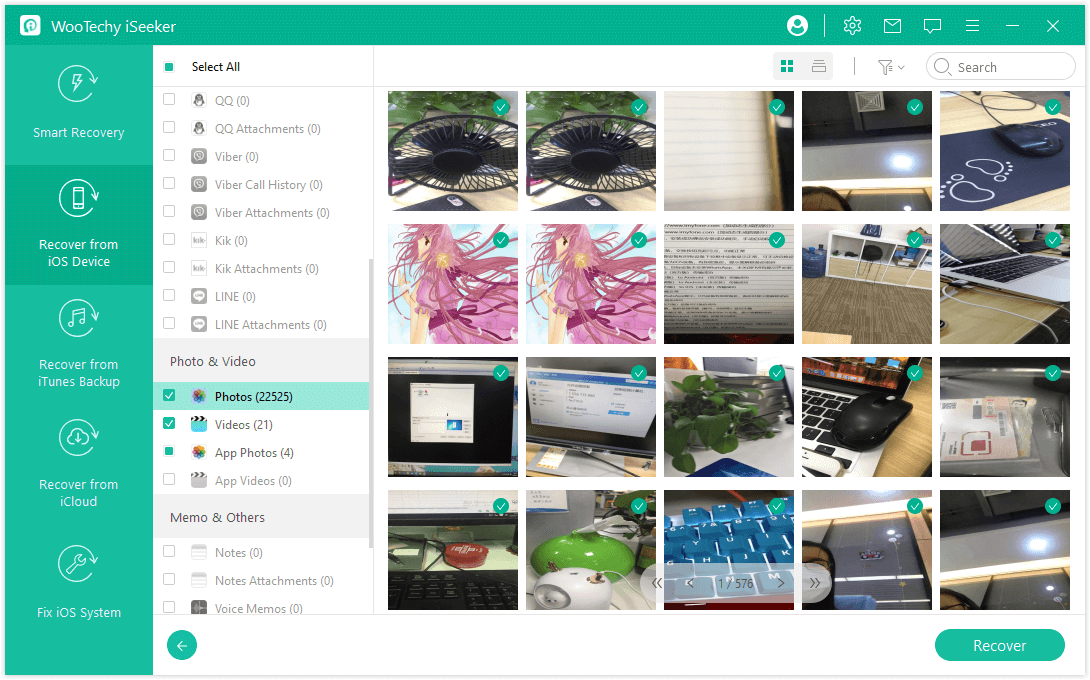
Step 2. iSeeker will prompt you to choose the types of data you wish to recover. For example, you can select photos, contacts, messages, or app data. Click Scan to begin the scanning process.
Step 3. Once the scan is complete, you’ll be able to preview the recoverable data in categories. Click Recover and choose a location on your computer to save the recovered files.
FAQs about Restoring iPhone without iTunes
Q1: How Can I Restore My iPhone if It Is Disabled or Locked?
If your iPhone is disabled due to too many incorrect passcode attempts or locked out, you can use the following methods to restore it without iTunes:
Using iCloud’s Find My iPhone: If Find My iPhone is enabled on your device, you can erase it remotely via iCloud.com:
Log in to your iCloud account.
Select Find iPhone and choose the locked device.
Click Erase iPhone to reset it to factory settings.
Recovery Mode with Finder (macOS Catalina and Later): Connect your iPhone to a Mac, put it in Recovery Mode, and use Finder to restore it.
Use Advance Mode in iPhixer: This mode allows you to restore your iPhone even if you cannot access your device.
Q2: How Can I Restore an iPhone Without a Computer?
If you don’t have access to a computer, the best way to restore your iPhone is using iCloud (Method 1). This method is especially useful if you need to restore your data while traveling or away from home, as it only requires a Wi-Fi connection.
Q3: Will Restoring an iPhone Delete All My Data?
Yes, restoring an iPhone typically involves erasing all current data on the device and replacing it with a previous backup.Remember to back up your data to iCloud or Finder before initiating a restore.
Q4: What is the difference between resetting iPhone and restoring iPhone?
Resetting adjusts specific settings or erases data without reinstalling the operating system. It can be done directly on the iPhone and is suitable for minor issues like Wi-Fi problems or preparing the phone for a new user.
Restoring erases all data and reinstalls the iOS system, providing a fresh start. This process requires a computer and is ideal for fixing serious software issues or if the iPhone is unresponsive.
Use reset for quick fixes or if you want to keep the current iOS version. Use restore for major issues, a fresh OS installation, or if you’re selling the device.
Conclusion
Restoring an iPhone without iTunes offers flexibility and convenience, especially when iTunes isn’t an option. Whether you choose to restore through iCloud, use third-party software like WooTechy iPhixer, or enter Recovery or DFU Mode, there are several reliable methods at your disposal. By following this guide, you can restore your iPhone effectively, with minimal hassle and risk of data loss.


