Were you recently unsuccessful in upgrading and restoring your iPhone? One of the options to do it successfully is learning how to put iPhone in recovery mode. The step is usually associated with overcoming complicated issues. Here is everything you need to know about it, but how about a little background first!
- 1.When is a recovery mode for iPhone necessary?
- 2.How to put iPhone in recovery mode?
- 3.How is recovery mode different from DFU mode?
When is a recovery mode for iPhone necessary?
The recovery becomes crucial to the phone’s operations in the following scenarios:
Your phone is a victim of the restart loop after upgrading the iOS system. The error usually occurs when the update has gone wrong, or the battery was too low during the iOS upgrade installation.
iTunes or Finder does not recognize your iPhone as authentic. The device is unrecognizable.
The phone is stuck on the Apple logo for more than a few minutes, resulting in halted operations
Connect to iTunes message is appearing frequently
The user cannot restore, back up, or upgrade their iPhone.
When you face one or all of the issues above, it is a clear indicator that the phone is not functioning correctly. Therefore, the fix is something different than a normal restart.
How to put iPhone in recovery mode?
Did you know many internal software issues can be resolved by simply restarting your iPhone? However, complex problem-solving requires putting the device in recovery mode. Remember, readers, how to put the iPhone in DFU mode must not be the first choice. The iPhone user may employ other methods to resolve the current problems. Fortunately, sometimes the recovery mode is the only answer that works.
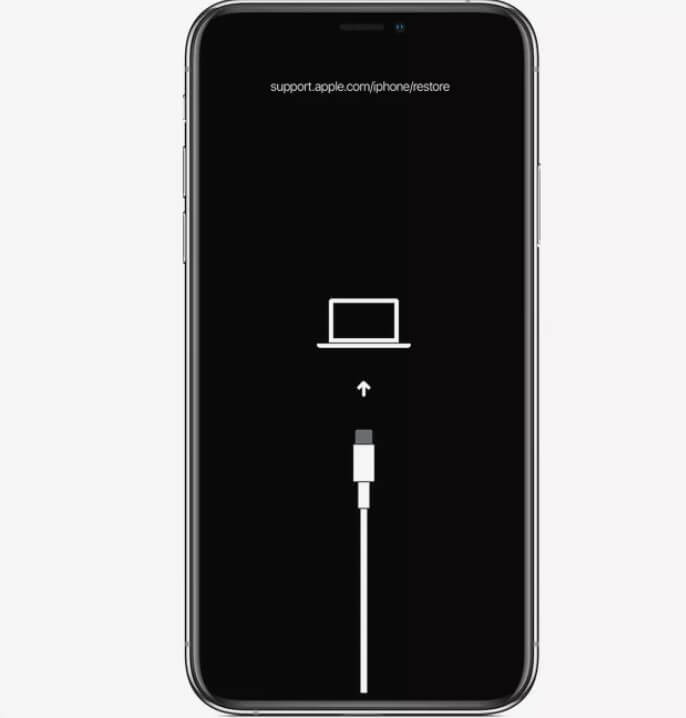
In other words, recovery mode is a wise option to eliminate software malfunctions. It will remove iPhone problems with the operating system as well. While you place the iDevice into recovery mode, the iPhone or iPad will still connect to iTunes and run in the background. Its operations are not halted.
You can use the feature to upgrade the iOS to a cooperative version that does not harm the applications. Furthermore, how to put it in DFU mode is not applicable when performing a data restoration. The recovery mode is easy to use.
Here are the steps to initiate the recovery mode, which do not apply if you own an iPhone 8 or higher model
Turn the iPhone off by pressing the side button and the volume button at the same time.
Continue pressing the buttons until the slider appears. Swipe to turn off the phone.
iPhone 7 and previous releases
Press the side and home buttons simultaneously until the screen is black. For iPhone 7 series, press the Volume down button instead of the home button.
Launch the Finder app on your phone if your Mac OS is 10.15 or higher.
On the other hand, open iTunes for a Windows personal computer or a dated Mac OS version. Ensure it is the latest version before launching it.
Connect the iPhone with the computer with an Apple-approved cable. Ensure the cord is not corrupted.
Launch the recovery mode
This step factors in the iPhone model you own.
Keep pressing the Volume up button and then repeat for the Volume down button. Now press and do not let go of the Side button until the recovery mode is active in iPhone 8 and newer models
Hold the side and the Volume Down button simultaneously to launch the recovery mode in iPhone 7 series.
At the same time, hold the side and home buttons until the recovery mode screen is active.
Finder/iTunes
After successfully performing the step as mentioned above, you will notice a pop-up window on Finder or iTunes. The application is dependent on the operating system of your personal computer.
The two options in how to put iPhone in recovery mode are Restore or Update the iPhone.
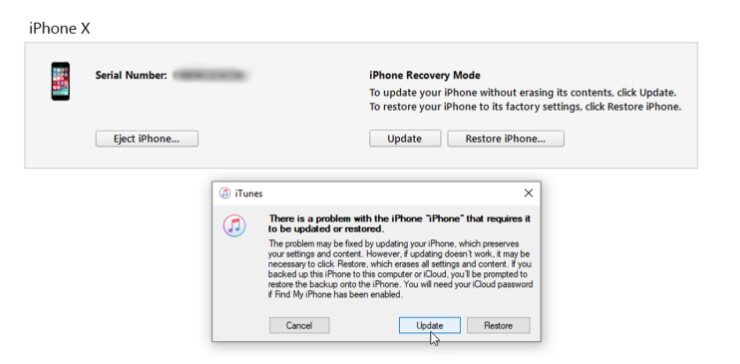
If you choose Update, the phone will attempt to update the iOS without incurring data loss or corruption.
If the update is not successful, the next option is Restore. Unfortunately, the option will remove all phone data and install a fresh iOS. We understand the option is not ideal, but it is the last beacon of hope.
How to exit the recovery mode on your iPhone?
Once the restoration or iOS upgradation is complete, you will notice the iPhone has restarted automatically. This indicates the procedure was successful, and the device exits the recovery mode.
Here is the procedure to end the recovery mode if the phone is not restored.
Remove the USB cable, unplugging your phone.
Continue pressing the side button until the iPhone has turned off.
Release the button.
Restart the device by pressing the side button and letting it go when the Apple logo appears.
WooTechy iPhixer
WooTechy iPhixer provides a genius approach to how to put iPhone in recovery mode. It will result in no data loss, file corruption, or lost documents.
Download and install WooTechy iPhixer
From the initial screen, pick the “Enter/Exit Recovery Mode” on the bottom right. It is one of the four modes iPhixer offers.
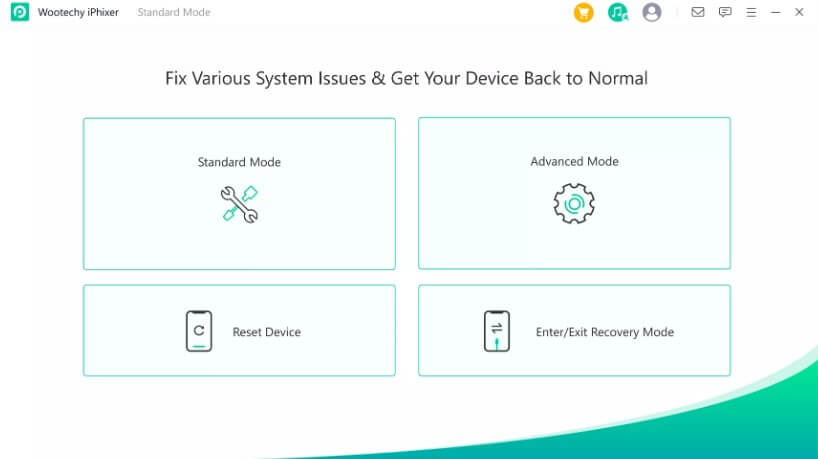
Now connect iPhone to the computer using an Apple-certified cable.
Click “Next.”
Choose “Entry Recovery Mode.”
Once you are done updating or restoring the iOS, click on “Exit Recovery Mode.”
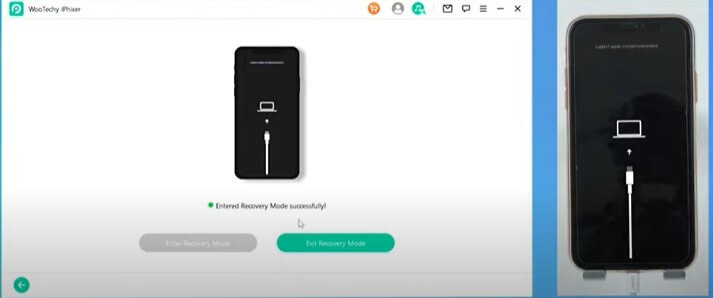
Disconnect the cable.
Enjoy the fully functional iPhone once again.
Why choose WooTechy iPhixer?
Other than how to put iPhone in recovery mode, the iPhixer firmware solution offers the following features:
Reset iOS devices very easily
iPhixer offers two modes to overcome software issues. These are the Standard Reset and Hard Reset. However, you can use the Standard Reset option if you forgot the screen lock or passcode. It is the perfect option when you do not wish to reinstall or install the latest iOS version. For other issues, opt for the Hard Reset.
Robust Enter/Exit Mode
The Enter/Exit Recovery mode is an excellent choice to recover or backup data on all iDevices. Platforms include iPhone, iPad, and iPod. You do not lose any data while the device is in this mode.
iTunes substitution
WooTechy is a reliable substitute for iTunes if it is not working on your computer. Besides updating and recovering data loss, iPhixer also provides solutions to iTunes errors, such as 4005. 4013, and 4010.
Which software issues will iPhixer remedy?
Other than how to put iPhone in recovery mode efficiently, WooTechy iPhixer will fix the following issues:
iDevices stuck on Apple logo
The spinning circle does not go away
Black and white screen on iDevices
The frozen screen on iPhone or iPad
iPhone stuck on boot loop
iPhone or iPad does not turn on
iDevices are lagging in terms of performance.
WooTechy iPhixer also fixes the following update issues regarding iOS 15/16:
The failure to update to the latest iOS
The iDevice does not turn on.
The iDevice is unable to install the iOS update
The update is not verified.
The Apple bar progress update is not moving forward
The interface is stuck on Update Requested.
What are the tech specifications for running WooTechy iPhixer on a computer?
Your personal computer must have windows 7,8, 10, or 11.
The macOS must run on Catalina, Mojave, High Sierra, Sierra, El Capitan, Yosemite, and Mavericks. The Big Sur includes MacOS 11.5.
iTunes must be present on your computer before WooTechy iPhixer
Internal Specifications
The computer has a 1 GHz or above present for 32 or 64 Bit.
The Mac must have a 1 GHz Intel or more.
512 MB or a higher RAM for Mac. 1024 RAM is recommended for Windows. However, a minimum of 256 MB is acceptable.
There must be more than 20 MB of free space on the hard drive
iPhixer FAQ
Does WooTechy iPhixer cause data loss?
The Standard Mode in iPhixer with the “Enter/Exit Recovery Mode” feature does not result in data loss. However, the Advanced Mode with Reset iDevices will remove all data on your phone. Therefore, regularly update the content before performing a reset.
How is the free version of iPhixer different from the full version?
The free version allows access to limited features. You can use the Enter/Exit Recovery mode and contact the customer representative team for assistance. On the other hand, purchasing the full version allows access to all iDevices such as iPadOS, iOS, and tvOS.
Is WooTechy iPhixer safe to use?
iPhixer is a completely safe firmware provider on Windows and Mac. It has been approved by well-known platforms such as Norton and McAfee. Moreover, Wootechy iPhixer is designed not to damage the device or operating system on phones, iPadOS, and TV.
How long will my phone stay in recovery mode?
The duration of how to put iPhone in recovery mode depends on the iPhone version you own. It also factors in the content size and the software OS too. However, the process can take more than 30 minutes but less than an hour on average.
How do I know recovery mode on iPhone was successful?
You will know how to put iPhone in recovery mode was successful when a pop-up window appears, asking for the user to Update or Restore the iDevice. The option varies according to the platform you are using, such as Finder or iTunes.
Can I perform a backup for iPhone data while the device is in recovery mode?
In short, you cannot perform data when the mode is active. Furthermore, iTunes nor iCloud will help you in the cause. Therefore, ensure the photos, messages, and emails are backed up before putting your phone in recovery mode.
How is recovery mode different from DFU mode?
No doubt, the iPhone is a very powerful device with versatile features. However, since it is a machine, there are days when it might go unresponsive or not work the way you want it to. Therefore, Apple has provided built-in assistance to streamline the functionality. These two modes are Recovery Mode and DFU mode.
Even though the names imply their usage is the same, there are some clear dissimilarities between their functions. Therefore, we present the following argument emphasizing their usage so you can adopt the best tool. Here are a few differences between how to put iPhone in DFU mode and recovery mode:
Mode of use
The purpose of putting an iDevice into recovery mode is so that iTunes can reboot the device. The procedure resolves many issues that circle around the phone getting stuck. The recovery mode is also helpful in updating your device to the latest iOS version. It will ensure the applications do not conflict with the software update.
On the other hand, the DFU mode is reserved for complicated issues. It is appropriate when you wish to downgrade the iOS update. Moreover, you can also use it to manage the applications better. The DFU mode contributes to the phone’s security and operation.
Different steps to initiate the mode
The user activates the recovery mode in seconds. As the phone is turned off during recovery mode, it also saves battery time. Furthermore, the user does not need to interact with the iOS functions for it too.
The process of initiating DFU mode is complicated because it does not require the operating system. However, you can activate the mode without the presence of a technician. We will discuss how to put iPhone in DFU mode in great detail in another article.
Losing data
Before you initiate the DFU mode without knowing its consequences, remember it comes with a hefty price. The DFU mode will delete the contents on your phone. Therefore, keep the option as a last resort before trying everything else.
Moreover, you can also back up the iPhone using iTunes or iCloud. It will relieve the pressure of a factory reset done by a DFU mode. Thankfully, the Recovery Mode does not result in such a consequence.
Download WooTechy iPhixer today
Devices malfunction; it is a bitter reality. It may result in the phone becoming inoperable and data corruption. Therefore, regularly update the content on your phone weekly to avoid losing it. iPhixer is an easy tool that provides step-by-step guidance for backing up your photos, messages, and other content.
You can download the iPhixer free version to enjoy the features. Furthermore, browsing the prices for the paid option as well. WooTechy offers advanced and exclusive technology with a 30-day money-back guarantee if the client is dissatisfied. Upon purchasing the full version, you can enjoy all features and free updates to the firmware.
Key Features of iPhixer

75.000.000+
Downloads
- Resolve all iOS update problems such as iPhone stuck on preparing update, iPhone stuck on update requested and iPhone freezing during update without data loss.
- Support all models of iPhone/iPad/iPod touch/Apple TV and ios versions.
- With a high success rate, iPhixer brings your device back to normal via a few clicks.
Free Download
Secure Download


