Have you ever captured a perfect moment, only to find out later that the picture turned out blurry? Have you ever captured a landscape with a perfect angel, only to find out later that the picture turned out blurry? It can be incredibly frustrating for the photographer, especially when they can't recreate the scene. Fortunately, there are ways to fix them.
So in this guide, we will show you how to clarify pictures and how to fix blurry pictures rescuing your precious photos from blurriness.
Part 1: Why Are My Pictures Blurry?
Blurry images can result from various factors, each impacting the overall clarity and sharpness of the photograph. Let's explore some common culprits behind blurry pictures:
Incorrect Focus
One of the primary reasons for blurry images is improper focus. If the camera fails to focus on the subject correctly, the resulting image may appear blurry or out-of-focus. This can happen due to manual focus errors or issues with autofocus systems.
Camera Shake
Camera shake occurs when the camera moves during the exposure, leading to blurred details in the image. Factors such as handheld shooting without stabilization or sudden movements while pressing the shutter button can contribute to camera shake.
Motion Blur
Motion blur occurs when there is movement within the frame during the exposure, causing moving subjects or the entire scene to appear blurred. This phenomenon is common in fast-paced environments or when capturing action shots with slow shutter speeds.
Low Light Conditions
Inadequate lighting conditions can result in blurry images, especially in low-light environments. When the camera struggles to capture enough light, it may compensate by using slower shutter speeds or wider apertures, leading to increased motion blur or reduced sharpness.
Lens Aberrations
Optical imperfections such as lens aberrations or distortions can affect the clarity of the final image. Issues like chromatic aberration, spherical aberration, or lens softness may manifest as blurriness or loss of detail in certain areas of the photograph.
Part 2: How to Make A Blurry Picture Clear & Sharp on Computer?
Dealing with blurry pictures can be disheartening, especially when you've captured a precious moment that you can't recreate. Fortunately, there are several methods to salvage blurry images and make a blurry picture clear. Let's explore some effective techniques for fixing blurry pictures:
1Use iSeeker Photo Enhancement Tool
One of the most effective ways to fix a blurry picture is to use a professional photo enhancement tool to help you clear a blurry picture. WooTechy iSeeker is such software.
It is an all-in-one data recovery software that can not only recover any iOS data on your iPhone but also make blurry pictures clear again thanks to its AI technology. No matter what format your picture is, it can clarify it for you with 1 click!
What Makes iSeeker Stand out?

100.000+
Downloads
- Supporting multiple data repairs including iOS data repair, photo repair, file repair and video repair, iSeeker is compatible with the latest iOS 17.
- iSeeker can smartly repair corrupted, broken, and damaged photos from these devices, ensuring no memory is lost.
- This photo repair tool can handle photos with various levels of corruption, from mildly pixelated to completely inaccessible or greyed-out.
- iSeeker allows users to add multiple damaged photos at once, streamlining the repair process and saving time.
- Users can monitor the repair progress at any time, ensuring transparency and control over the restoration process.
-
Free Download
Secure Download
How to Fix Blurry Pictures Using iSeeker?
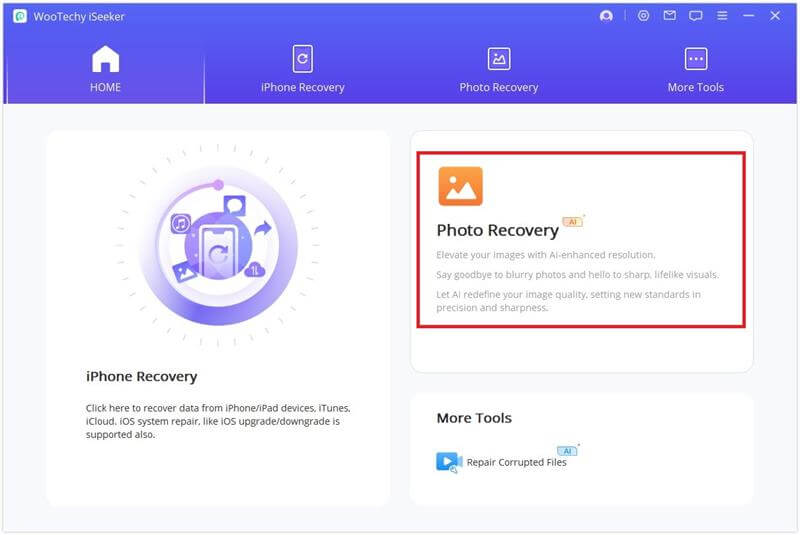
Step 1. Download and install iSeeker on your computer and open it. Select Photo Recovery section.
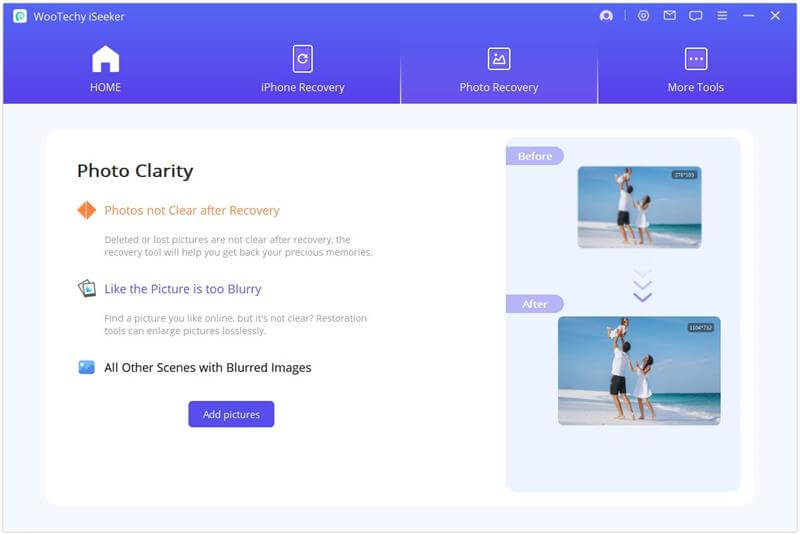
Step 2. Select the blurry pictures from your computer by clicking Add Pictures button.
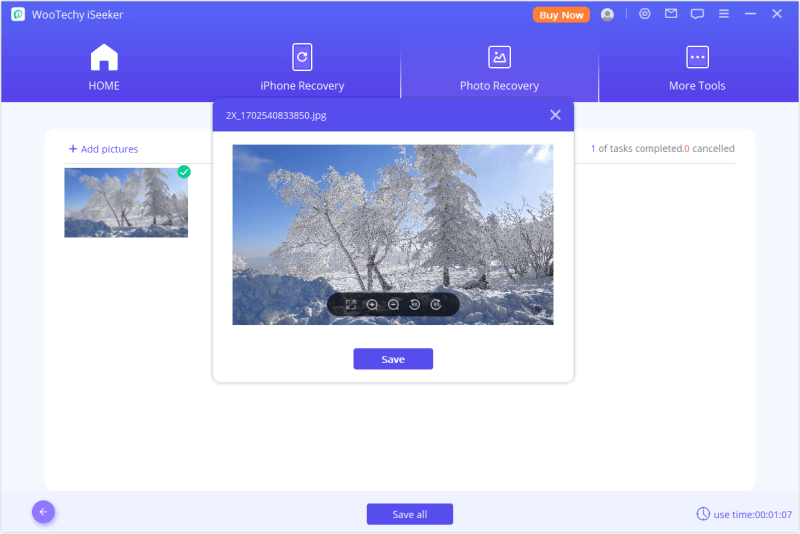
Step 3. Wait for a few seconds, your blurry pictures are clear. Then you can save the enhanced photos.
Note
This photo recovery feature is exclusive for iSeeker (Windows Version).
2Clear A Blurry Picture with PhotoShop
Using Adobe Photoshop is another way to fix blurry pictures. It offers a robust solution for addressing various image-related challenges. Among its many capabilities, Photoshop excels in clarifying blurry photos and has been instrumental in assisting numerous users in recovering corrupted images. For those unfamiliar with its workings, fear not! We'll walk you through the process of unblurring a photo using Photoshop:
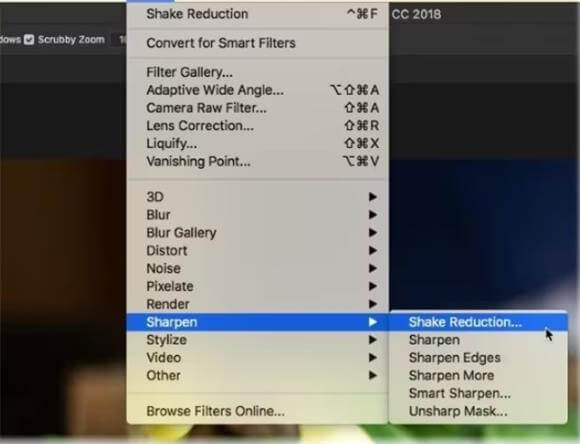
Start by navigating to the “Filter” menu located at the top of the Photoshop interface.
Within the filter menu, locate and click on the “Sharpen” option.
Upon selecting “Sharpen,” a submenu will unveil; here, opt for the “Shake Reduction Filter.”
Engage the “Shake Reduction Filter” to set the wheels in motion. This feature autonomously analyzes the image, seeking out areas of blur.
A progress bar will materialize on the screen, indicating the ongoing analysis. Once the scanning concludes, the progress bar will vanish.
Voila! Witness the transformation as Photoshop unveils the enhanced image, now free from blurriness and restored to its clear, crisp state.
Part 3: How to Make A Blurry Picture Clear & Sharp on Phone?
If you don’t have a computer by your side, there are also ways to fix a blurry picture, here we offer 2 different methods for both iPhone and Android phone users. Let’s check them out!
Fix A Blurry Picture on iPhone
To access the app switcher on an iPhone 8 or earlier model, simply double-click the home button. For iPhone X or later models, a straightforward swipe up from the bottom to the center of the screen will suffice.
Next, to ensure complete closure of the camera app, swipe it off the top of the screen.
Following these steps, reopening the camera app will yield improved photo results. This action is particularly essential as the iPhone camera app may occasionally crash, leading to blurry images.
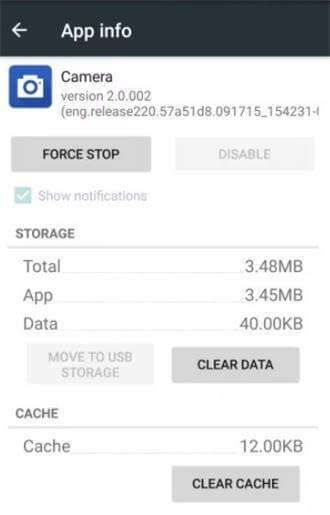
Clear A Blurry Picture on Android
Begin by accessing your phone's “Settings.”
Locate and tap on “Applications.” Within this menu, select “Application Manager.”
Swipe left until you reach the “All” tab.
Once there, search for the “Camera App” and tap on it.
A new window will appear. From here, select “Force Stop” to halt the application.
Part 4: How to Make An Not Blurry Picture?
Employ High Dynamic Range (HDR): HDR photography blends multiple exposures to capture a wider range of tones. Use your camera's HDR mode or manual bracketing for balanced, detailed shots free from over or underexposure.
Adjust Focus and Depth of Field: Ensure precise focus on your subject by manually adjusting focus points. Experiment with depth of field to balance foreground sharpness and background blur, using aperture settings to control the effect.
Adjust sharpness and contrast settings: Enhance clarity in post-processing with subtle sharpening and contrast adjustments. Avoid overdoing it to maintain a natural appearance and prevent artifacts.
Clean Lens Before Shooting: Keep your lens spotless to prevent soft, hazy images caused by dust or fingerprints. Use a microfiber cloth and lens cleaner solution for optimal clarity.
Steady Hands Make Clear Photos: Minimize motion blur by practicing proper camera handling techniques. Hold your camera firmly with both hands or use a tripod for stability, especially in long exposure shots.
Implementing these strategies will elevate your photography skills, ensuring your images are sharp, clear, and captivating. Remember to experiment and refine your techniques over time to achieve the best results.
Conclusion
Don't let blurry pictures dampen your photography spirit. Armed with a deeper understanding of the causes, preventive measures, and effective solutions outlined in this guide, you're equipped to tackle blurry images head-on and elevate your photography game to new heights.
Many users recommended. Fix Blurry Pictures on iPhone in 1 Click
Free Download
Secure Download


