
“I was clearing up the photos on my iPhone for there are so many photos. To save time, I chose multiple photos and deleted them at once. And today I found I have deleted several important photos by mistake. They don't show up anywhere now. My friend told me maybe I could get them back with iCloud. Can someone tell me how can I recover them from iCloud?”
Well, everyone today is fond of taking photos, uploading them on social media platforms, or just storing them to have a memory to remember. However, it is not uncommon to see that any accidental human error or some other system glitch in our iPhone might delete our most valuable photos.
When you are in this case, maybe the first solution you came up with is to use iCloud to restore the photos. And there are some different ways to utilize the iCloud. This is exactly what this article is here to discuss. In this article, you will learn how to recover photos from iCloud using four reliable methods. So, let's jump right to it!

- Method 1. Recover Photos from iCloud.com
- Method 2. Recover Photos from iCloud Backup
- Method 3. Best Way to Recover Photos from iCloud (Without Reset)
- Method 4. Recover Photos from iCloud with iCloud for Windows
Method 1. Recover Photos from iCloud.com
When a photo is deleted from iCloud, it is sent to the "Recently Deleted" album where it remains for 30 days. During that period, you can go to that folder and get the photos back. Follow the below steps to learn how to restore photos from iCloud.com:
Step 1 Go to iCloud.com webpage and sign in with your Apple login credentials.
Step 2 Click the Photos icon and then click the Recently Deleted album from the sidebar.
Step 3 Select the photos you like to retrieve from the list of recoverable photos and then click the Recover button.
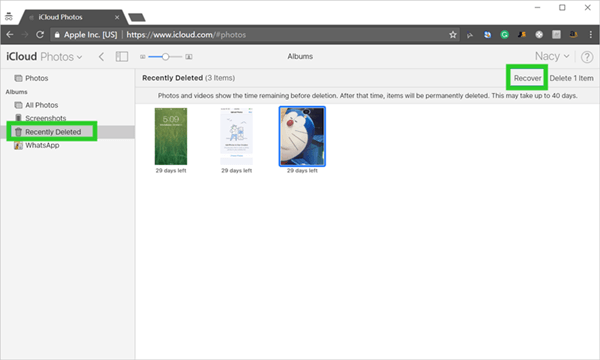
This way, you will recover photos from Recently Deleted folder on iCloud.com. Now, you can check these photos on your iPhone. However, if you don't find deleted photos in the Recently Deleted album on iCloud,com, then it means that either 30 days period has passed or you have accidentally deleted them permanently. Method 3 discusses how to recover permanently deleted photos from iCloud.
Method 2. Recover Photos from iCloud Backup
If you have made a data backup of your iPhone in iCloud before your photos got deleted, then you can simply restore the backup and retrieve photos. However, this method requires that you reset your iOS device and then use the iCloud backup to replace all content. Moreover, this method will restore all the backed-up data, including photos, videos, files, contacts, and all datasets, not just the photos only.
Follow the below steps to learn how to recover photos from iCloud backup:
Step 1 Go to the Settings app from your iOS device and then tap General > Reset > Erase All Contents and Settings.
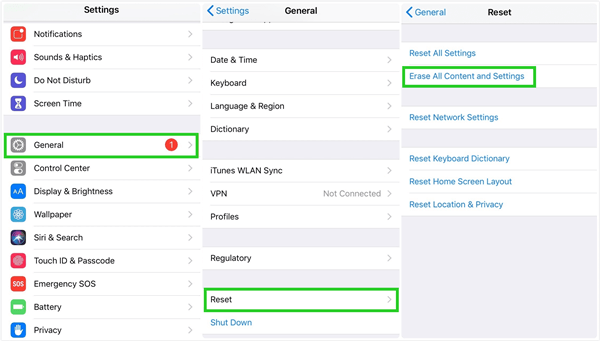
Step 2 Initiate the device setup process by following the on-screen instructions once your iOS device restarts.
Step 3 When you reach the Apps & Data setup part, tap Restore from iCloud Backup.
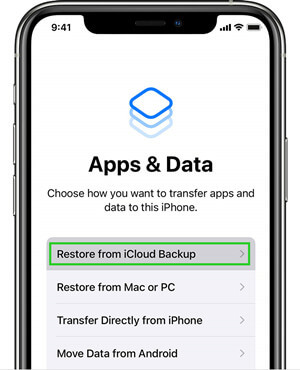
Step 4 Sign in to your iCloud account, pick the backup you want to restore and initiate the recovery process.
Afterwards, all the backed-up data from that specific backup file will be restored to your iPhone. Once the process is completed, you can go to Photos app and access the lost photos.
Method 3. Best Way to Recover Photos from iCloud (Without Reset)
If you have permanently deleted photos on iCloud.com or you don't want take the risk that might happen during the process of restoring an iCloud backup, then the above two methods might not be your best choice. In this case, the iSeeker will come to the rescue.
iSeeker is an intelligently designed powerful iOS data recovery tool that can retrieve lost data no matter the scenario. With iSeeker, you could preview your photos in iCloud to make sure what you are looking for is stored there. What's more, you could choose to recover photos only rather than all the data in iCloud. Therefore, you don't need to reset your device and won't overwrite other important data. And through its intuitive user interface, it just takes a few clicks to retrieve lost photos from iCloud. In a word, using iSeeker is the best way to recover photos from iCloud.
Key Features of iSeeker

100.000+
Downloads
- It recovers deleted photos from iCloud account and iCloud backup.
- Apart from photos, it can recover more than 18 types of lost or deleted data on iOS devices, such as videos, messages and WhatsApp data.
- It can restore photos from various data loss scenarios, such as unexpected deletion, system crash, factory reset, iOS upgrade/downgrade, etc.
- It provides a free trial, with which you can scan and preview the photos in iCloud.
- It is compatible with a wide range of iOS models and iOS versions, including iOS 16.
Download Now
Secure Download
To recover photos from iCloud account with iSeeker:
Step 1 Launch iSeeker on your computer and click Recover from iCloud from the left sidebar. Afterward, select Recover Data from iCloud Account and then sign in to iCloud using Apple login credentials.
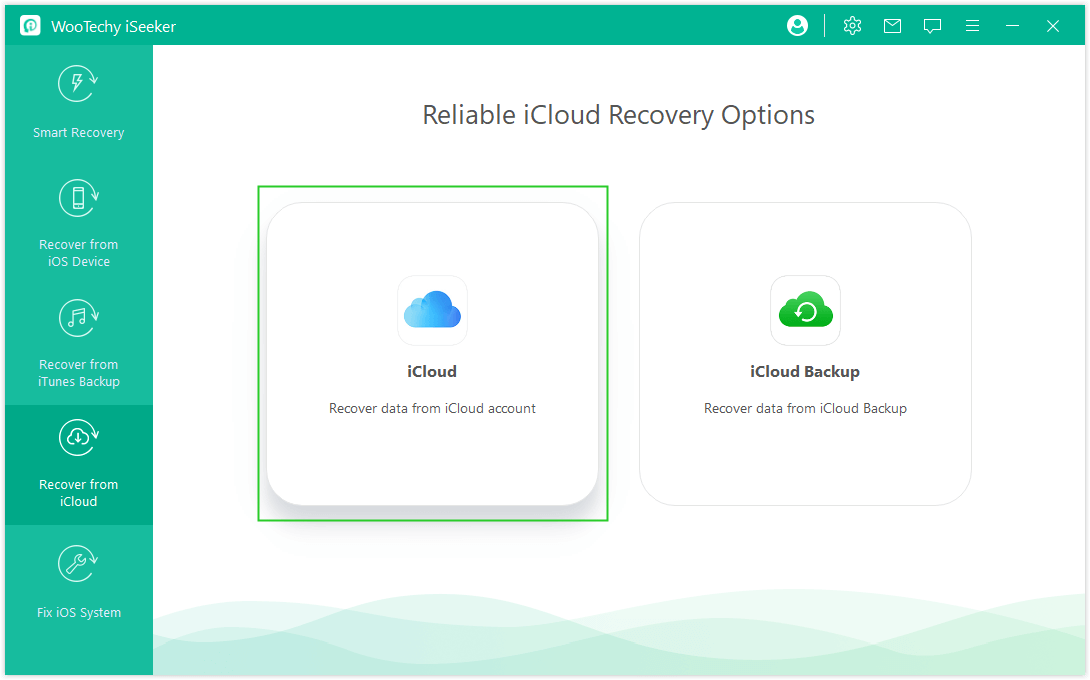
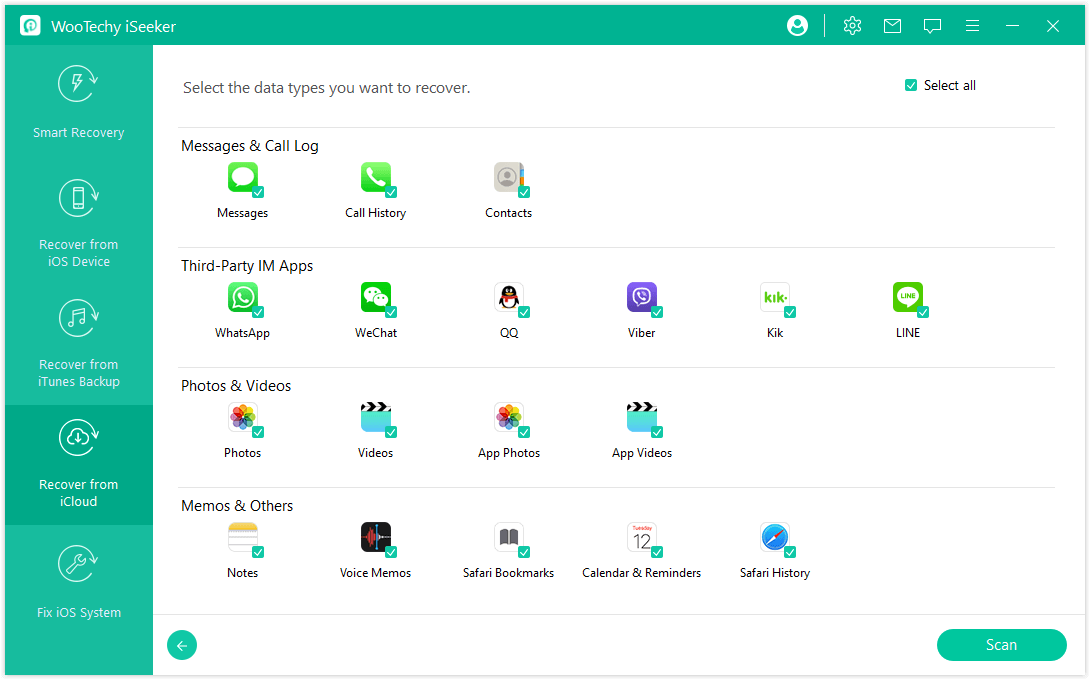
Step 2 Select the data type you want to recover. In your case, tick the checkbox next to the Photos app and then click Scan.
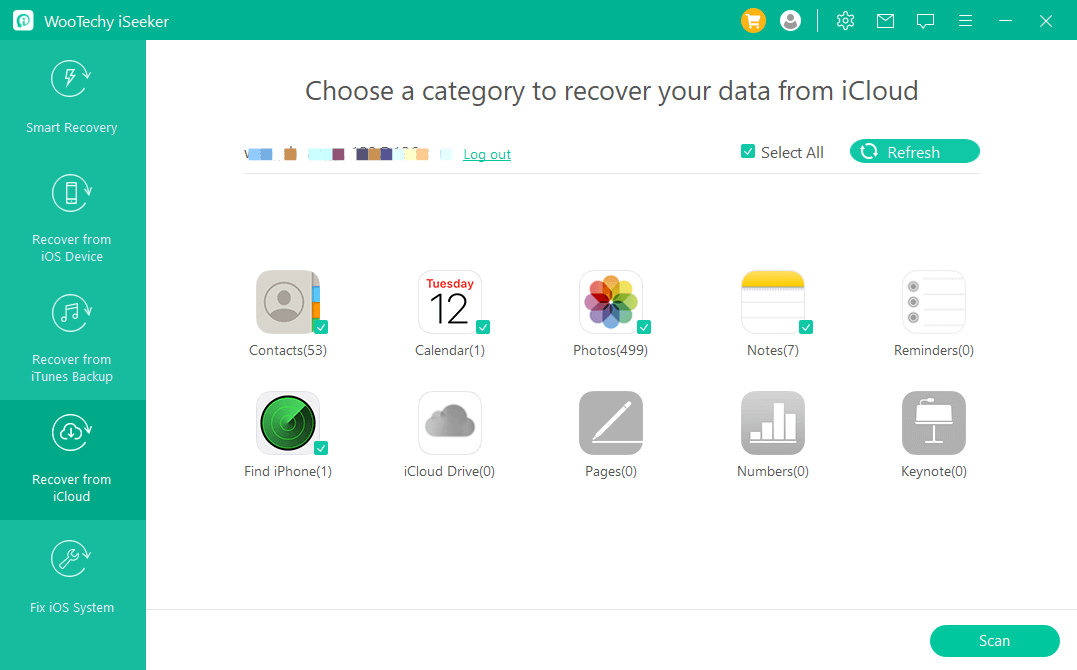
Step 3 The tool will start the scan process and then let you preview all the recoverable photos. So, select the photos you want to recover and then click Recover.
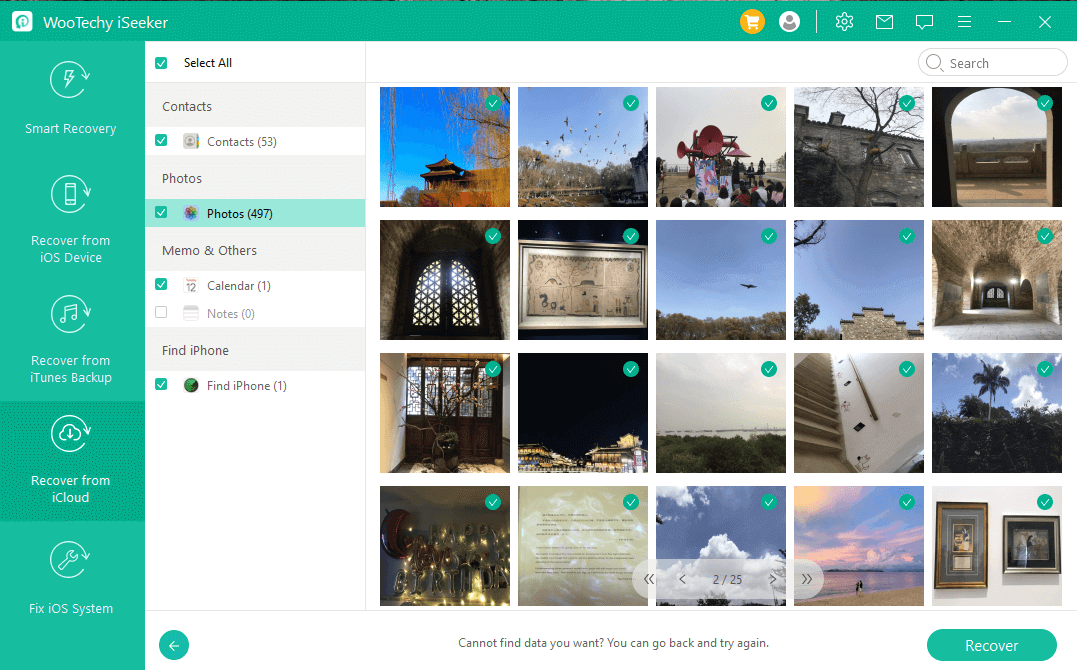
To recover photos from iCloud backup with iSeeker:
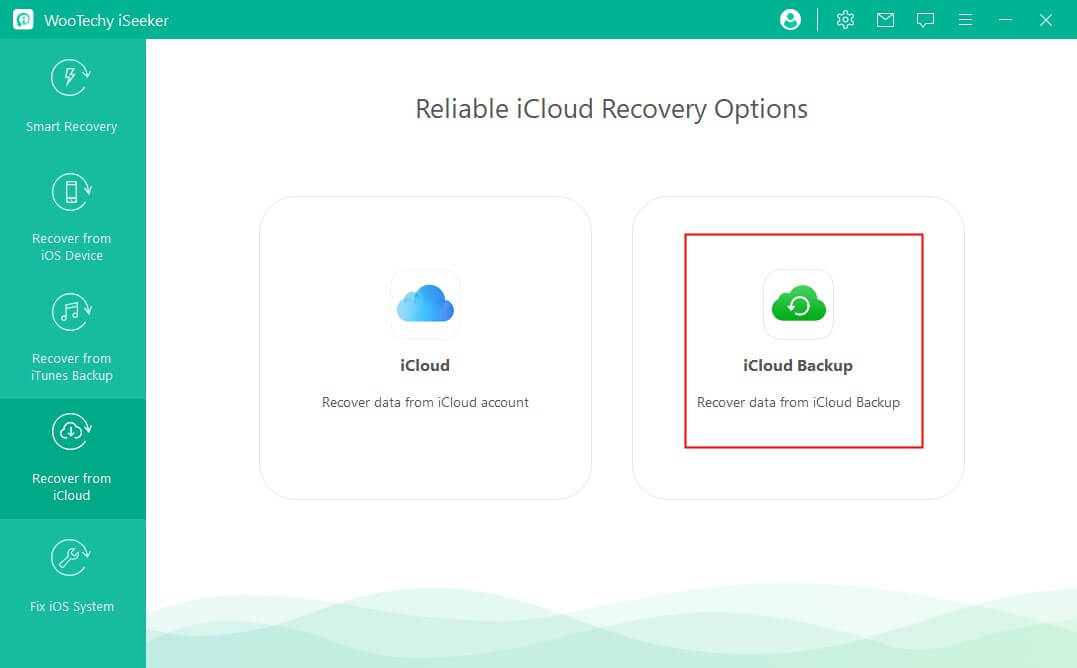
Step 1 Launch iSeeker on your computer and click Recover from iCloud from the left sidebar. Afterward, select Recover Data from iCloud Backup. Then follow the instructions on the screen to prepare your iPhone.
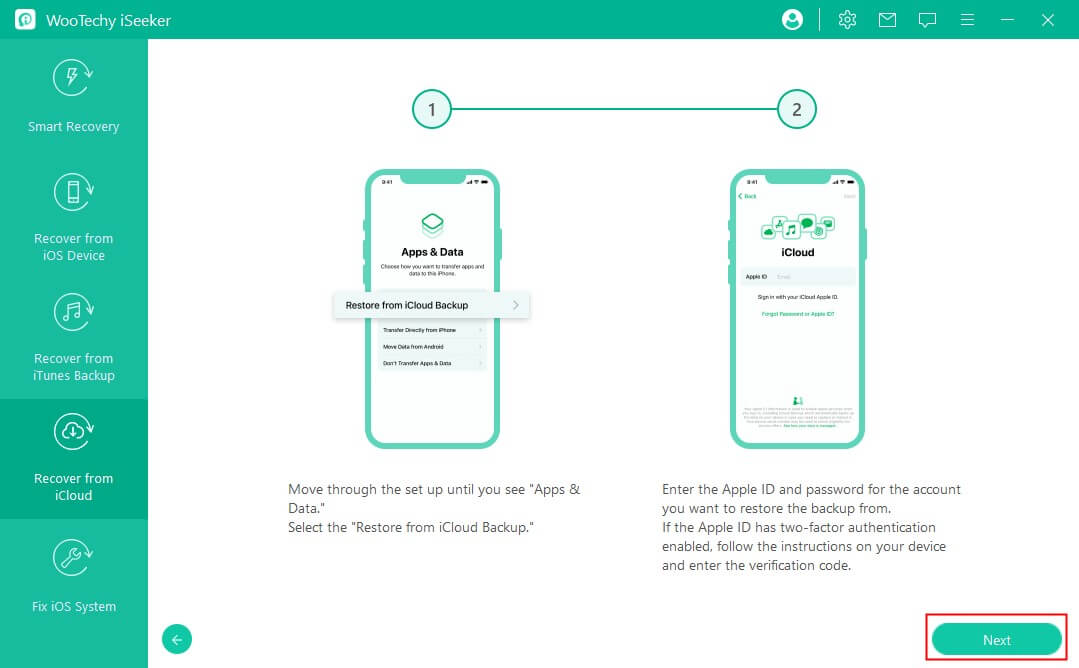
Step 2 Choose Restore from iCloud Backup on the Apps & Data screen. Then sign in with your Apple ID. Choose a backup you want to restore. After the restoration complete, your iPhone will reboot.
Step 3 Connect your iPhone to iSeeker.then choose Photos in the category list. Click Scan to begin the scanning process. After that, you will preview all the photos in iCloud and choose the ones you need and click Recover to restore them.
Method 4. Recover Photos from iCloud with iCloud for Windows
You could also download the iCloud for Windows and set up iCloud Photos on your PC. Then you will be able to restore all the photos in iCloud to your PC.
To use the iCloud Photos on PC, you need to turn on Photos in iCloud on all your Apple Devices. Follow the steps below to recover photos from iCloud using iCloud for Windows:
Open iCloud for Windows and sign in with your Apple ID.
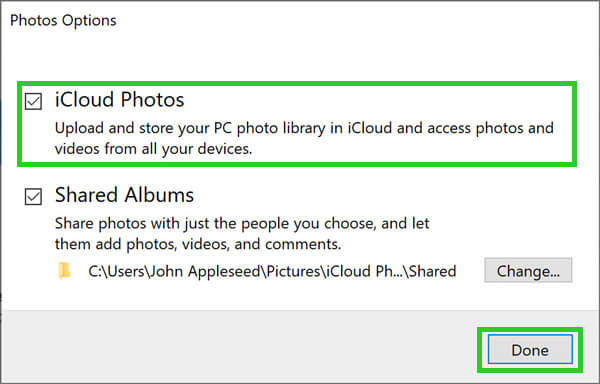
Click Options behind Photos.
Select iCloud Photos from the menu. Click Done > Apply.
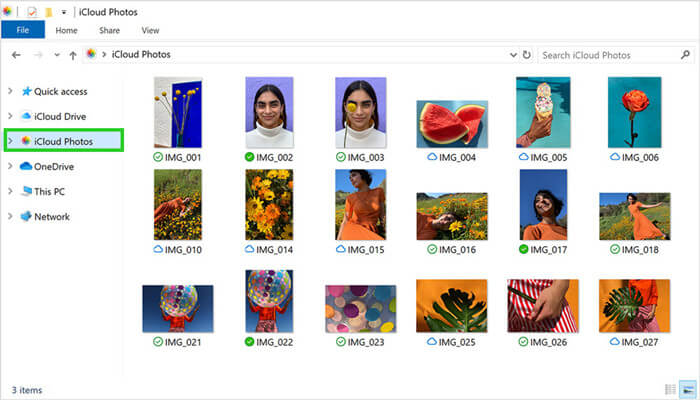
After you finished set up, all your photos in iCloud will sync to the PC. To find and sownload the photos, head to iCloud Photos in the File Explorer. Then choose the photo you want to keep and right-click it, then choose "Always keep on this device" from the menu. And you could also transfer these photos to your iPhone through a USB cord or Wi-Fi.
Conclusion
With the high-resolution camera of the iPhone, no one wants to miss taking a click of any memorable event. However, the situation becomes quite frustrating when you don't see those valuable photos in your Photos app. Luckily, iCloud provides a chance to recover those deleted photos. The above-listed 5 methods are found to be the perfect answer for how to recover photos from iCloud.
However, if you want an instant and reliable recovery, then the iSeeker iCloud data recovery tool is the method you should proceed with. Its intuitive user interface makes it straightforward to restore photos from iCloud in no time with high accuracy. So, use iSeeker right away and get your photos back on iCloud in no time.
Download Now
Secure Download


