Excel spreadsheets are the backbone of countless businesses and personal projects. They store crucial data, complex formulas, and intricate formatting, making them invaluable tools. But like any computer file, Excel spreadsheets are susceptible to corruption. When faced with a corrupted Excel file, panic might set in, but fear not! There are several methods you can employ to attempt to repair the file and recover your precious data.
This comprehensive guide will show you how to repair corrupted Excel file with all the knowledge and steps. We'll delve into both built-in Microsoft Excel repair functionalities and explore advanced data recovery techniques.

Table of Contents
Part 1: Possible Reasons for A Corrupted Excel File
Part 2: Things to Check Before Repairing Corrupted Excel File
Part 1: Possible Reasons for A Corrupted Excel File
While encountering a corrupted Excel file can be frustrating, comprehending the potential causes empowers you to take preventative measures and approach recovery with a clearer strategy. Here's a breakdown of some common culprits behind Excel file corruption:
Power outages, system crashes, or even accidentally closing unsaved files can disrupt Excel's saving process and corrupt your data.
In rare cases, glitches within Excel itself during saving, editing, or complex calculations can lead to corruption.
Failing storage devices can develop bad sectors where your Excel file resides, making it inaccessible or corrupted.
For shared files, network problems can disrupt saving and potentially corrupt the file.
Power outages or surges can interrupt saving, leading to corruption. Use a surge protector for safety.
Viruses or ransomware can damage or corrupt your files.
Very large and complex spreadsheets with intricate formulas are more prone to corruption, especially during saving or calculations.
Part 2: Things to Check Before Repairing Corrupted Excel File
Before delving into repair procedures for your corrupted Excel file, a quick inspection and some preventative measures can save you time and frustration. Here's what to do first:
Check for Backups: Backups are lifesavers! If you have a recent backup of your Excel file, restoring it is the fastest and most reliable solution. Utilize cloud storage services like OneDrive or Google Drive for automatic backups.
Simple Attempts: Sometimes, a minor glitch might be the culprit. Try opening the file again or restarting your computer. These simple steps can often resolve the issue.
Identify the Problem: Was the file accessible earlier? Did a specific action (saving, editing, etc.) seem to trigger the corruption? Noting any unusual behavior might provide clues for potential repair strategies.
Part 3: 6 Quick Ways to Repair Corrupted Excel File
1 Use Excel Built-in Feature to Repair Damaged Excel
Excel offers a built-in repair functionality designed to address common corruption issues. Consider it your first line of defense in recovering your precious data. Here's a step-by-step guide to utilizing this handy feature:
Open the Microsoft Excel software on your computer.
Click the "File" tab and then select "Open."
In the file explorer window, browse to the location of your corrupted Excel file.
Click the dropdown arrow next to the "Open" button. A menu will appear, select "Open and Repair."
Excel presents two repair options, each tailored to different scenarios:
Repair: This attempts to recover as much data and formatting from the corrupted file as possible. It's the recommended first choice for most situations.
Extract Data: If "Repair" fails, you can try "Extract Data." This option prioritizes salvaging core values and formulas from the file, even if formatting is lost. This can be useful if the data itself is the primary concern.
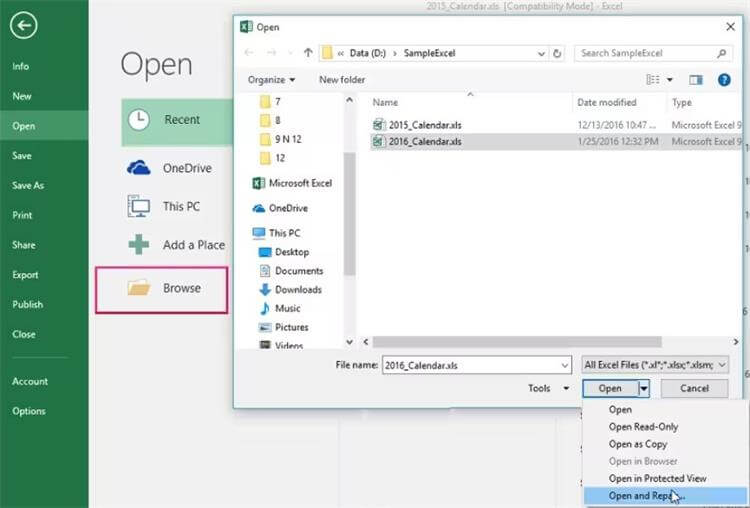
The repair process creates a new, repaired copy of the file, leaving the original corrupted file untouched. This ensures you always have a fallback option if the repair is unsuccessful.
2 Change Excel File Type
Excel files can be like picky eaters. Sometimes, older Excel files (.xls) don't work well with newer versions of Excel (.xlsx), or vice versa. This can cause them to act strange. We can try changing the file format to see if Excel recognizes it better. Think of it like putting on a different outfit!
Open File Explorer, and click the "View" tab at the top of it.
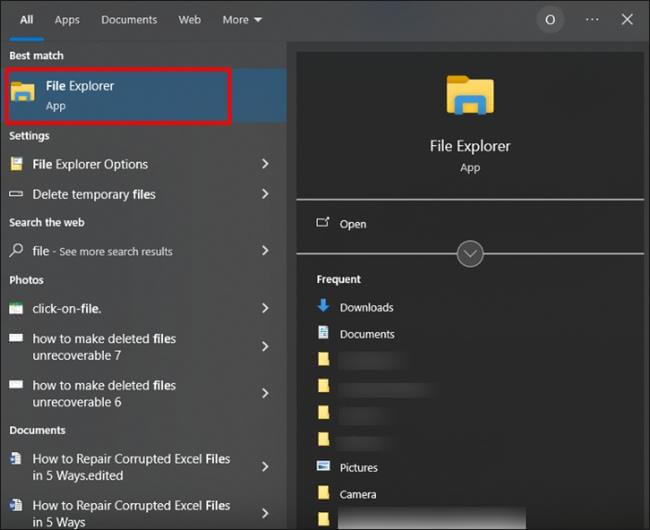
In the "Show/hide" section, check the box next to "File name extensions". This will show you the file type (like .xls or .xlsx) for each file.

Go to where your corrupt Excel file is stored and select the file.
Click on the file and then click on Key F2, which is the quick access to rename the file.
Look at the end of the file name, where it says ".docx" or something similar. Delete those letters and replace them with ".xlsx" (common Excel format).
If ".xlsx" doesn't work, try ".xls" or ".html" instead.
A message might pop up asking you to confirm the change. Click "Yes" to save the new format.

Double-click the file to try opening it in Excel. If it works, then your file is cured!
If you used ".html" as the format, it might open in a web browser. Don't worry! Drag this file onto the Excel icon on your screen. Then, save the opened file as a new ".xlsx" file.
For minor issues, these 2 ways often provide a swift solution. However, for extensively corrupted files, you might need to explore advanced recovery techniques.
3 Use iSeeker to Repair Excel File on Windows
In case the Excel file is seriously damaged and cannot open after using the above methods, then you can try a professional recovery tool WooTechy iSeeker to help you recover corrupt files on Windows effectively.
With iSeeker, you can recover damaged or corrupt files including Excel, PowerPoint, and Word with a few clicks. Whatever the reasons, it can restore your files to what it was perfectly.
Free Download
Secure Download
How to Use iSeeker to Repair Excel Files?
Step 1. Open iSeeker and click on “More Tools” on the interface to open the recovery toolkit. Then Select "File Repair."
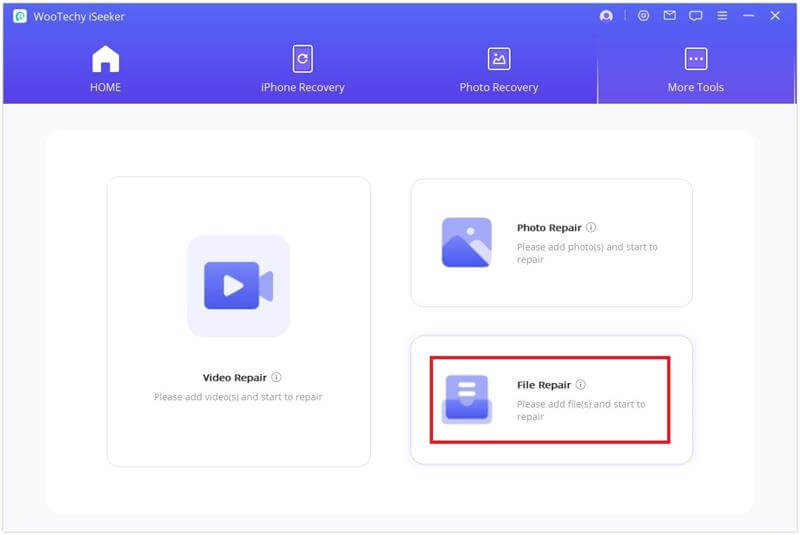
Step 2. At this time, you will be asked to download a package to use this feature. Rest assured for it's completely safe. Once done, Click "File Repair" again to upload the corrupted Excel file. If you have different formats of files to repair, just upload them all together.

Step 3. Wait for the Excel file to be uploaded and then click on “Repair” when it’s done.

Step 4. Once the recovery process is completed, a pop-up message will notify you with a "Success" sign. Then click on “Save as” button to save the recovered Excel file to your preferred location.

4 Use Microsoft Office Tool to Repair Corrupt Excel File
While the built-in Excel repair functionality is a powerful first approach, there's another option within your Microsoft Office arsenal: the Microsoft Office Repair Tool. This tool can address broader issues within the entire Office suite that might be contributing to the Excel file corruption. Here's how to utilize it:
Navigate to your Start menu and locate "All Programs."
Within "All Programs," find the "Microsoft Office" folder and then select "Microsoft Office Tools."
Choose "Microsoft Office Application Recovery" from the available tools.
A dialog box will appear. Select "Microsoft Office Excel" to focus the repair process on the Excel application.
Click on "Recover Application." This process might take a few minutes as the tool repairs potential issues within the Excel program.
The tool might prompt you to "Send Report To Microsoft." The decision is yours, but sending a report can help Microsoft identify and address broader software issues.
Once the repair is complete, the tool will close the current Excel instance and restart it. Upon relaunch, you might see a list of recently recovered Excel workbooks, including your potentially repaired file.
5 Recover A Temporary Save on Windows
Excel might automatically save backup versions of your file while you work. These backups are called "recovery versions". If your main Excel file gets corrupted, you might be able to use a recovery version to get some of your work back.
However, Excel doesn't always save these backups at the perfect moment. It's possible that the latest recovery version won't include all the changes you made before the corruption happened. In the worst case, there might not be any recovery versions available at all.
Open File Explorer. (It might be called "Windows Explorer" on some computers.)
Click on the "View" tab.
In the "Show/hide" section, check the box next to "Hidden items". This lets you see hidden folders like the one containing unsaved Excel files.
Navigate to your C drive (usually labeled "OS (C:)") at the This PC section.
Double-click "Users" folder > "Username" folder" > AppData" folder > "Local" folder > "Microsoft" folder > "Office" folder > “UnsavedFiles" folder.
Click the Excel file whose name matches the corrupt one.
Then change the Excel file's extension using Method 2.
Double-click to open the file.
If the file opens correctly and it's your lost work, press Ctrl+S on your keyboard. This will prompt you to save the file.
In the save window, browse to a location on your computer where you want to save the recovered file.
Once you've chosen a filename and location, click Save.
Note
Don't save the recovered file over the corrupted file you were working on. Choose a completely new filename to avoid losing any data.
6 Remove Unwanted Add-ins
faulty add-ins in Excel can sometimes cause file corruption. Removing them might be the fix you need! Here's how to remove them and potentially fix your corrupted file:
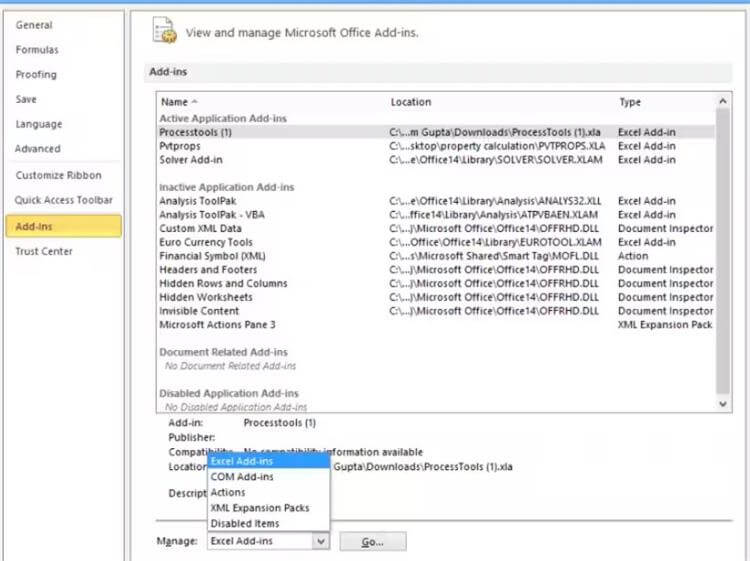
Open Microsoft Excel. Click the File tab, then navigate to Options.
In the Options window, look for the Add-ins section on the left sidebar.
Here you'll see a list of add-ins installed in your Excel.
Select an add-in you suspect might be causing problems.
Click the "Go" button next to "Manage Add-ins". (You can also access this menu directly by selecting "Manage Add-ins" from the dropdown menu.)
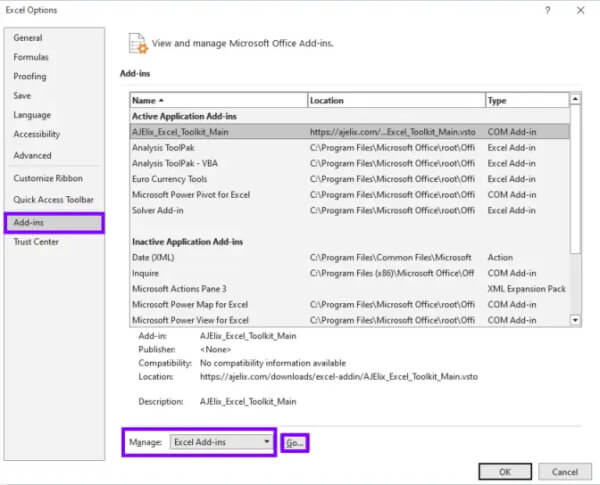
A new window will appear listing all your add-ins.
Choose the unwanted add-in and click "Remove".
Many users recommended. A professional way to repair corrupted Excel file with a click.
Free Download
Secure Download
Part 4: How to Enable Auto-Save in Excel?
AutoSave is a lifesaver! It automatically saves your Excel workbook at regular intervals, protecting you from data loss in case of unexpected crashes or power outages. Here's how to enable it:
Launch Microsoft Excel and click the "File" tab in the top left corner of the window.
Within the File menu, locate and click on the "Options" button. This will open a new window with various Excel settings.
In the Options window, look for the "Save" section on the left sidebar. Click on it to reveal the save-related settings.
Look for the option labeled "Save AutoRecover information every".
In the adjacent box, enter a desired frequency for saving backups (e.g., type "10" for every 10 minutes).
Check the box next to "Keep the last autosaved version if I close without saving". This ensures you have a backup even if you accidentally close the file without saving explicitly.
Once you've set your preferred AutoSave interval and (optionally) enabled keeping the last saved version, click "OK" to confirm the changes and activate AutoSave.
Conclusion
Excel file corruption can be a nerve-wracking experience. However, by following the steps outlined in this comprehensive guide, you'll be well-equipped to tackle corrupted files and attempt data recovery. Remember, the success rate hinges on various factors, including the severity of the corruption and how quickly you act.
Should you face a data recovery scenario beyond the scope of this guide, don't hesitate to seek assistance from data recovery professionals. In this case, we recommend WooTechy iSeeker, whose expertise can prove invaluable in retrieving your critical data.
Free Download
Secure Download


