Have you ever found yourself staring at your locked iPhone, unable to remember the passcode you once knew by heart? It's a frustrating situation, but it doesn't mean your iPhone is locked forever. In this guide, we'll walk you through how to wipe an iPhone without passcode effectively, allowing you to regain access and start fresh.
| Method | Apple ID Password Required | Requirements | Suitable Scenarios |
|---|---|---|---|
| iDelock Professional Unlocker | No | - A Computer - USB cable |
When you forgot screen passcode or Apple ID password and want a quick and easy unlock solution. |
| iCloud (Find My iPhone) | Yes | - Find My iPhone enabled - iCloud account credentials - Internet connection - Access to iCloud or Find My app |
When your iPhone is lost/stolen, or you want to wipe it remotely through iCloud. |
| iTunes | Yes | - Latest version of iTunes - USB cable - Apple ID and password |
When you have access to a trusted computer with iTunes and need to restore or reset your iPhone. |
| Recovery Mode | Yes | - Computer with iTunes/Finder - USB cable - Apple ID and password |
When the iPhone is unresponsive, or other methods (iTunes, iCloud) are not working. |
| DFU Mode | Yes | - Computer with iTunes/Finder - USB cable - Apple ID and password |
For severe software issues, iPhone bricking, or if Recovery Mode does not work. |
Part 1. What to Know Before Wiping Your iPhone
Before you start wipe your iPhone, there are some essential things to know:
1. Create a Comprehensive Backup
Losing your data can be a significant setback. Before wiping your iPhone, create a thorough backup of your contacts, photos, messages, documents, and other essential files. You can use either iCloud or iTunes to perform the backup.
2. Verify Your Apple ID and Password
Having access to your Apple ID and password is essential for various steps during the wiping process. And wiping your iPhone cannot wipe the Apple ID or its password. Ensure you have them readily available.
3. Check Carrier Restrictions
If your iPhone is carrier-locked, you might need to contact your carrier to unlock the carrier lock before wiping it. This will prevent the device from being locked to a specific network.
4. Disable Find My iPhone
If you plan to sell or give away your iPhone, disabling Find My iPhone can be helpful for the new owner. However, keep in mind that this will prevent you from tracking your device remotely in case it's lost or stolen.
Part 2. Wipe iPhone without Passcode with a Professional Unlocker
If you're locked out of your iPhone and don't want to struggle with more technical methods like iTunes or Recovery Mode, using a professional unlocker is the easiest way to wipe your iPhone without a passcode. In this case, we’d recommend WooTechy iDelock, which is an iOS passcode unlocker for iPhone, iPad, and iPod touch. With it, you can remove any kind of screen locks on your iPhone. During the process, your device will be restored to factory settings and the passcode will be removed as well. What’s better is that you can remove Apple ID without password in a few clicks.
Key Features of WooTechy iDelock

75.000.000+
Downloads
- Simple and Fast: No need for prior technical knowledge or complicated steps.
- Bypasses Passcode Quickly: Unlike Recovery Mode or iTunes, which may require multiple attempts, iDelock is tailored to bypass the passcode efficiently, including 4/6 digit passcode, passwords, Face ID or Touch ID.
- Supports All iPhone Models: These tools usually support a wide range of iPhone models and iOS versions, including iOS 18.
- Complete Data Wipe: A professional unlocker not only removes the passcode but also wipes all the data on your iPhone, making it a full reset.
-
Free Download
Secure Download
How to Wipe iPhone without Passcode Using iDelock?
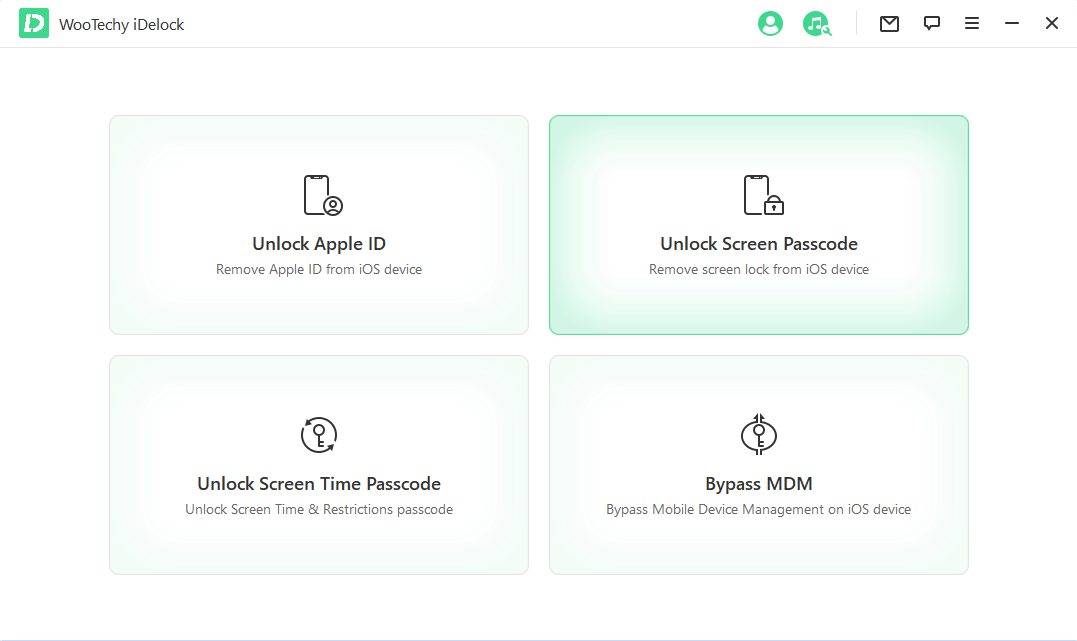
Step 1. Download iDelock the professional unlocking software and install it on your computer. Open it and choose Unlock Screen Passcode.
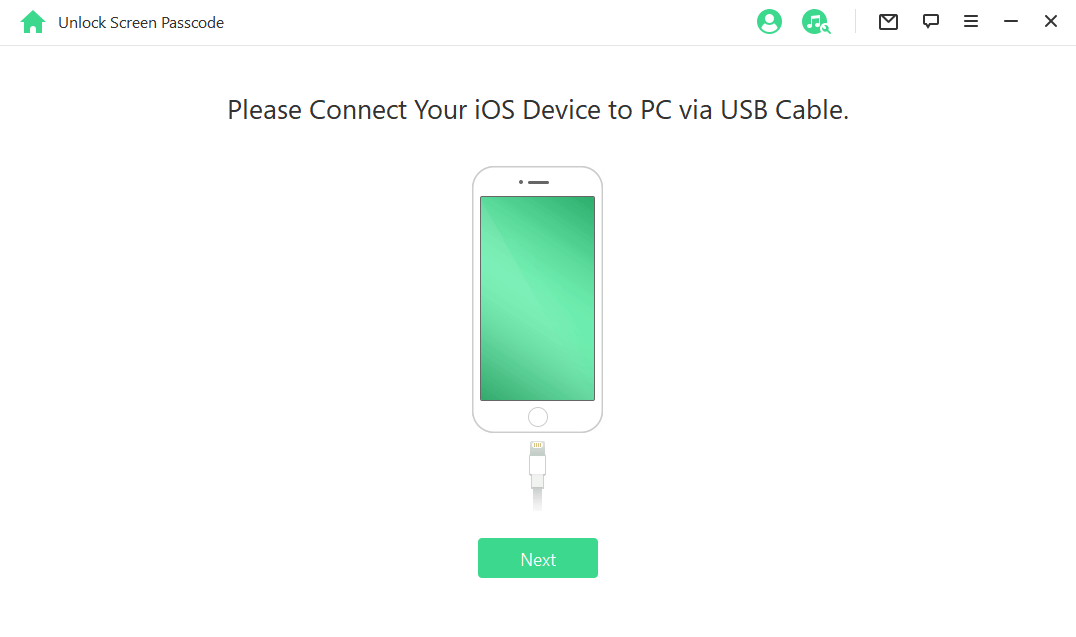
Step 2. Use a USB cable to connect your locked iPhone to the computer and click “Next”.
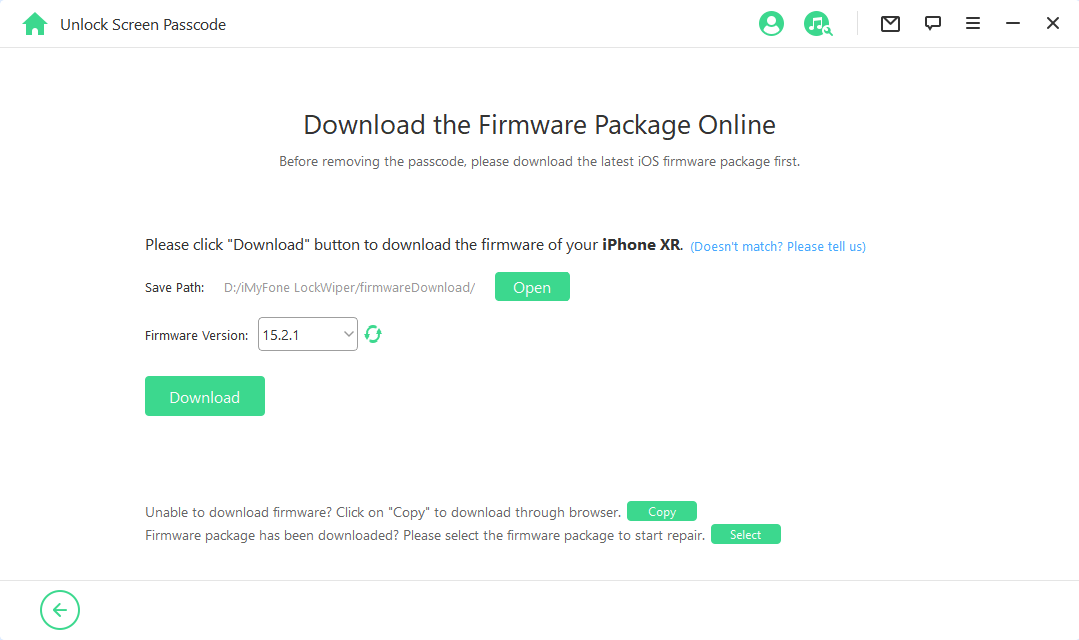
Step 3. iDelock will detect your device and prompt you to download the necessary firmware for your iPhone. Click “Download.”
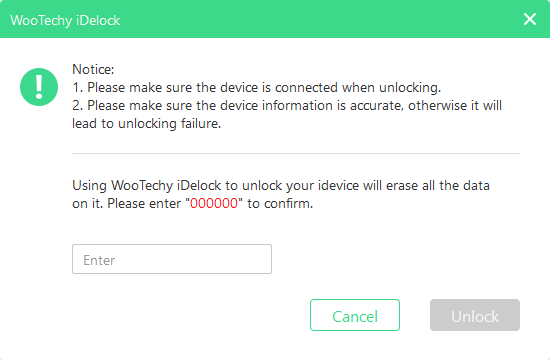
Step 4. Once the firmware is downloaded, the software will start wiping your iPhone. Click "Unlock." And then input “000000” to confirm the action. This process will remove the passcode and erase all data on your device.
After the wiping process is complete, your iPhone will restart and be reset to factory settings without passcode.
Part 3. Use iCloud to Wipe an iPhone Remotely
If you've enabled Find My iPhone on your device, you can use iCloud to remotely wipe your iPhone without needing the passcode. This method is especially useful if you’ve lost your iPhone or can’t physically access it, as it allows you to erase all the data and reset the device remotely from any computer or smartphone with an internet connection.
Open a web browser and go to iCloud.com. Log in with your Apple ID and password.
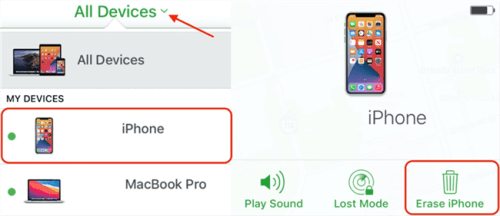
Once logged in, click on the Find iPhone option.
Click on All Devices at the top and select the iPhone you want to erase.
Click on Erase iPhone to initiate the remote wipe process. Confirm your choice when prompted.
After the process is complete, the iPhone will restart and be reset to factory settings.

- You don’t need physical access to your iPhone to erase it.
- You can bypass the passcode requirement by using iCloud’s remote wipe feature.
- This is an official Apple method, which is safe and compatible with all iOS devices.

- This method only works if you previously turned on Find My iPhone on the locked device.
- Your iPhone must be connected to the internet (Wi-Fi or cellular) for iCloud to send the erase command.
Part 4. Use iTunes to Wipe an iPhone without Passcode
If you’ve previously synced your iPhone with iTunes, you can use it to wipe your device and remove the passcode, even if you’re locked out. This method works best if you’ve connected your iPhone to the computer before and iTunes doesn’t prompt you for a passcode when it detects the device. Here’s how you can wipe your iPhone using iTunes.
Use the same computer you’ve previously synced your iPhone with.
Open iTunes (on Windows or macOS Mojave and earlier) or Finder (on macOS Catalina and later).
Connect your iPhone to the computer using a USB cable.
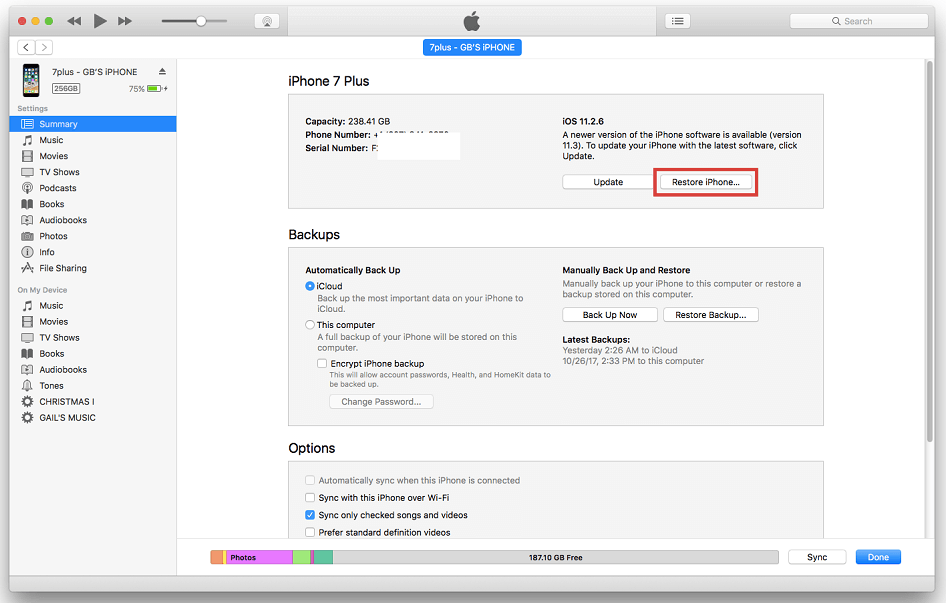
Once connected, click on the device icon in the upper-left corner of the iTunes window or Finder sidebar.
In iTunes or Finder, select the Summary tab from the left-hand menu.
In the Summary section, click on the Restore iPhone button. This action will prompt iTunes to erase your iPhone and install the latest version of iOS.
Confirm your choice by clicking Restore again in the pop-up message.

- iTunes is a free official Apple tool that can reset your iPhone without requiring external software.
- After wiping your iPhone, you can restore it from an iTunes backup if available, ensuring you don’t lose all your data.

- iTunes only works without a passcode if you’ve previously synced your iPhone with the computer.
If iTunes doesn’t recognize your iPhone and is still asking for a passcode and you don’t have it, you’ll need to put your iPhone into Recovery Mode to bypass the passcode.
Part 5. Use Recovery Mode to Bypass iPhone Passcode
If you haven't synced your iPhone with iTunes or enabled "Find My iPhone," using Recovery Mode is a reliable method to wipe your iPhone and bypass iPhone passcode. This method forces your iPhone into a state where iTunes can erase iPhone without passcode.
Connect your iPhone to your computer using the USB cable.
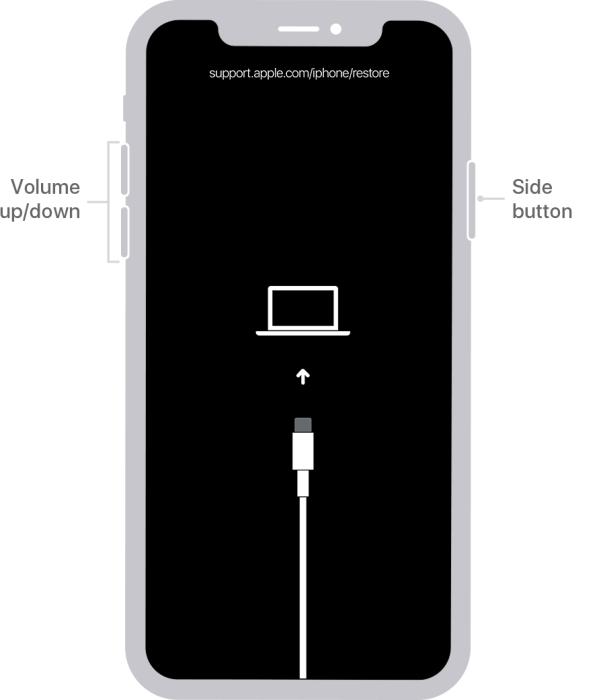
The exact steps to enter Recovery Mode vary depending on your iPhone model:
- For iPhone 8 or later: Quickly press and release the Volume Up button, then press and release the Volume Down button. Then, press and hold the Side (power) button until the Recovery Mode screen appears.
- For iPhone 7 or earlier: Press and hold both the Volume Down button and the Side button together until you see the Recovery Mode screen.
- iPhone 6s and earlier (including iPhone SE 1st Gen): Press and hold both the Home button and the Side/Top button at the same time until the Recovery Mode screen appears.
 >
>
iTunes should recognize your iPhone in Recovery Mode and display a message asking if you want to restore or update your iPhone.
Select the "Restore" option to erase your iPhone's data and restore it to its factory settings.
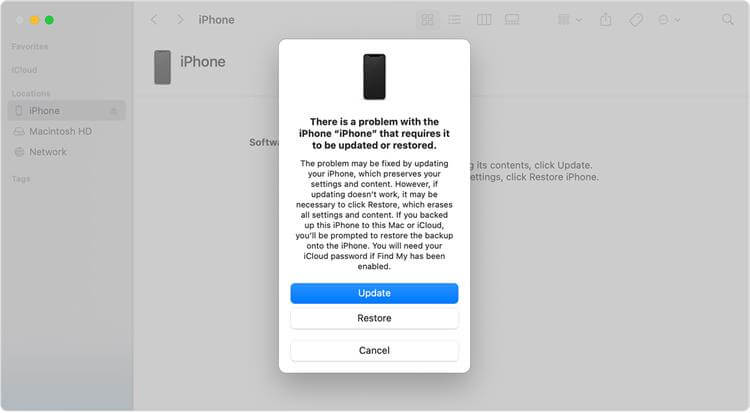
iTunes will download the latest iOS software for your iPhone and guide you through the restoration process.

- It can be used even if you’ve never synced your iPhone with iTunes or Finder before.
- This method doesn’t require “Find My iPhone” to be enabled.
- Recovery Mode is an Apple-approved process for resetting iPhones when they’re unresponsive or locked.

- The download and restore process might take some time.
- Your iPhone can get stuck in Recovery Mode.
Many users recommended. Enter/Exit Recovery Mode free in 1 click
Free Download
Secure Download
Part 6. Use DFU Mode to Wipe an iPhone
DFU Mode (Device Firmware Update) is the most comprehensive solution for wiping and restoring an iPhone. Unlike Recovery Mode, DFU Mode allows your device to interact with iTunes or Finder without loading the iPhone’s operating system (iOS). This method is particularly useful when other methods fail or if your iPhone is experiencing severe software issues that prevent it from functioning normally.
How to put your iPhone into DFU Mode?
Use a Lightning/USB-C cable to connect the iPhone to your computer. Make sure iTunes or Finder is open.
Turn off iPhone. The specific steps of entering DFU mode vary from iPhone models:
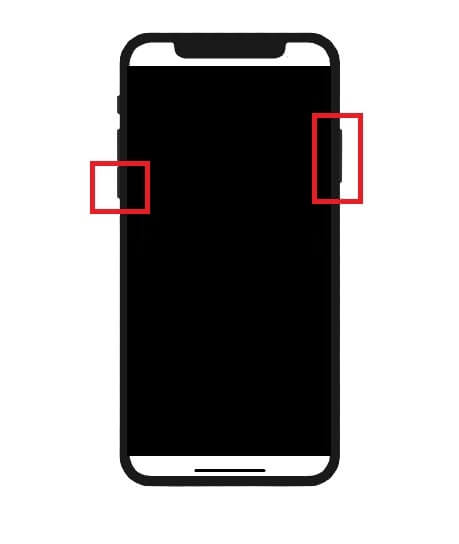
- For iPhone 8, iPhone X, iPhone 11 12, 13, 14, 15, or 16: Once the screen is black, continue holding the Side button and now press and hold the Volume Down button for 5 seconds. After 5 seconds, release the Side button but continue holding the Volume Down button for about 10 seconds. The screen should remain black if you're in DFU Mode. If you see the Apple logo, you’ll need to repeat the process.
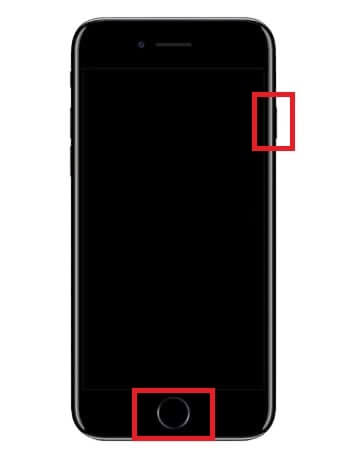
- For iPhone 7 and iPhone 7 Plus: Press and hold both the Side button and the Volume Down button for 10 seconds. After 10 seconds, release the Side button but keep holding the Volume Down button for another 10 seconds. The screen will remain black, signaling that you're in DFU Mode.
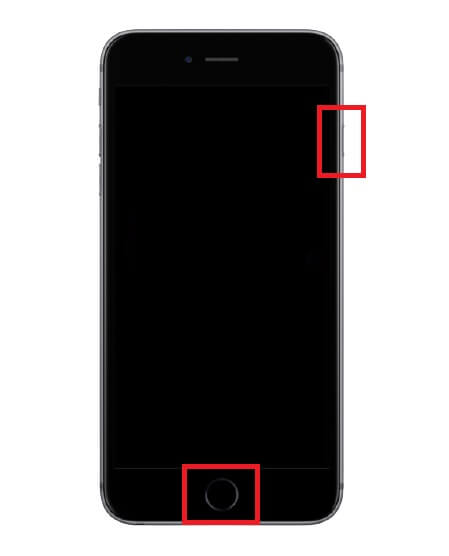
- For iPhone 6s, iPhone SE (1st generation), and Earlier Models: Once the screen goes black, press and hold both the Power button and the Home button together for 8 seconds. After 8 seconds, release the Power button but continue holding the Home button for another 10 seconds. The screen will remain black, meaning you're in DFU Mode.
iTunes or Finder should detect your iPhone in Recovery Mode (although the screen remains black). You’ll see a message saying the iPhone has been detected in Recovery Mode and that it must be restored before it can be used.

- DFU Mode is the ultimate solution for restoring and wiping an iPhone, which can resolve software problems that Recovery Mode cannot.
- Since DFU Mode bypasses the operating system, it does not require a passcode.
- DFU Mode not only wipes the iPhone but also allows for reinstalling the firmware, providing a fresh version of iOS.

- DFU Mode completely wipes your iPhone, so make sure you have a backup if you want to restore your data afterward.
- DFU Mode is typically used when the iPhone is experiencing severe software problems, such as boot loops or failed iOS updates.
Conclusion
Wiping an iPhone without passcode is possible through various methods, including professional unlocking tool WooTechy iDelock, iTunes, iCloud, Recovery Mode, and DFU Mode. Depending on your situation and the tools you have available, one of these methods should help you regain access to your device and erase all its data.
Free Download
Secure Download


