User Guide of iMoveGo Android App
How to change Android location without a computer? How to spoof Pokemon GO location without PC? Here are the guides!
Depending on your operating system, you can choose:
- WooTechy iMoveGo Android App User Guide
- WooTechy iMoveGo iOS App User Guide
- WooTechy iMoveGo PC User Guide (iOS System)
- WooTechy iMoveGo PC User Guide (Android System)
Part 1. Mode Selection
Click the button below to download and install WooTechy iMoveGo App on your Android device.
Launch the iMoveGo app. You’ll see two different location-changing modes. Choose the one that best suits your needs.
Mode 1: General Mode (Default Mode)
This mode is ideal for most location-based applications such as Find My, Facebook, WhatsApp, Tinder, Life360, etc.
Steps to enable General Mode:
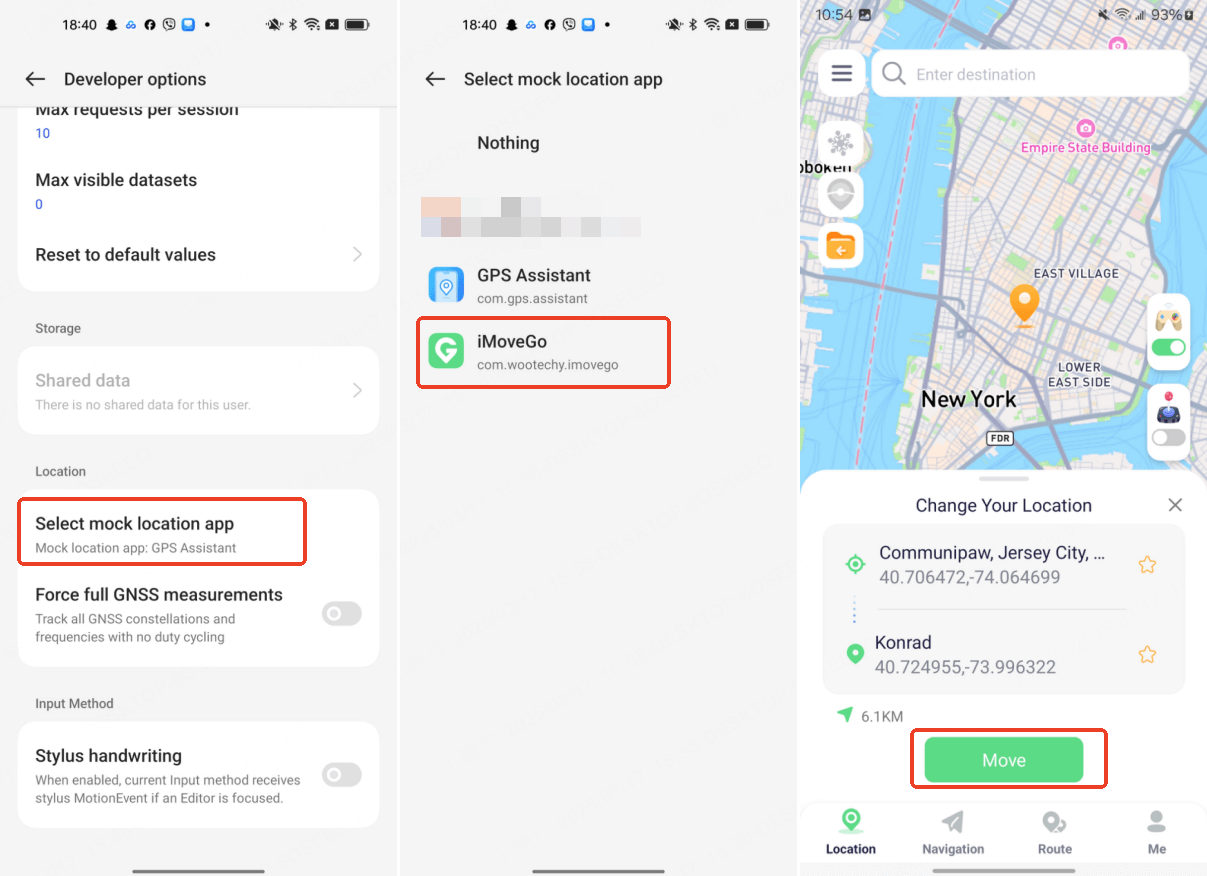
- Go to Settings > About phone > Software information. Tap Build number seven times to unlock Developer options.
- Go to Developer options > Select mock location app, then choose iMoveGo.
- Once completed, you can now modify your location freely.
Mode 2: Game Mode
This mode is specifically designed for changing your location in AR games such as Pokémon GO, Monster Hunter Now, and Dragon Quest.
Steps to Enable Game Mode:
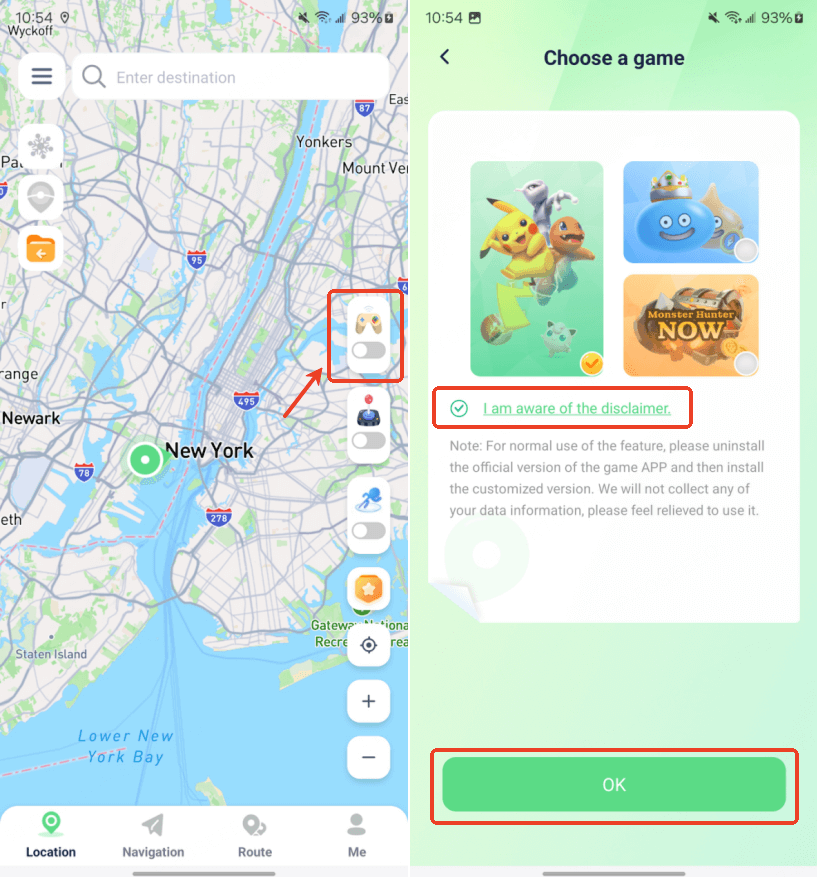
- Tap the Game Mode button on the right sidebar or access it from the side menu.
- Select your game from the game selection page, then tap OK.
- Follow the instructions to install the customized app. Ensure to change the location to your desired destination before launching the game to avoid detection.
Game Mode only affects the selected game—your location in other apps remains unchanged.
Part 2. Change GPS Location with Single Point Teleport
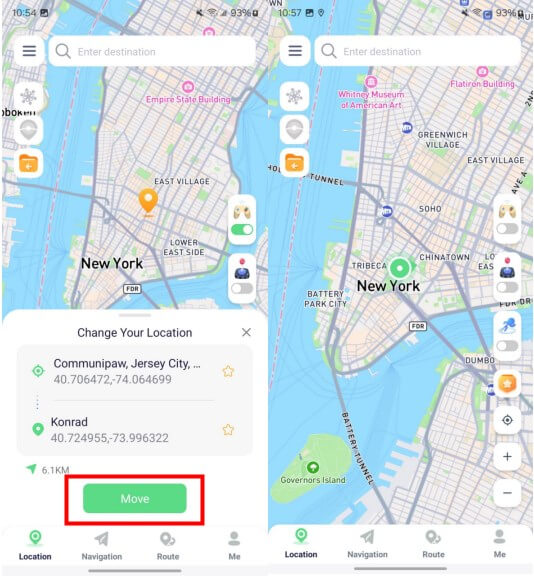
Long press on the map or enter an address or coordinates in the search bar at the top.
Once the destination panel appears, click the “Move” button to instantly change your GPS location to the selected point.
Part 3. Mock Location with Joystick
The Joystick Mode allows smooth, real-time movement for gaming and other applications. To enable the Joystick, activate the icon from the right sidebar to bring up the control panel.
Use the joystick to move in any direction at customized speeds. You can choose from walking, cycling, or driving speeds for a more natural experience.
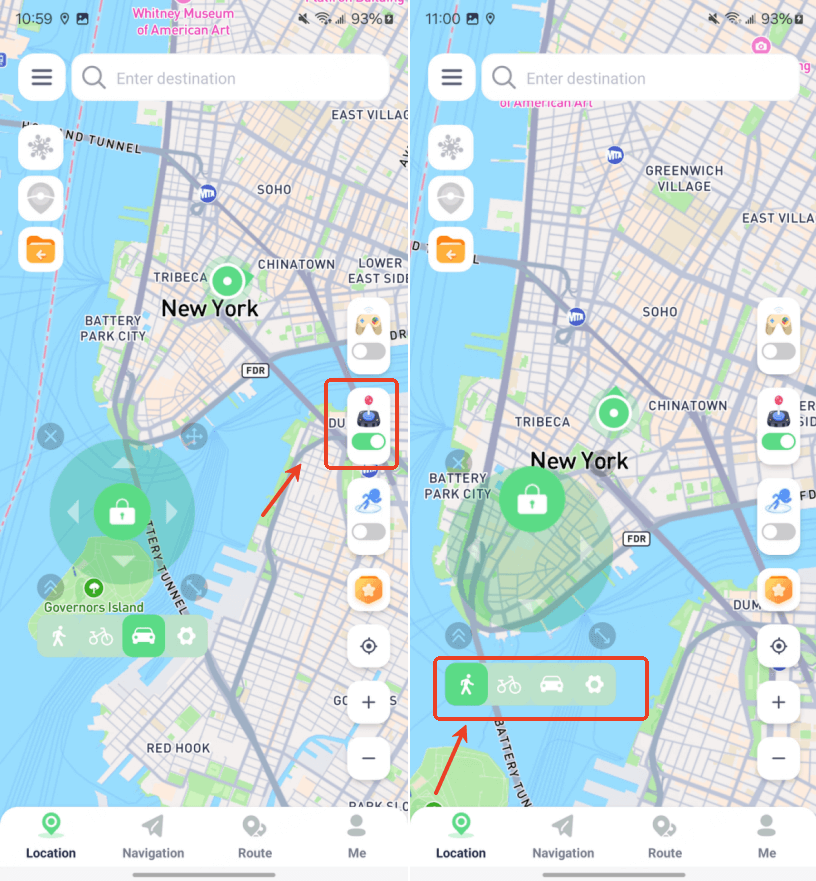
For the best gaming experience, set the joystick speed to walking mode to mimic real-world movement and avoid detection.
Part 4. Simulate GPS Movement with Jump Teleport Route
This mode allows you to teleport between multiple locations step by step.
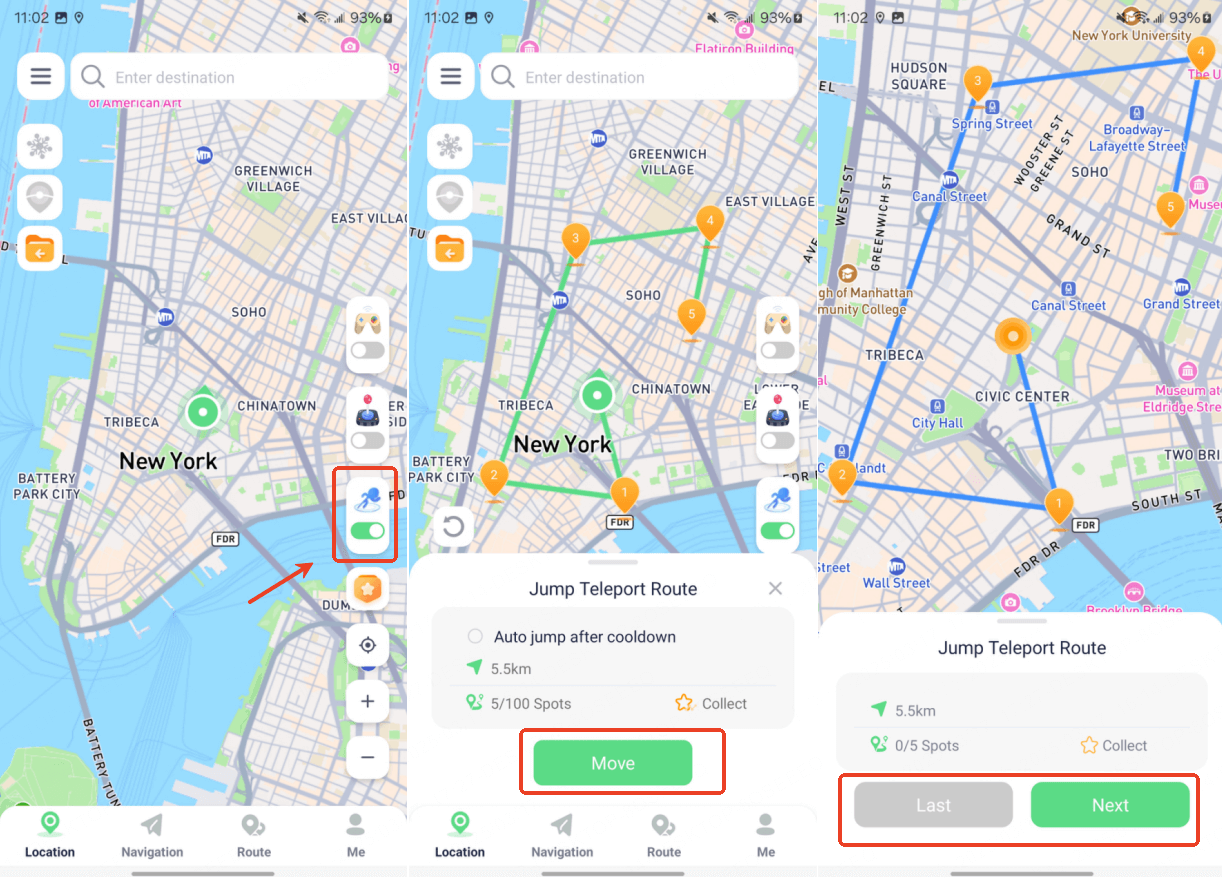
Activate Jump Teleport Mode from the right sidebar. Select multiple locations on the map. Click the “Move” button to teleport to the next location. You can switch freely between previous and next points.
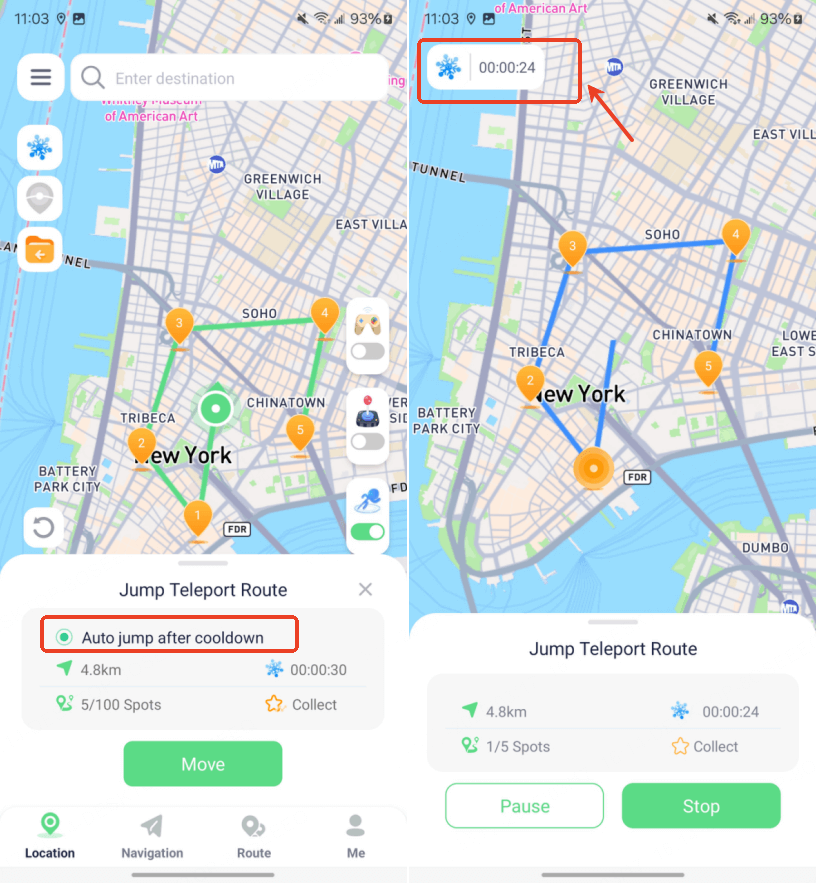
Enable “Auto jump after cooldown” to automatically teleport to the next point once the cooldown timer ends.
Part 5. Simulate GPS Movement with Two-Point Navigation Route
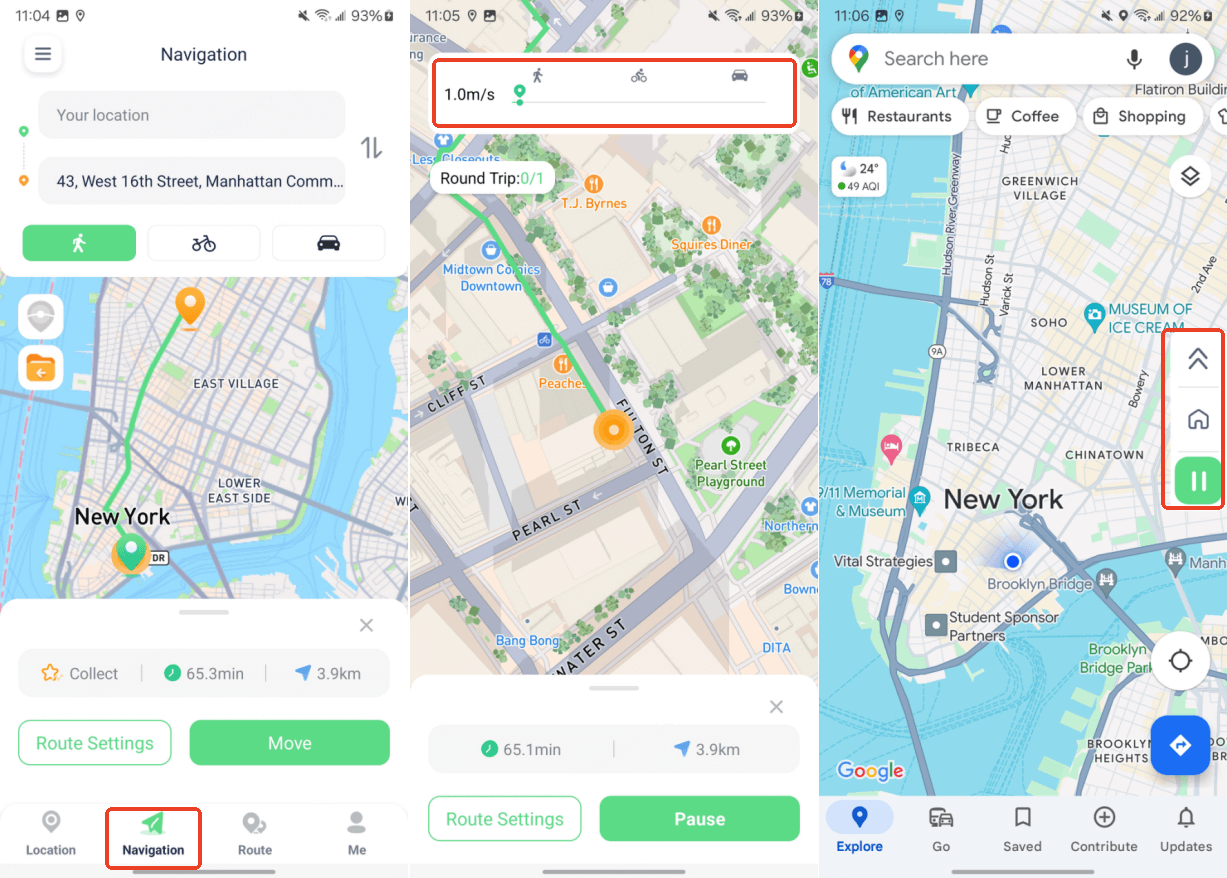
Click the “Navigation” tab. Set your route – Choose a start and end point, then select a travel speed. Click “Move” to begin the navigation.
Use the speed bar slider to modify movement speed during the simulation. You can pause or end the route at any moment.
Tip: Enable background permissions to pause and resume the route while using other apps.
Part 6: Custom Routes with Multi-Point Route
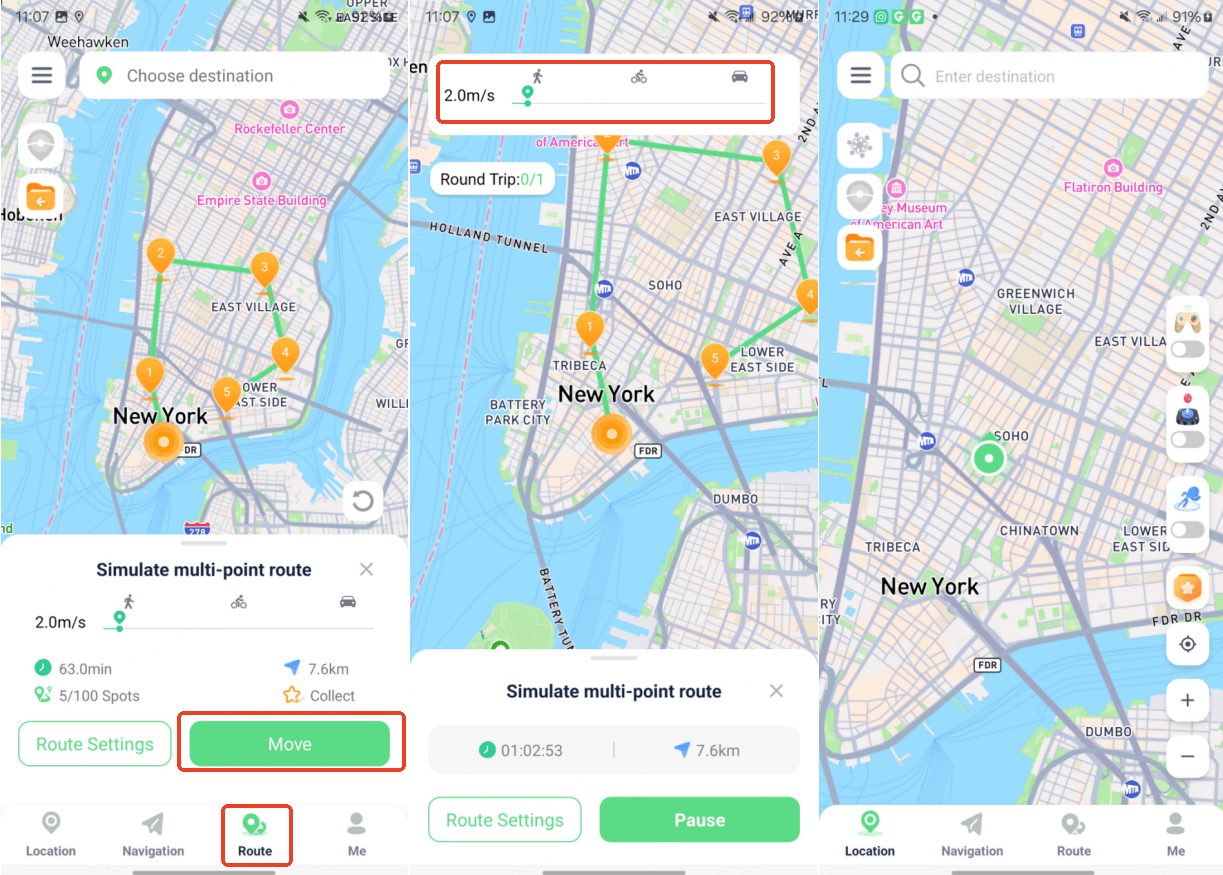
Click the “Route” tab to enable Multi-Point Mode. Select multiple destinations on the map. Click “Move” to begin following the selected route.
Adjust movement speed using the slider at any time. Pause or stop the simulation whenever needed.
Tip: Enable floating window permissions for easy route control in the background.
Part 7: More Special Features of Wootechy iMoveGo
Feature 1: Favorites and History
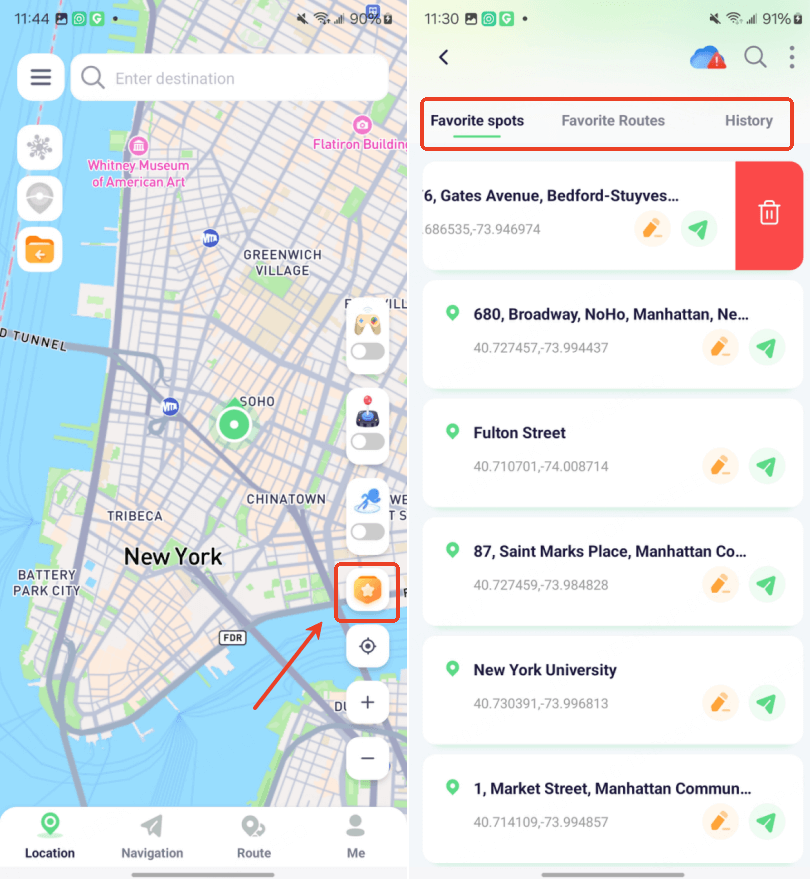
Data Management: Click "Favorites" on the right sidebar to access saved locations, routes, and history. You can rename, navigate to, apply, or delete saved spots and routes. Use the search bar at the top to quickly find specific data.
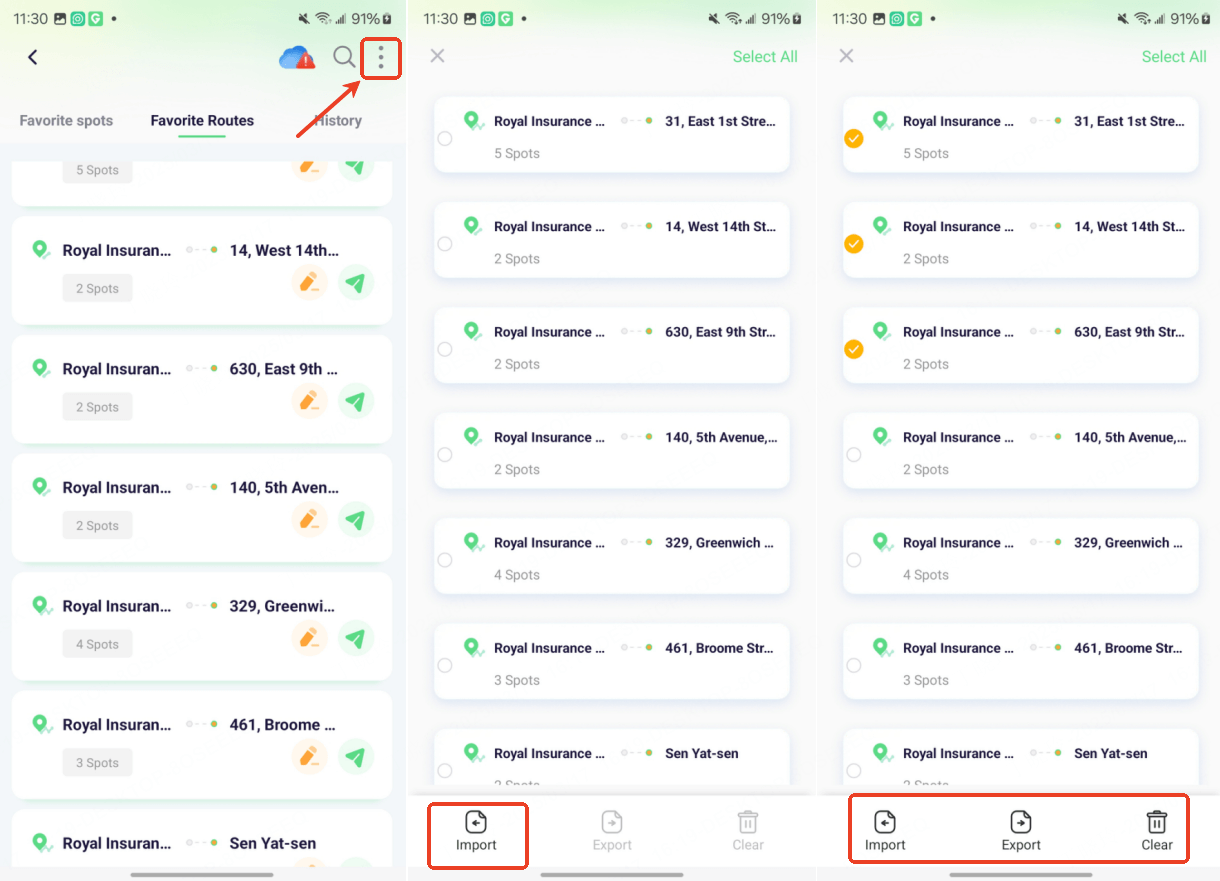
Import and Export GPX Files: In the "Favorite Routes" list, click "Manage" to export selected routes as GPX files or import GPX files from your device.
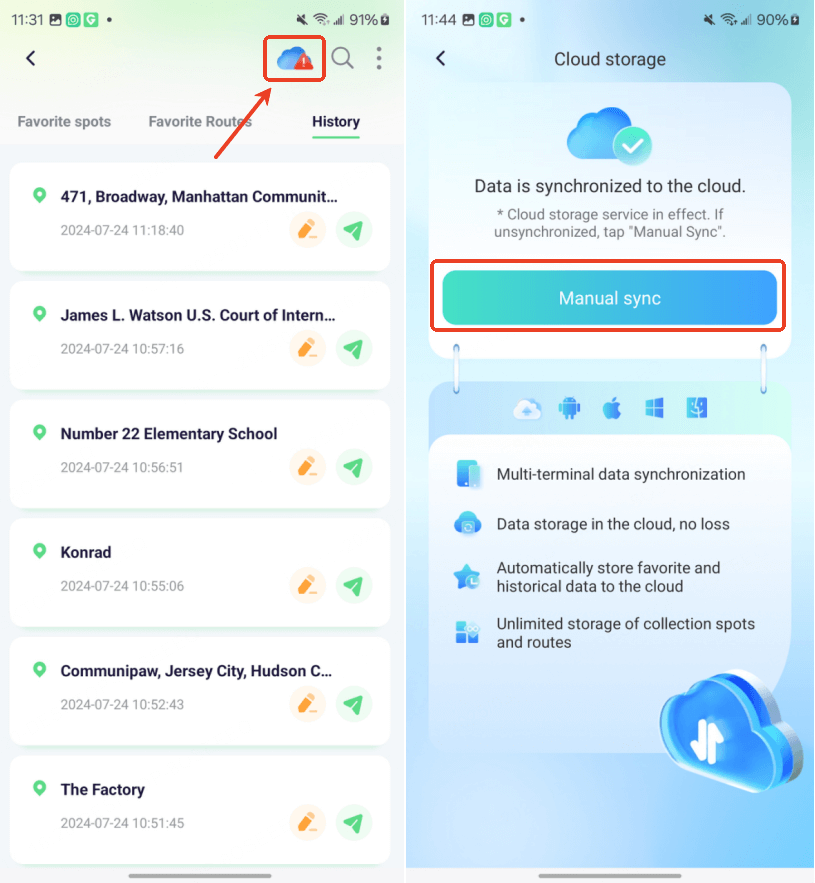
Cloud Storage Data: Click "Cloud Storage Service" to check if your data is synced. If unsynced, click "Manual Sync" to back up your favorites and history.
Feature 2: Cooldown Timer (Game Assist)
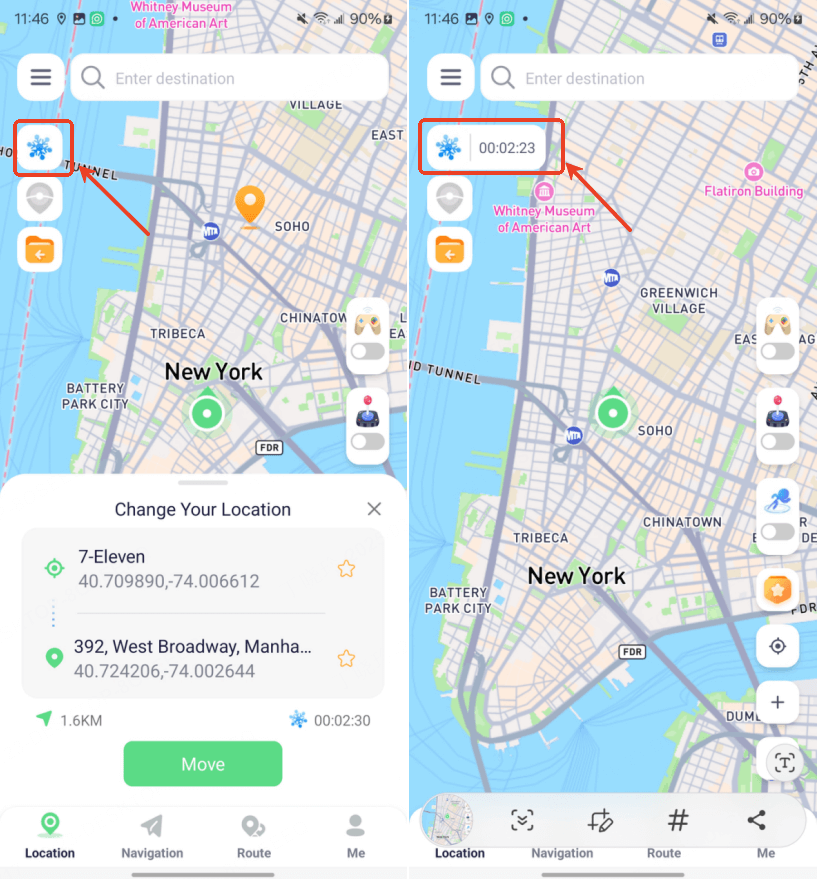
Activate the cooldown timer from the left sidebar to prevent detection in location-based games. Avoid performing in-game actions like catching Pokémon or spinning PokéStops until the countdown ends.
When teleporting, the cooldown timer calculates the waiting period based on travel distance and starts the countdown.
To disable the cooldown timer, click the button again.
Learn More: [Pokémon GO Cooldown Chart to Avoid Soft Ban]
Feature 3: Live Atlas (Game Assist)
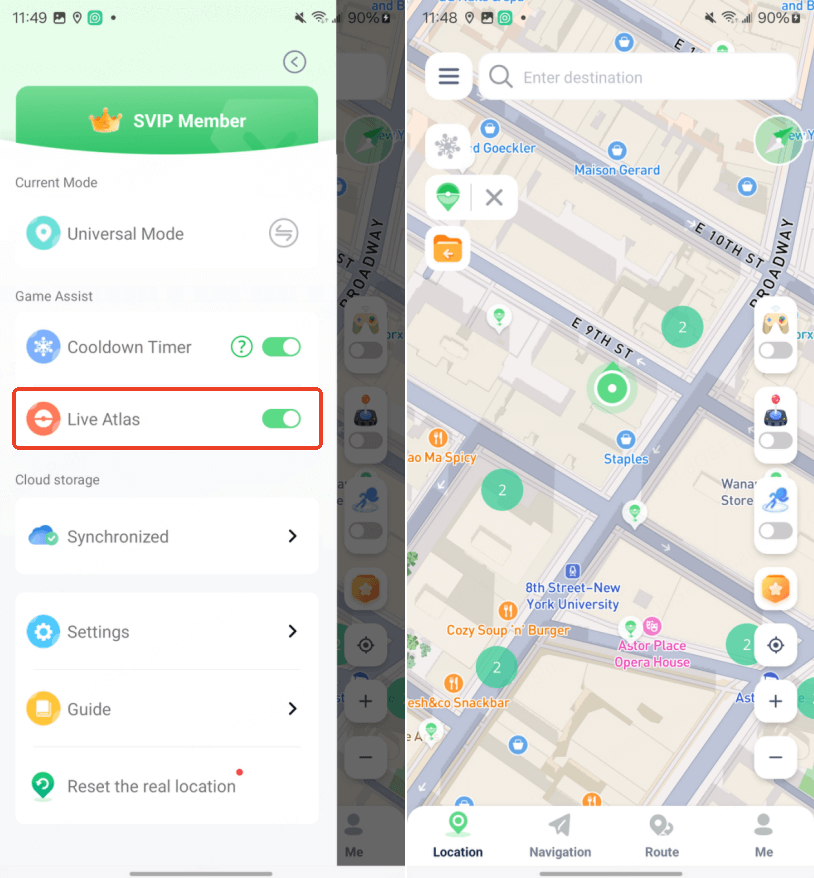
Toggle "Live Atlas" on the left sidebar to display PokéStops and Gyms within a 2 km radius. Click the refresh button to update the map with the latest locations. Visit PokéStops to collect items or Gyms for battles.
Swipe left to open the side drawer and navigate to settings. Enable "Favorites Atlas" to display saved spots on the map.
Feature 4: Pokédex (Game Assist)
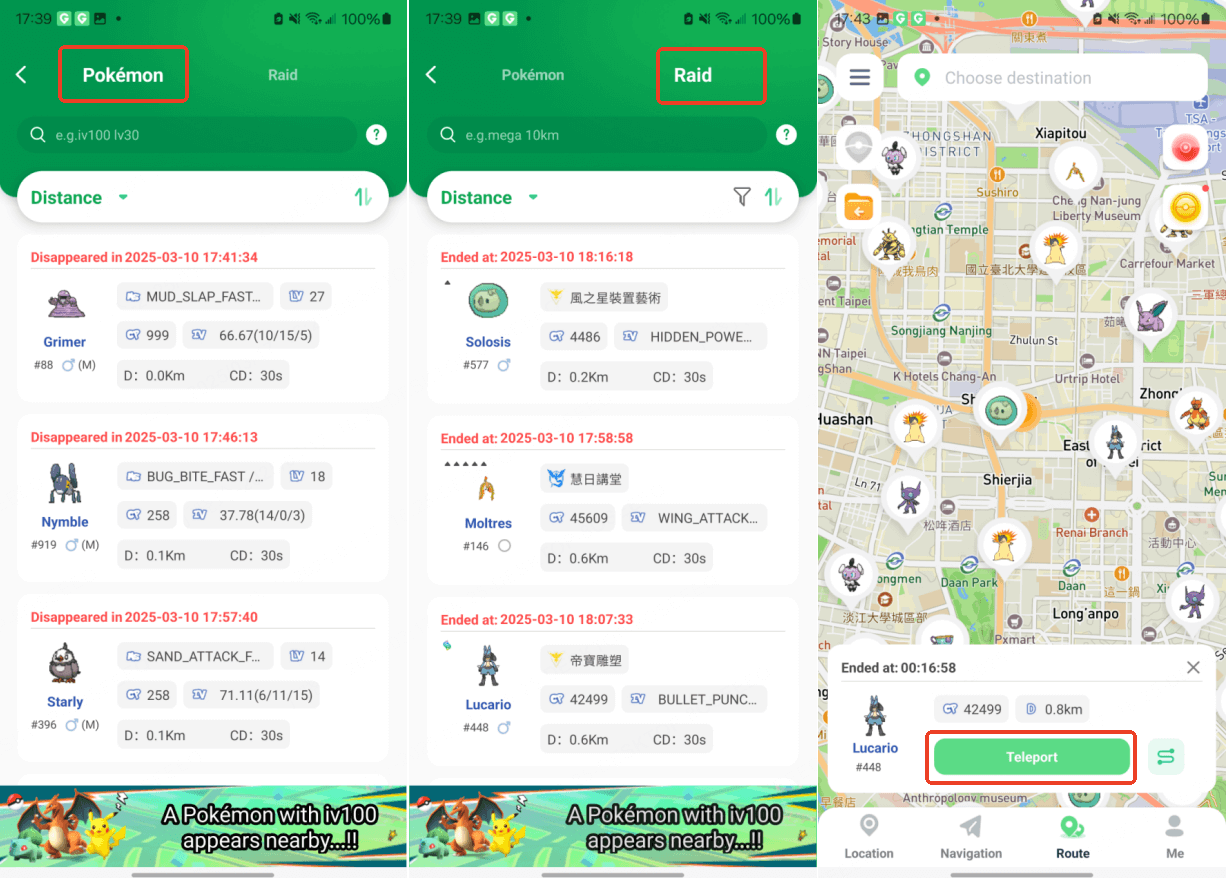
In Game Mode, view detailed Pokémon and raid information, including the latest updates. Search for Pokémon using filters like name, ID, IV, CP, level, etc.
Feature 5: Round Trip Route
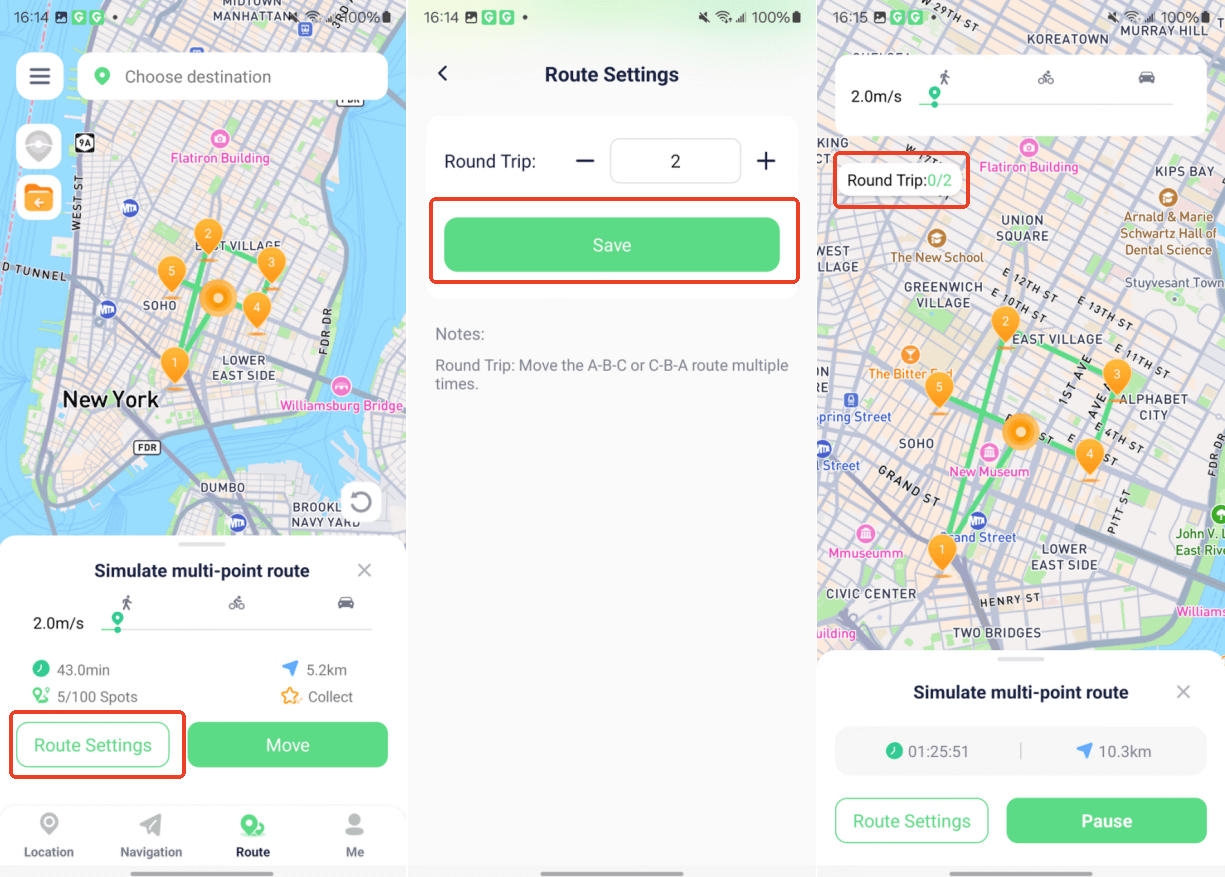
To customize the number of times a route is repeated, access the route settings for two-point or multi-point navigation. For instance, if you set a route from A to B to C to repeat twice, the path will be completed as A-B-C-B-A.
Feature 6: Import Route
Click the import button on the left sidebar to import a GPX file from your device. Once imported, the route will be applied to the map.
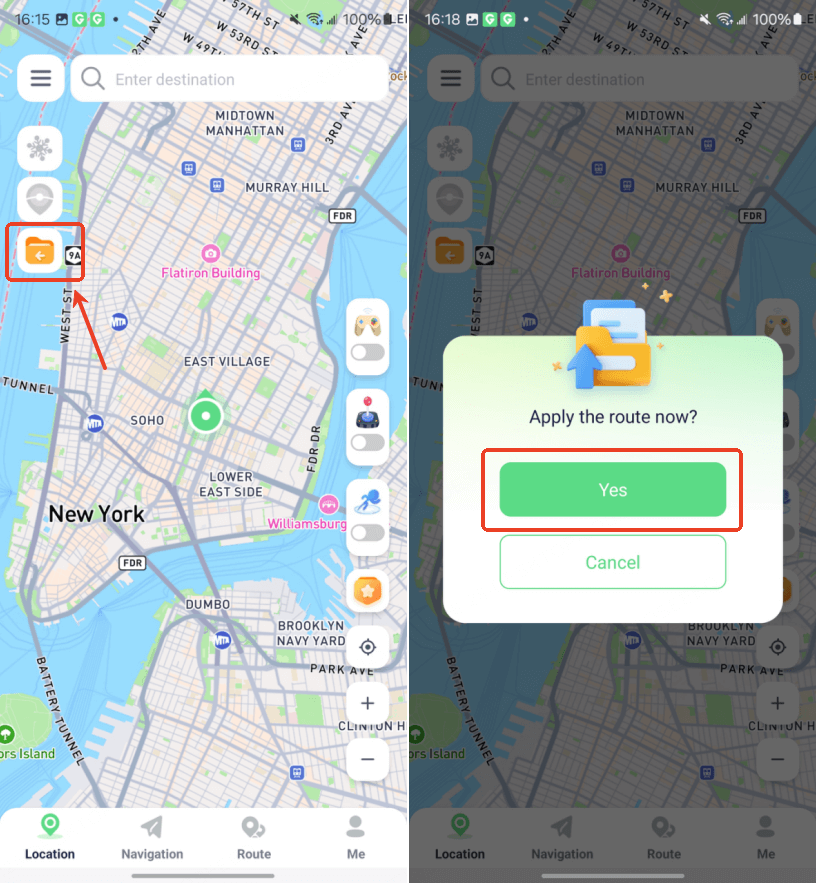
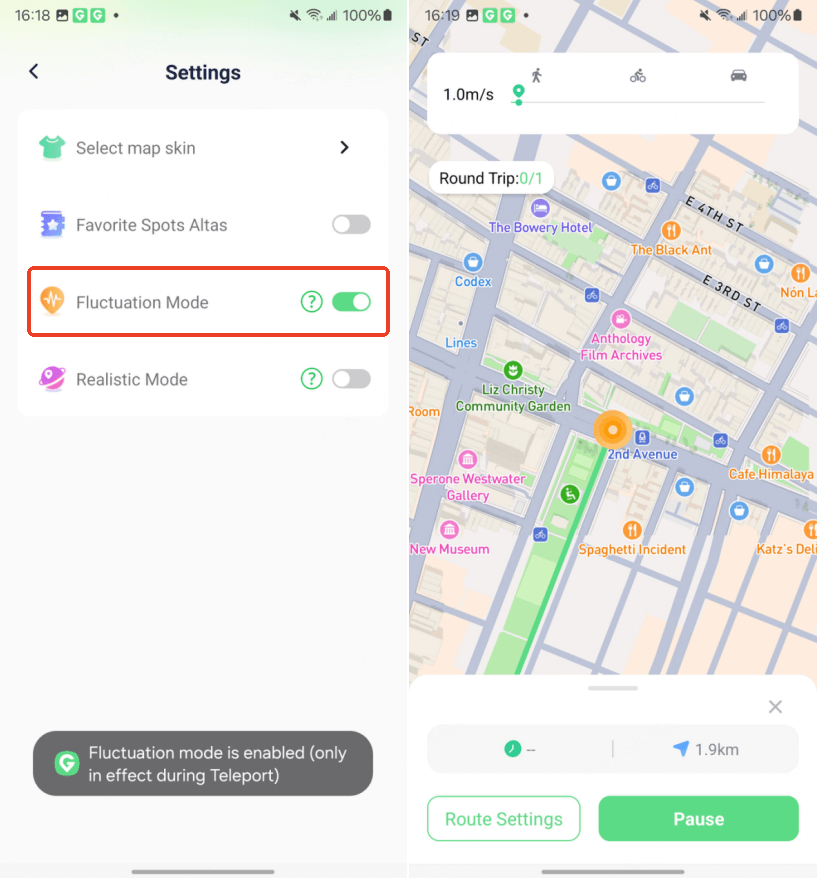
Feature 7: Fluctuation Mode
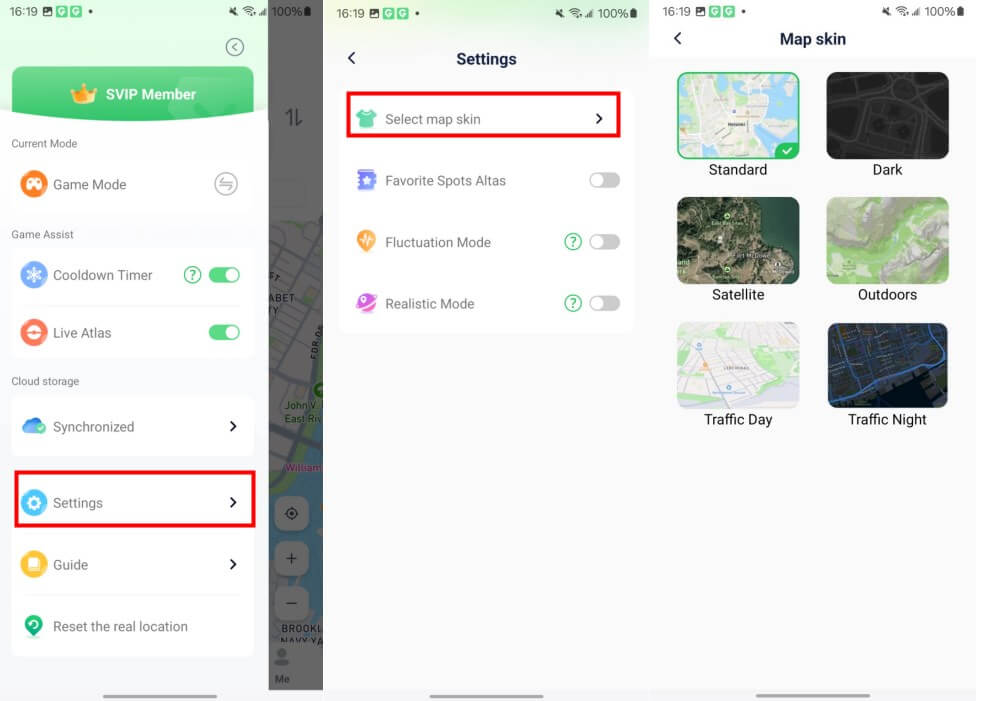
Swipe left to open the side drawer, and in the settings, you can see the Fluctuation Mode switch. Enable it to slightly alters your virtual location within a few meters in teleport mode, reducing the risk of detection.
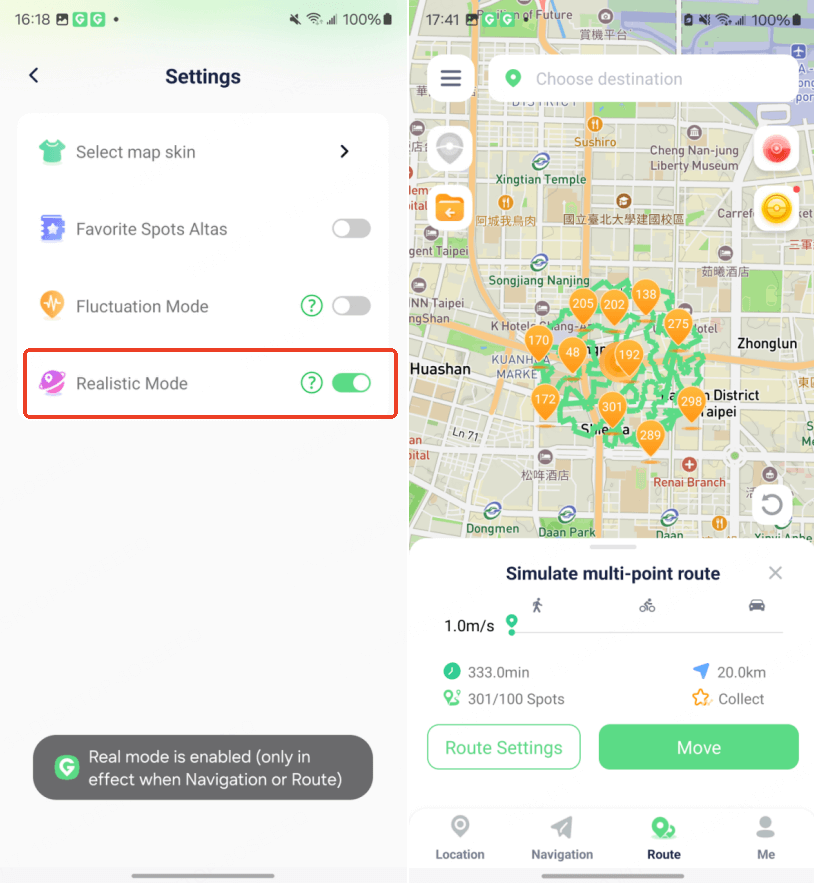
Feature 8: Realistic Mode
Similar to Fluctuation Mode, this feature randomly adjusts your virtual location within a few meters. Activate it from Settings in the side drawer to make movements appear more natural in teleport mode.
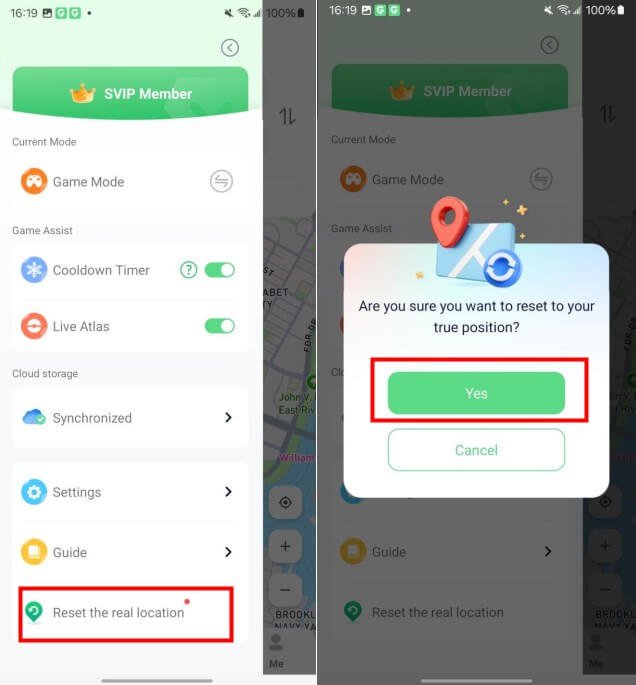
Feature 9: Reset Location
Swipe left to access the side drawer, select the "Reset Real Location" option to reset your device's location.
Feature 10: Map Skin
To choose your desired map skin, swipe left to open the side drawer. Then, go to the settings and click on "Map Skins" to select the map skin you want.
